
63
Creating a workout tracking app with React Native and Fauna
There are lots of options when it comes to databases in React Native, either cloud or offline. But I don't see a lot of tutorials showing how to use Fauna within a React Native. That's why in this tutorial, I'll be showing you how it can be done.
For those who are new to Fauna, it's a cloud database that supports relations, documents and graphs. It also supports real-time streaming and GraphQL. If you're in need of a serverless solution for your database needs then consider using Fauna.
As a practical use case, I'll be walking you through how to create a workout tracking app with React Native and Fauna.
The app that we will be creating allows for recording the exercises performed by the user on a given day.
First, we have the exercises screen. This is where the user can add new exercises that they want to keep track of. Each exercise is classified by category and muscle being worked by the exercise. In this case, there's only one category: weight and reps. This allows the user to track the weight they're lifting and the number of repetitions they have lifted it:
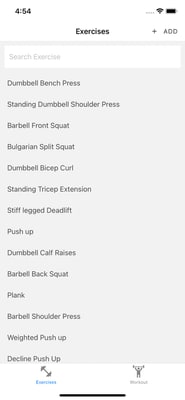
Here's what shows up when the user clicks on the ADD button:

Next, we have the current workout screen. This is where the user can add a new workout. To get to this screen, they first have to go to the exercises screen and select an existing exercise. From there, they can enter the weight and reps they performed. This is considered "one set" of the workout. A workout can have as many sets as the user wants:

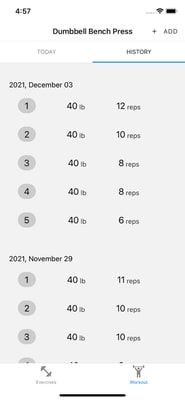
Lastly, we have the workout history screen where the user can keep track of the workouts they performed for a specific exercise. This is grouped into days, sorted from latest to oldest:
You can view the source code of this app on its GitHub repo.
To follow this tutorial, you need to have the following installed on your machine:
Experience in JavaScript, React and React Native is also required. This isn't a "building from scratch" tutorial where we build the app from scratch, showing all of the code. We will only focus on the crucial parts such as navigation and working with Fauna. We won't be going through the code for the different components or their styling, so I expect you’ll download the source code from GitHub for this tutorial.
Lastly, a Fauna account is required. Go ahead and sign up for an account if you don't have one already.
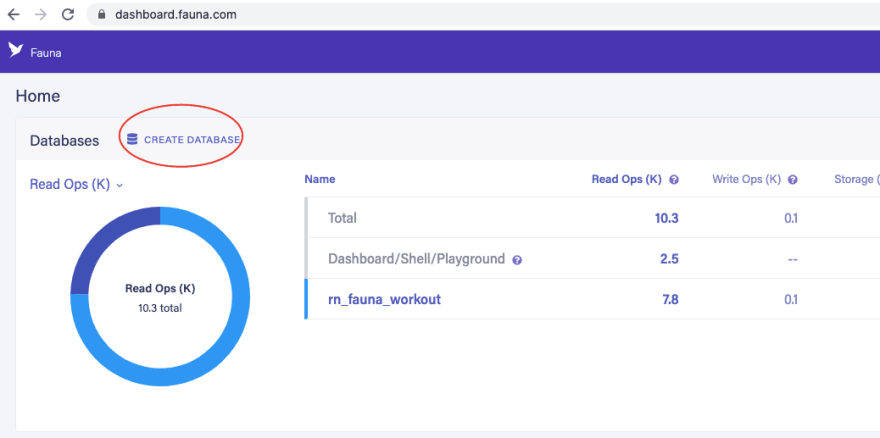
Once you're inside the Fauna dashboard, the first thing to do is create a new database:
You can also set it to whichever you like. Be sure to use the correct connection domain once you connect the app.
The next step is adding the collections. If you're coming from a relational database background, these are pretty much the same as tables in a database. It's basically a way of storing related data together. We only need two collections for this app:
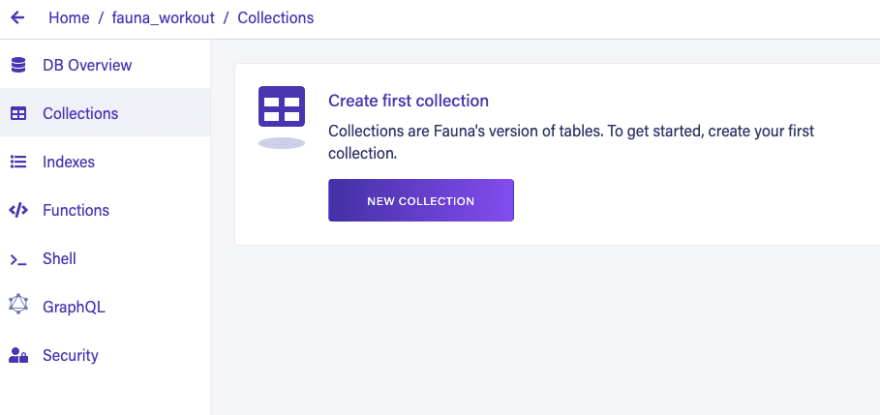
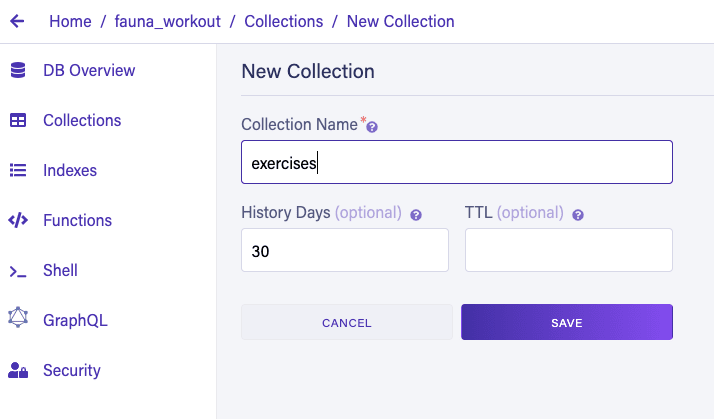
Create one for the exercises. Leave the defaults as they are then click SAVE:
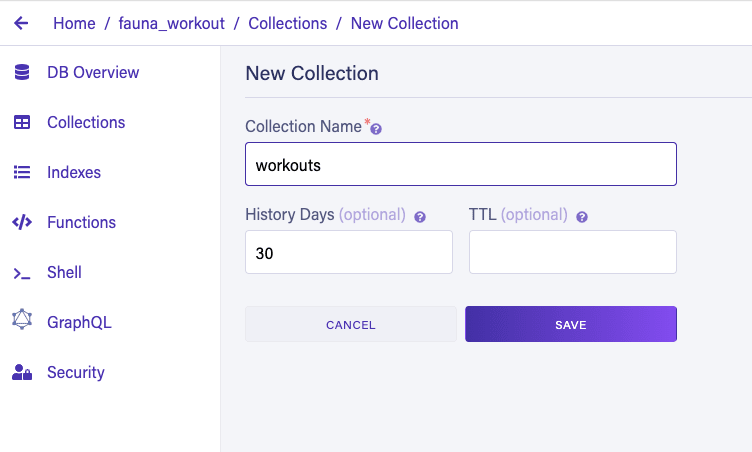
And another for the workouts:
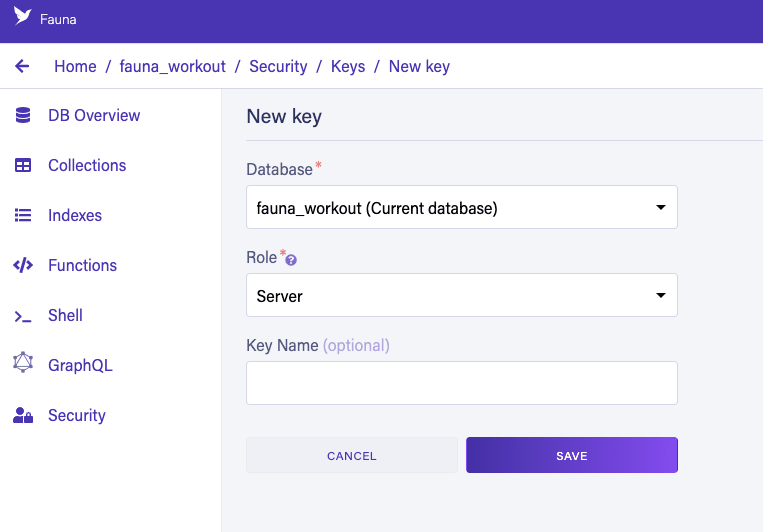
We won't be able to talk to the database from the app without creating an access key. Click on the Security menu and click NEW KEY:

Select the database, and set the role to Server then click SAVE:
Once created, copy the secret key somewhere safe because it won't be displayed again. We'll be adding this key to the app later:

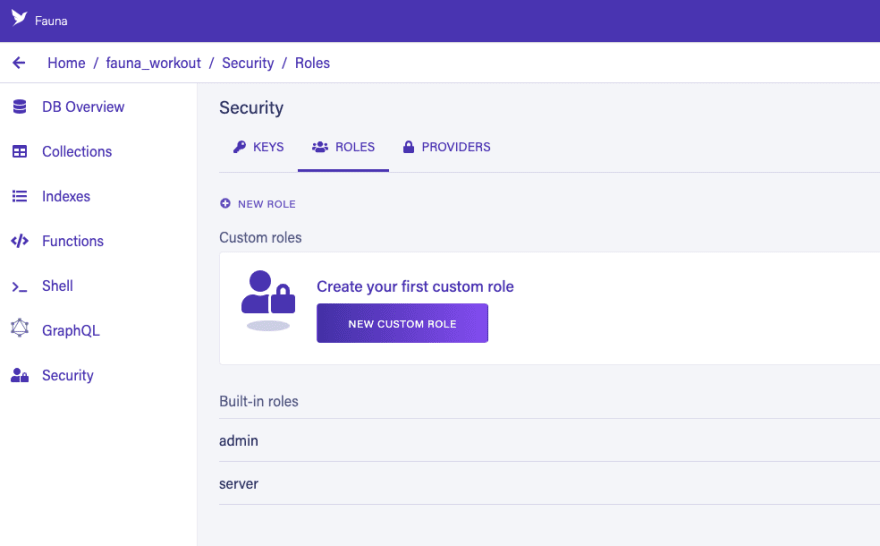
The final step in setting up Fauna is creating a custom role. Still on the Security page, click on the Roles tab and click on NEW CUSTOM ROLE button:
Set the name as
MyCustomRole and from the collections dropdown, select both the exercises and workouts collection then check all the privileges. Note that this is just for testing purposes so we won't have any issues when it comes to permissions. In a production app, you have to check only the privileges your app is using:
Once that's done, don't forget to click on SAVE.
That's it for now. Later on, you'll need to update this role again to give it permission for the indexes that we'll be creating.
Start by generating a new React Native project:
npx react-native init RNFaunaWorkoutOnce that's done, you should have a new
RNFaunaWorkout folder in your current working directory. Navigate inside that folder. That will be the root directory for all the commands and file paths that I'll be referring to in this tutorial.Our project depends on the following packages:
Here are the commands for installing the dependencies. First is Fauna:
npm install faunadbNext, install React Navigation and its dependencies:
npm install @react-navigation/native
npm install react-native-screens react-native-safe-area-context
npm install @react-navigation/material-top-tabs react-native-tab-view
npm install react-native-pager-view
Next, install React Native Paper:
npm install react-native-paper
npm install react-native-vector-icons
Once that's done, link the native dependencies for React Native Vector Icons:
react-native link react-native-vector-iconsIf you're on Mac, also execute the following to install the iOS dependencies:
npx pod-installBe sure to follow any additional installation instructions mentioned in the documentation for each package we installed.
At this point, you should be able to run the app:
npx react-native run-androidFor iOS, you need to open the
.xcworkspace file in the ios directory. This will launch the iOS project in Xcode. Simply run the app from there.As mentioned earlier, we're not actually building the app from scratch. We'll only go through the most relevant parts in this tutorial. I'll leave it to you to check out the code that we won't be going through in the GitHub repo.
First, we have the
index.js file. It's where we set up the React Native Paper theme:// index.js
import * as React from "react";
import { AppRegistry } from "react-native";
import { DefaultTheme } from "@react-navigation/native";
import { Provider as PaperProvider } from "react-native-paper";
import App from "./App";
import { name as appName } from "./app.json";
const theme = {
...DefaultTheme,
dark: true,
roundness: 10,
colors: {
...DefaultTheme.colors,
text: "#333",
background: "#ccc",
gray: "#858585",
white: "#fff",
default: "#f2f2f2",
},
fonts: {
...DefaultTheme.fonts,
small: 15,
regular: 16,
big: 20,
icon: 30,
},
};
export default function Main() {
return (
<PaperProvider theme={theme}>
<App />
</PaperProvider>
);
}
AppRegistry.registerComponent(appName, () => Main);Then in the
App.js we're wrapping the app's Root component with AppContextProvider. As you'll see later, this will provide global state that will be used throughout the app:// App.js
import React from "react";
import type { Node } from "react";
import {
SafeAreaView,
StatusBar,
useColorScheme,
StyleSheet,
} from "react-native";
import Root from "./Root";
import { AppContextProvider } from "./src/context/AppContext";
const App: () => Node = () => {
const isDarkMode = useColorScheme() === "dark";
return (
<SafeAreaView style={styles.root}>
<StatusBar barStyle={isDarkMode ? "light-content" : "dark-content"} />
<AppContextProvider>
<Root />
</AppContextProvider>
</SafeAreaView>
);
};
const styles = StyleSheet.create({
root: {
flex: 1,
justifyContent: "center",
},
});
export default App;The Root component is where we set up the screens that will be used throughout the app. We're using a bottom tab navigator as the root navigator. Inside it are the exercises screen and the workout screen. Both of these screens has an "add" button on the right header position. The one for the exercises screen toggles the value for the
isAddingExercise in the global app state. As you'll see later, this state value is used to determine whether to show the modal for creating a new exercise or not. On the other hand, the "add" button for the workout screen is used to navigate to the exercises screen. Because to start recording a new workout session, the user has to select an exercise first. The main purpose of having a separate tab for the workout screen is for easy access when the user has already selected an exercise:// Root.js
import React, { useContext } from "react";
import { NavigationContainer } from "@react-navigation/native";
import MaterialCommunityIcons from "react-native-vector-icons/MaterialCommunityIcons";
import { Button, withTheme } from "react-native-paper";
import { createBottomTabNavigator } from "@react-navigation/bottom-tabs";
import ExercisesScreen from "./src/screens/ExercisesScreen";
import WorkoutTabScreen from "./src/screens/WorkoutTabScreen";
import { AppContext } from "./src/context/AppContext";
const Tab = createBottomTabNavigator();
function getHeaderTitle(route) {
// ..
}
function Root({ theme }) {
const { colors, fonts } = theme;
const { setIsAddingExercise, setIsAddingWorkout } = useContext(AppContext);
return (
<NavigationContainer>
<Tab.Navigator>
<Tab.Screen
name="Exercises"
component={ExercisesScreen}
options={{
tabBarLabel: "Exercises",
tabBarIcon: ({ color, size }) => (
<MaterialCommunityIcons
name="dumbbell"
color={colors.gray}
size={fonts.icon}
/>
),
headerRight: () => (
<Button
icon="plus"
color={colors.text}
onPress={() => setIsAddingExercise(true)}
>
Add
</Button>
),
}}
/>
<Tab.Screen
name="Workout"
options={({ route, navigation }) => ({
tabBarLabel: "Workout",
headerTitle: getHeaderTitle(route),
tabBarIcon: ({ color, size }) => (
<MaterialCommunityIcons
name="weight-lifter"
color={colors.gray}
size={fonts.icon}
/>
),
headerRight: () => (
<Button
icon="plus"
color={colors.text}
onPress={() => navigation.navigate("Exercises")}
>
Add
</Button>
),
})}
component={WorkoutTabScreen}
/>
</Tab.Navigator>
</NavigationContainer>
);
}
export default withTheme(Root);The
getHeaderTitle() function is used for showing a different title for the workout screen based on the exercise selected by the user. You might be wondering why it's route.params.params instead of just route.params. That's because the data is being passed to the nested screen as you'll see later:function getHeaderTitle(route) {
if (route.params) {
const exercise_name = route.params.params.exercise.name;
return exercise_name.length > 25
? exercise_name.substr(0, 25) + ".."
: exercise_name;
}
return "Workout";
}The AppContext is what provides the global app state. This allows us to use the data that was set from the current screen in another screen:
// src/context/AppContext.js
import React, { useState } from "react";
const AppContext = React.createContext();

const AppContextProvider = (props) => {
  const [isAddingExercise, setIsAddingExercise] = useState(false); // whether to show the add exercise modal or not
  const [workoutHistory, setWorkoutHistory] = useState([]);

  const value = {
    isAddingExercise,
    setIsAddingExercise,
    workoutHistory,
    setWorkoutHistory,
  };

  return (
    <AppContext.Provider value={value}>{props.children}</AppContext.Provider>
  );
};

export { AppContext, AppContextProvider };Before we proceed with the code for each of the screens, let's first take a look at the code for connecting to Fauna and manipulating the database:
// src/config/db.js
import faunadb from "faunadb";
const client = new faunadb.Client({
  secret: "YOUR FAUNA SECRET",
  domain: "YOUR FAUNA DOMAIN",
});

const q = faunadb.query;
export { client, q };
That's really all there is to it when it comes to connecting to Fauna. Just supply the
secret and the domain where your database instance is hosted. If you selected "United States" earlier, the connection domain should be db.us.fauna.com. If you selected anything else, check out the docs on region groups. If you scroll down near the bottom, you'll find a table showing the region group and their corresponding connection domain.Now we're ready to make some queries to the database. First, let's take a look at the query for getting the exercises:
// src/data/index.js
import {client, q} from '../config/db';
export const getExercises = () => {
  return client
    .query(q.Paginate(q.Match(q.Ref('indexes/exercises_index'))))
    .then(response => {
      const exercises_ref = response.data;
      const getAllDataQuery = exercises_ref.map(ref => {
        return q.Get(ref);
      });
      return client.query(getAllDataQuery).then(data => data);
    })
    .catch(error => console.error('Error: ', error.message));
};
Fauna uses FQL (Fauna Query Language) as its query language. We won't be diving into it in this tutorial since there are already existing guides for that. If you're up for some reading, I recommend the following:
It's not required for you to read the articles above to follow this tutorial, but its definitely recommended.
The
faunadb package we installed earlier provides the JavaScript API for FQL. This means that the function calls we made above basically looks similar to FQL in its raw form (eg. when you execute it via the Fauna console). If you check out the FQL API cheat sheet, you'll see the same methods we used above:In most cases, you'll have to use
client.query(q.Paginate(q.Match(q.Ref('YOUR INDEX')))) to fetch data from the database.In the following code, we're getting the data from the
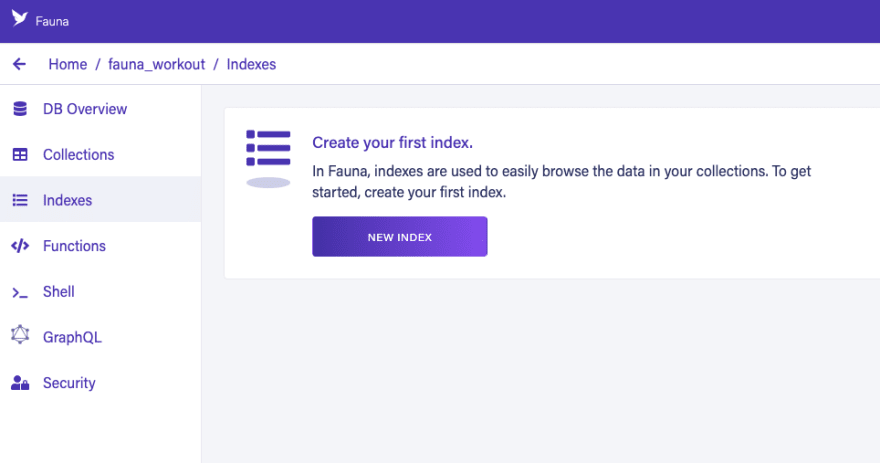
exercises index:We haven't really created it yet, so go to the Fauna dashboard and click on the Indexes menu then click on NEW INDEX:
Select the exercises collection and set the name of the index to
exercises_index. Leave the defaults as it is then click SAVE: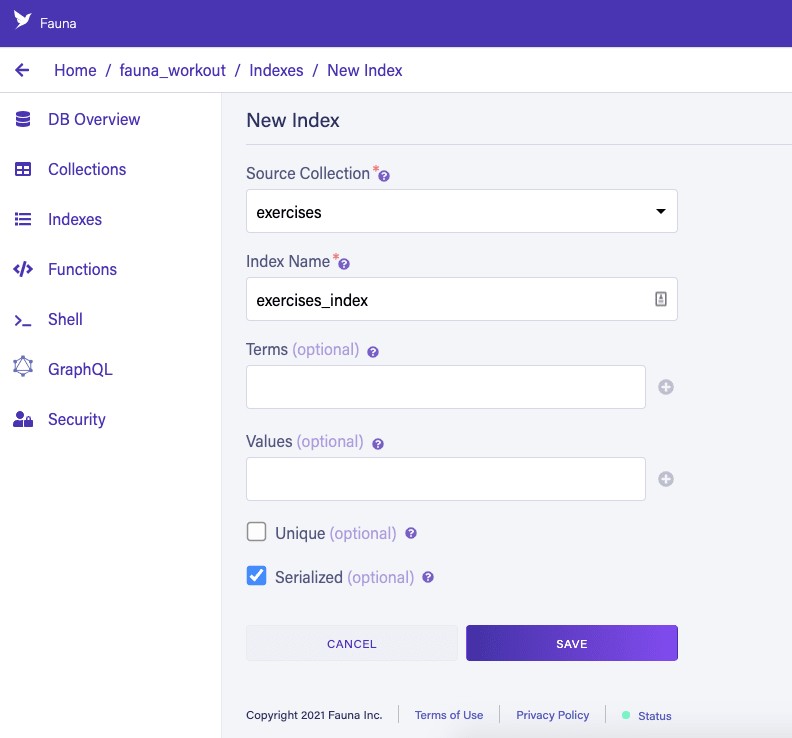
Next, you need to give permission to the role you created earlier to access this index. To do that, go to the Security page and click on the Roles tab then click on the gear icon on the role. This should redirect you to the same page as below. In the Indexes section, select the exercises index and check all the privileges:

Once that's done, the code for getting data from the exercises index should work. Note that
response.data doesn't actually contain the data. All it returns is the reference to the data. That's why we have to use JavaScript's map() function to go through the results and call q.Get() on each to construct the query for getting the data for each row. The call to client.query(getAllDataQuery) is what returns the actual data:return client
.query(q.Paginate(q.Match(q.Ref('indexes/exercises_index'))))
.then(response => {
const exercises_ref = response.data;
const getAllDataQuery = exercises_ref.map(ref => {
return q.Get(ref);
});
return client.query(getAllDataQuery).then(data => data);
})
.catch(error => console.error('Error: ', error.message));Creating a new exercise record is a lot simpler. We just need to use the
q.create() method and pass in the collection as the first argument, and an object containing a data object which contains the data you want to save:// src/data/index.js
export const saveExercise = (name, category, primary_muscle) => {
return client
.query(
q.Create(q.Collection('exercises'), {
data: {
name,
category,
primary_muscle,
},
}),
)
.then(ret => ret)
.catch(error => console.error('Error: ', error.message));
};Getting workouts for a specific exercise is also required as we can't be fetching all the workouts that had been saved ever since the user started recording. It's bad for performance reasons.
To achieve this, we need to create another index. This time, let's use the shell to create the index. Go ahead and click on the Shell menu in the Fauna dashboard. That should show you the following screen. The larger box on the top is where the output of whatever commands you execute in the shell is shown. While the one below it is where you type in the commands. Clear it out for now:

Enter the following command in the shell:
CreateIndex({
  name: "all_workouts_by_exercise_id",
  source: Collection("workouts"),
  terms: [
    { field: ["data", "exercise_id"]}
  ]
})
Make sure to run it as the role you created earlier. You can change that by clicking on the RUN AS button and selecting the role. The above code is the standard code for creating an index in Fauna. The
CreateIndex() function accepts an object containing the following properties:name - the machine-friendly name for the index. source - the source collection.terms - an array of term objects describing the fields that should be searchable.Here's the code. It looks pretty much the same as the code for getting the exercises, the only difference is that we're passing a second argument to
q.Match(). This value will be used as the value for the term you added:// src/data/index.js
export const getWorkoutsByExercise = exercise_id => {
return client
.query(
q.Paginate(
q.Match(q.Ref('indexes/workouts_by_exercise_id_index'), exercise_id),
),
)
.then(response => {
const workouts_ref = response.data;
const getAllDataQuery = workouts_ref.map(ref => {
return q.Get(ref);
});
return client.query(getAllDataQuery).then(data => data);
})
.catch(error => console.error('Error: ', error.message));
};We can actually implement the same thing without using an index, but since we already know we will need this exact query in the app, it's better to create an index for it instead. That way we don't have to construct the query for it everytime we need it.
Next is the code for creating a new workout. It looks pretty much the same as the code for creating a new exercise, only this time we're saving the data to the
workouts collection. We also need to save the timestamp. Fauna actually saves a timestamp for each document already. But that one is attached to the database itself and is used for the temporal stuff. It also provides date and time functions but we also won't be using that. To keep things simple, we're gonna use good old new Date() to get the unix timestamp and storing it along with the other data we need to store for each workout:// src/data/index.js
export const saveWorkout = (exercise_id, weight, reps) => {
const time_created = Math.round(new Date().getTime() / 1000);
return client
.query(
q.Create(q.Collection('workouts'), {
data: {
exercise_id,
weight,
reps,
time_created,
},
}),
)
.then(ret => console.log('created workout: ', ret))
.catch(error => console.error('Error: ', error.message));
};Updating a workout also looks the same as creating a workout. The only difference is that we need to pass in the document's ref ID as a second argument to the
q.Update() function. Note that the data you pass in doesn't have to contain all the fields (with their updated values) that were present when you created the document. That's why we're only specifying the weight and reps here:// src/data/index.js
export const updateWorkout = (id, weight, reps) => {
return client
.query(
q.Update(q.Ref(q.Collection('workouts'), id), {
data: {
weight,
reps,
},
}),
)
.then(ret => console.log('updated workout: ', ret))
.catch(error => console.error('Error: ', error.message));
};Lastly, here's the code for deleting a workout. All we need is to pass in the ref ID as a second argument to
q.Ref(). That should delete the corresponding document in the collection you specified as the first argument:// src/data/index.js
export const deleteWorkout = id => {
return client
.query(q.Delete(q.Ref(q.Collection('workouts'), id)))
.then(ret => console.log('deleted workout'))
.catch(err => console.error('Error: %s', err));
};The data formatter is our nifty little helper which allows us to manipulate the raw data that we get from Fauna to a format which best suits our needs. It's also responsible for filtering the workout history to only the one's performed by the user in the current day:
// src/helpers/DataFormatter.js
import groupBy from 'lodash.groupby';
import {fromUnixTime, format} from 'date-fns';

function getGroupedWorkouts(res) {
  const formatted_workouts = res.map(item => {
    const {exercise_id, weight, reps, time_created} = item.data;
    const date = format(fromUnixTime(time_created), 'yyyy-MM-dd');

    return {
      id: item.ref.id,
      exercise_id,
      weight,
      reps,
      date,
      time_created,
    };
  });

  return groupBy(formatted_workouts, 'date');
}

export const groupWorkouts = res => {
  return getGroupedWorkouts(res);
};

export const filterTodaysWorkout = grouped => {
  const today = format(new Date(), 'yyyy-MM-dd');
  return grouped[today] ? grouped[today] : [];
};Now, let's proceed with the exercises screen. First, import the modules we need.
getExercises, getWorkoutsByExercise, and saveExercise allows us to interact with the Fauna database. While groupWorkouts is for formatting the data so that it can easily be presented in the UI:// src/screens/ExercisesScreen.js
import React, { useState, useEffect, useContext } from "react";
import { View, TextInput, StyleSheet } from "react-native";
import { List, withTheme } from "react-native-paper";
import AddExerciseModal from "../components/AddExerciseModal";
import { getExercises, getWorkoutsByExercise, saveExercise } from "../data";
import { AppContext } from "../context/AppContext";
import { groupWorkouts } from "../helpers/DataFormatter";Inside the
ExercisesScreen component, we have some state for storing the exercises, filtered exercises, and the exercise being searched by the user. Filtered exercises are simply the exercises that has been filtered based on the value of searchExercise. The filtered exercises is what's going to be displayed in the UI:function ExercisesScreen({ navigation, theme }) {
const { fonts, colors } = theme;
const [exercises, setExercises] = useState([]);
const [filteredExercises, setFilteredExercises] = useState([]);
const [searchExercise, setSearchExercise] = useState("");
}Next, we extract the methods we need from the AppContext:
const {
  // for toggling the create exercise modal visibility
  isAddingExercise,
  setIsAddingExercise,
  setWorkoutHistory, // for updating the state with the current workout history being viewed
} = useContext(AppContext);
Once the component has loaded, that's the time we fetch the exercise data from the database then update the state:
useEffect(() => {
  getExercises().then((res) => {
    setExercises(res);
    setFilteredExercises(res);
  });
}, []);
We also have another useEffect, this time for listening for changes on searchExercise. Here, we're filtering the exercises based on its value:
useEffect(() => {
  const filtered = exercises.filter((item) => {
          return item.data.name.startsWith(searchExercise);
  });
        setFilteredExercises(filtered);
}, [searchExercise]);
Next, the
createExercise function is executed when the user clicks on the "create" button on the add exercise modal. All it does is call the saveExercise() function for interacting with the FaunaDB database, then calls getExercises() function to update the UI with the updated data:const createExercise = (name, category, primary_muscle) => {
saveExercise(name, category, primary_muscle).then(() => {
getExercises().then((res) => {
setExercises(res);
setFilteredExercises(res);
});
});
setIsAddingExercise(false);
};The
goToWorkout function is executed when the user clicks on any exercise on the list. This makes a request to Fauna to get the workout history for a particular exercise then updates the global state with it. Navigation works a bit differently because the workout screen is actually a tab navigator. This means that it has other screens under it. That's why aside from the name of the workout screen, we also need to pass in the name of the screen under it. In this case, it's CurrentWorkout. Then we pass in the parameters we want to pass via the params property. That's the reason why this specific data had to be accessed under route.params.params as you've seen earlier in the getHeaderTitle() function:const gotoWorkoutScreen = (item_id, item_data) => {
getWorkoutsByExercise(item_id).then((res) => {
const grouped_workouts = groupWorkouts(res);
setWorkoutHistory(grouped_workouts);
});
navigation.navigate("Workout", {
screen: "CurrentWorkout",
params: {
exercise_id: item_id,
exercise: item_data,
},
});
};Lastly, here's the the UI for the exercises screen. All it contains is the search field for searching an exercise, the list of exercises, and the add exercise modal:
return (
    <View style={styles.container}>
      <View style={[styles.box, styles.searchContainer]}>
        <TextInput
          value={searchExercise}
          placeholder="Search Exercise"
          onChangeText={(text) => setSearchExercise(text)}
          style={[styles.input, { backgroundColor: colors.white }]}
        />
      </View>
      <View style={styles.box}>
        {filteredExercises.map((item) => {
          return (
            <List.Item
              title={item.data.name}
              description={item.data.muscle}
              key={item.data.name}
              onPress={() => gotoWorkoutScreen(item.ref.id, item.data)}
            />
          );
        })}
      </View>
      <AddExerciseModal
        isAddingExercise={isAddingExercise}
        setIsAddingExercise={setIsAddingExercise}
        createExercise={createExercise}
      />
    </View>
);
I'll leave it to you to check out the complete code in the GitHub repo for the styles.
The workout tab screen is just a tab navigator with two screens on it: the current workout screen and the workout history screen. We need to pass in the
initialParams prop on each screen so that they inherit whatever navigation params is passed to their parent:// src/screens/WorkoutTabScreen.js
import React, { useState } from "react";
import { createMaterialTopTabNavigator } from "@react-navigation/material-top-tabs";
import WorkoutScreen from "./WorkoutScreen";
import WorkoutHistoryScreen from "./WorkoutHistoryScreen";
const Tab = createMaterialTopTabNavigator();
function WorkoutTabScreen({ route }) {
return (
<Tab.Navigator>
<Tab.Screen
initialParams={route.params}
name="CurrentWorkout"
options={{
title: "Today",
}}
component={WorkoutScreen}
/>
<Tab.Screen
initialParams={route.params}
name="WorkoutHistory"
options={{
title: "History",
}}
component={WorkoutHistoryScreen}
/>
</Tab.Navigator>
);
}
export default WorkoutTabScreen;The workout screen is where all the workout recording happens. This is where the user can create new workouts, and update or delete existing ones:
// src/screens/WorkoutScreen.js
import React, { useState, useContext, useEffect } from "react";
import { View, Text, TextInput, ScrollView, StyleSheet } from "react-native";
import { Button, IconButton, withTheme } from "react-native-paper";
import { useRoute } from "@react-navigation/native";
import SetItem from "../components/SetItem";
import {
  saveWorkout,
  updateWorkout,
  deleteWorkout,
  getWorkoutsByExercise,
} from "../data";
import { groupWorkouts, filterTodaysWorkout } from "../helpers/DataFormatter";
import { AppContext } from "../context/AppContext";
Inside the component, we extract the
workoutHistory and setWorkoutHistory from the global state. Because as you've seen in the exercises screen earlier, we're actually calling the setWorkoutHistory() function to update the global state with the workout history of the exercise clicked on by the user. So we're basically just reading that here. Below that, we have a few state variables for keeping track of the currently selected set (selectedSet), the index of the selected set (selectedIndex), the weight (weight), repetitions (reps), and an array containing the workout for the current day for that specific exercise:function WorkoutScreen({ navigation, theme }) {
const route = useRoute();
const { colors, fonts } = theme;
const {
workoutHistory,
setWorkoutHistory,
} = useContext(AppContext);
const [selectedSet, setSelectedSet] = useState(null);
const [selectedIndex, setSelectedIndex] = useState(null);
const [weight, setWeight] = useState(0);
const [reps, setReps] = useState(0);
const [todaysWorkout, setTodaysWorkout] = useState([]);
const currentAction = selectedIndex !== null ? "Update" : "Add";
const disableDelete = selectedIndex !== null ? false : true;
}Next, we have the functions for incrementing or decrementing the weight and reps:
const increment = (type, value) => {
  if (type === "weight") {
    setWeight(weight + 1);
  } else if (type === "reps") {
    setReps(reps + 1);
  }
};

const decrement = (type, value) => {
  if (value >= 1) {
    if (type === "weight") {
      setWeight(value - 1);
    } else if (type === "reps") {
      setReps(value - 1);
    }
  }
};
Next, we have the function that gets called when the user clicks on a specific set. In this case, we need to update the
selectedSet and selectedIndex to match. The weight and reps field also need to be updated based on the weight and reps for that set. This will then allow us to update the details for that set:const selectSet = (item, index) => {
setSelectedSet(item);
setSelectedIndex(index);
setWeight(parseInt(item.weight));
setReps(parseInt(item.reps));
};Next is the function that gets called everytime the user creates a new workout entry or updates an existing entry. We can determine which one needs to be executed based on the presence of the
selectedIndex in the state. If it's present then we're updating a workout entry. Otherwise, we're creating a new entry:const saveAction = () => {
if (selectedIndex !== null) {
updateWorkout(selectedSet.id, weight, reps).then(() =>
syncWorkoutHistory()
);
} else {
if (route.params) {
saveWorkout(route.params.params.exercise_id, weight, reps).then(() =>
syncWorkoutHistory()
);
}
}
};Here's the code for fetching the fresh workout history from the database. We need to call this function everytime we make a modification to the workout history so that the UI can be updated:
const syncWorkoutHistory = () => {
  getWorkoutsByExercise(route.params.params.exercise_id).then((res) => {
    const grouped_workouts = groupWorkouts(res);
    setWorkoutHistory(grouped_workouts);
  });
};
The
deleteSet() function gets called when the user clicks on the "delete" button after selecting a set:const deleteSet = () => {
deleteWorkout(selectedSet.id).then(() => syncWorkoutHistory());
};When the route params changes, we call the
syncWorkoutHistory() function to update the UI with the workouts for the specific exercise:useEffect(() => {
if (route.params) {
syncWorkoutHistory();
// reset the inputs
setSelectedSet(null);
setSelectedIndex(null);
setWeight(0);
setReps(0);
}
}, [route.params]);Since this is the current workout screen, we only need to show today's workout to the user. So we watch for changes in the
workoutHistory and update todaysWorkout based on that:useEffect(() => {
if (workoutHistory) {
const todays_workout = filterTodaysWorkout(workoutHistory);
setTodaysWorkout(todays_workout);
}
}, [workoutHistory]);Here's the UI code for the current workout screen:
return (
    <ScrollView style={styles.container}>
      <View style={styles.top}>
        <View style={styles.field}>
          <Text>WEIGHT (LB)</Text>
          <View style={styles.inputContainer}>
            <IconButton
              icon="minus"
              size={fonts.icon}
              style={{ backgroundColor: colors.background }}
              onPress={() => decrement("weight", weight)}
            />
            <TextInput
              keyboardType="number-pad"
              style={[styles.input, { fontSize: fonts.big }]}
              onChangeText={(text) => setWeight(text)}
              value={weight.toString()}
            />
            <IconButton
              icon="plus"
              size={fonts.icon}
              style={{ backgroundColor: colors.background }}
              onPress={() => increment("weight", weight)}
            />
          </View>
        </View>
        <View style={styles.field}>
          <Text>REPS</Text>
          <View style={styles.inputContainer}>
            <IconButton
              icon="minus"
              size={fonts.icon}
              style={{ backgroundColor: colors.background }}
              onPress={() => decrement("reps", reps)}
            />
            <TextInput
              keyboardType="number-pad"
              style={[styles.input, { fontSize: fonts.big }]}
              onChangeText={(text) => setReps(text)}
              value={reps.toString()}
            />
            <IconButton
              icon="plus"
              size={fonts.icon}
              style={{ backgroundColor: colors.background }}
              onPress={() => increment("reps", reps)}
            />
          </View>
        </View>
      </View>
      <View style={styles.buttonContainer}>
        <Button color={colors.text} onPress={() => saveAction()}>
          {currentAction}
        </Button>
        <Button
          labelStyle={{ color: colors.text }}
          disabled={disableDelete}
          onPress={() => deleteSet()}
        >
          Delete
        </Button>
      </View>
      <View style={styles.setContainer}>
        {todaysWorkout.map((item, index) => {
          const isSelected = index === selectedIndex;
          return (
            <SetItem
              item={item}
              index={index}
              key={index}
              onPress={() => {
                selectSet(item, index);
              }}
              isSelected={isSelected}
            />
          );
        })}
      </View>
    </ScrollView>
);We now proceed to the workout history screen. This is where the user can see all the workouts they performed for a specific exercise since they started recording:
// src/screens/WorkoutHistory.js
import React, { useState, useContext } from "react";
import { ScrollView, View, Text, StyleSheet } from "react-native";
import { withTheme } from "react-native-paper";
import { fromUnixTime, format } from "date-fns";
import { AppContext } from "../context/AppContext";
import SetItem from "../components/SetItem";
import { getWorkoutsByExercise } from "../data";
Since all the data we require for this screen has already been set in the current workout screen, all we have to do is extract the
workoutHistory from the app context. The workout history has to be sorted from latest to oldest so we need to use Object.keys() to get an array of the workoutHistory's properties. In this case, the properties are the workout dates. Calling reverse() on this resulting array will sort the workout history from latest to oldest. From there, we simply extract and format the data accordingly:function WorkoutHistoryScreen({ theme }) {
const { fonts } = theme;
const { workoutHistory } = useContext(AppContext);
return (
<ScrollView style={styles.container}>
{Object.keys(workoutHistory)
.reverse()
.map((key, date) => {
const day_workouts = workoutHistory[key];
const formatted_date = format(
fromUnixTime(day_workouts[0]["time_created"]),
"yyyy, MMMM dd"
);
return (
<View style={styles.card} key={date}>
<View style={styles.sectionHeader}>
<Text style={{ fontSize: fonts.regular }}>
{formatted_date}
</Text>
</View>
<View>
{day_workouts.map((item, index) => {
return <SetItem item={item} index={index} key={index} />;
})}
</View>
</View>
);
})}
</ScrollView>
);
}That's it! In this tutorial, you learned how to use Fauna within a React Native app. Specifically, you learned how to fetch, create, update, and delete documents in Fauna. Along the way, you also learned how to use tab navigation and nested navigation in React Navigation and also how to use React Native Paper.
There's a lot of opportunity to improve this app further. Here are a few ideas:
weight x reps to encourage the user to surpass it.I could go on, but let's leave it there.
You can view the source code of the workout tracking app in its GitHub repo.
63