
28
Building a Todo List Application with Flask
In this part of the series, you'll learn how to build a web application with the
Flask framework. At the end of this part of the series, you'll have a working application with create, read, and delete functionalities.Let's get started!!
The database that will be used here is
sqlite, but you can choose any db of your choice.You'll need to install the Flask-SQLAlchemy and Flask-Migrate extensions which will map all the data in your application to the
sqlite db and also handle database migrations.pip install flask-sqlalchemypip install flask-migrateIn the root directory, create a
config.py and a .env file where all the configurations for the application will be stored.touch config.pytouch .envFirst, set up the .env file by adding your secret key here. Remember that it is bad practice to hardcode your
SECRET KEY in the main body of your application as this would make your application vulnerable to security breaches in production. That is why you need to always set it up as an environmental variable.SECRET_KEY = put-your-own-secret-secret-key-hereThen add your configurations:
import os
from dotenv import load_dotenv

load_dotenv()
basedir = os.path.abspath(os.path.dirname(__file__))

class Configuration(object):
    SECRET_KEY = os.environ.get('SECRET_KEY')
    SQLALCHEMY_DATABASE_URI = os.environ.get('DATABASE_URL') or \
        'sqlite:///' + os.path.join(basedir, 'todo.db')
    SQLALCHEMY_TRACK_MODIFICATIONS = False
Here os is imported to handle the paths and also retrieve data from the environment.
The
load_dotenv function is imported from the installed dotenv package and then called. This loads the SECRET KEY variable stored in the .env file.basedir = os.path.abspath(os.path.dirname(__file__))The value assigned to the
basedir variable is the path for the root directory. This is done to avoid hardcoding the path to the root directory which may change whenever you make changes to the structure of your directories.Finally, the configuration settings are assigned to variables under the
Configuration class.i) the value of the
SECRET KEY obtained when the load_dotenv function is called and assigned to the SECRET KEY variable.ii) the database URL is obtained from the environment file and assigned to the
SQLALCHEMY_DATABASE_URI variable. The or operator is used here so that if the database URL is not specified in the .env file, the variable DATABASE URL is set to the base directory. todo.db is the name of the database that'll be created in the root directory. You can choose to change the name of the db to whatever suits you.iii)
SQLALCHEMY_TRACK_MODIFICATIONS is set to false, this disables the feature which sends a signal every time the database changes.The database and configuration setup is done. Now, you need to register it in your init.py script.
from flask import Flask
from config import Configuration
from flask_sqlalchemy import SQLAlchemy
from flask_migrate import Migrate

app = Flask(__name__)
app.config.from_object(Configuration)
db = SQLAlchemy(app)
migrate = Migrate(app, db)

from core import views, models
Import the
Configuration class and configure the app variable with it. This assigns all the configuration settings to the application.Next, import
SQLAlchemy and Migrate from the packages installed earlier and configure them as done above. You need to create a database module
models.py in your core directory.from core import db
class Todo(db.Model):
id = db.Column(db.Integer, primary_key=True)
title = db.Column(db.String(140))
date = db.Column(db.Date())
time = db.Column(db.Time())
category= db.Column(db.String, db.ForeignKey('category.id'))
def __repr__(self):
return '<ToDo {}>'.format(self.title)The db variable in the
__init__.py file is imported here and used to set up the structure(columns) of the database.The
id field is declared as an integer type and the database will assign the primary key automatically.The
Todolist database model class will have title, date, and time fields as well so the title field is declared as a string type, date and time are declared as types date and time respectively.Each
todo created will also have a category, so you need to create a category field as type string. This will be connected to the Category database model that will be created later on.The last line
def __repr__(self): defines the format in which python will print the objects of this database model.The application is about to grow massively, to prevent the project from becoming rough and confusing, and to ensure separation of concerns we'll be using Blueprints. Each part of the application will be made into modular applications which will all be registered in the
__init__.py file in the core directory.Let's start with the blueprint (mini-application) that will make it possible for the user to create
todos. Create a new directory task in the core directory. Next, create the following files in the task directory: __init__.py, forms.py, models.py, and views.py. Remember that this is going to be an application on its own so you need to create a
templates folder in the task directory as well. Create a new folder task in it and within it a file named tasks.html.Let's work on the init.py script.
from flask import Blueprint

task = Blueprint('task', __name__, template_folder='templates')

from . import views
The
Blueprint class is imported from the flask package and the name of the current blueprint task is assigned to the constructor Blueprint(). The name is passed as an argument as well, as discussed earlier python automatically passes the name of the base module core here. Next, the folder in which the application will look for template files is assigned to the template_folder variable and also passed as an argument to the blueprint constructor.Finally, the content of the
views.py file will be imported into the script so that they can all be registered with the blueprint.from .. import db
class Category(db.Model):
id = db.Column(db.Integer, primary_key=True)
name = db.Column(db.String(20))
def __repr__(self):
return '<Category {}>'.format(self.name)The
db variable is imported from the core directory and used to set up the Category database model class. This should be self-explanatory with the explanation done above when the Todo model class was created.To create the forms for the application you'll need to install Flask-WTF:
pip install flask-wtfThen, you can create the various fields for the form that users will use to create todos.
from flask_wtf import FlaskForm
from wtforms import StringField, TimeField, DateField, SubmitField, SelectField
from wtforms.validators import DataRequired, Length, Email, EqualTo

class TaskForm(FlaskForm):
    title = StringField('Title', validators=[DataRequired()])
    category = SelectField('Category', coerce=int , validators=[DataRequired()])
    date = DateField('Date', format='%Y-%m-%d' , validators=[DataRequired()])
    time = TimeField('Time', format='%H:%M' , validators=[DataRequired()])
    submit = SubmitField('Add task')
A label is the first variable assigned to each form field declared,
DataRequired is passed to the form validators as well to ensure that the fields are not left blank by the user.The
coerce keyword arg passed to the SelectField tells the application to use the int() function to coerce data for this particular field from the Task form.from flask import render_template, redirect, url_for, request
from .models import Category
from ..models import Todo
from . import task
from .forms import TaskForm
from .. import db
from datetime import datetime
@task.route('/create-task', methods=['GET', 'POST'])
def tasks():
check= None
todo= Todo.query.all()
date= datetime.now()
now= date.strftime("%Y-%m-%d")
form= TaskForm()
form.category.choices =[(category.id, category.name) for category in Category.query.all()]
return render_template('task/tasks.html', title='Create Tasks', form=form, todo=todo, DateNow=now, check=check)First, the required functions from flask, model classes, db, form, and datetime class are imported into the
views file.The variable
task is imported from the __init__.py blueprint script and is then extended as shown below with .route functions by mapping the URL and adding the HTTP methods which in this case are GET and POST.@task.route('/create-task', methods=['GET', 'POST'])This is used as a decorator for the
tasks function defined below. In part 1 of the series app.route was used but since the task blueprint is being used here, you can simply use task.route since the blueprint will eventually be registered in the app.The
check variable initially assigned a value of None is simply used to pass an error message to the template. Next, the Todo table in the database is queried for all the todos in the database. This would later be changed when the authentication blueprint is set up. The present date is obtained and formatted using the strftime function. Finally, the view uses
render_template function to render the tasks.html file in the tasks directory located in the templates directory. The function also takes the title, form, DateNow, and check arguments that it will use to replace the placeholder variables that will be added to the task html file.The choices for the select field are assigned the result of querying the
Category table in the database. Let's test the application before adding the conditions that will handle the methods. The
task blueprint needs to be registered with the application so its content can also be recognized when the application is being run. Open the __init__.py script in the core directory and add the following lines before the last import line:# blueprint for non-authentication parts of the app
from .task import task as task_blueprint
app.register_blueprint(task_blueprint)The
task variable to which the blueprint is assigned is imported from the task directory as task_blueprint and then registered with the application using the Flask inbuilt register_blueprint function.Now you have to migrate the new database models to the database; you'll notice two new additions to your directory after doing this.
i) a new folder named
migrations will be added to your root directory.ii) a new database will also be created in your root directory bearing whatever name you specified in your config file. If you remember, the name of the db was specified as
todo.db earlier on. If you made any change to yours, the database that will be created will bear the name you specified as well. Now let's see this in action. Run:flask db initYou should see the new folder
migrations added to your root directory. Next, run:flask db migrate -m "Put any comment of your choice here"Now you should see the created database
todo.db in your root directory as well.The last command to run is:
flask db upgradeThis will apply all the changes you made to the database model class to your database. Your directory should currently look like 👇.
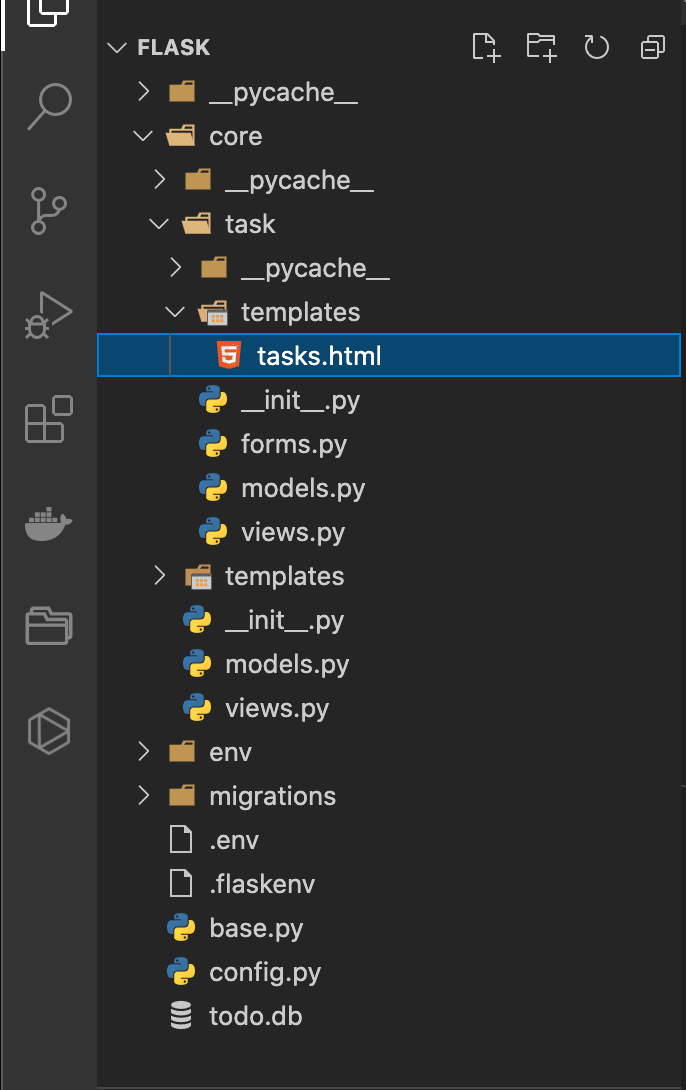
The category table in the database is currently empty so let's go ahead and create the three categories that the user can choose when creating their
todo list.Open up the python shell in your terminal using:
pythonThen, import the Category model from the task directory in the core directory and the db as well
from core.task.models import Category
from core import db
Create the three categories
ctgry1 = Category(name='Business')
ctgry2 = Category(name='Personal')
ctgry3 = Category(name='Other')
Now, the variables need to be added to the current database session using:
db.session.add(ctgry1)
db.session.add(ctgry2)
db.session.add(ctgry3)
Finally, the session is committed so that the changes are applied to the Category table in the database.
db.session.commit()To confirm that the categories
Business, Personal, and Other have all been added to the Category table in the database, run the commands below.categories = Category.query.all()
for c in categories:
print (c.name)The categories should be printed out exactly like what is in the image below.

Before you can go ahead and run the application, you need to create the HTML code that will be rendered by the
First you need to create a base html file and then set up the
task view function. First you need to create a base html file and then set up the
task html file as an extension of the base file.Create a new file named
base.html inside the templates directory in the core directory.<!doctype html>
<html>
<head>
{% if title %}
<title>{{ title }} </title>
{% else %}
<title>Todo List</title>
{% endif %}
</head>
<body>
{% block content %} {% endblock content%}
</body>
</html>If you are new to jinja2 templates, the curly braces might look odd. The variable declared in the curly braces gets passed the value assigned to the variable when the
render_template function is called in the view. For example, Create Tasks has already been assigned to the title variable so whenever the render_template function is executed, {{title}} in the tasks.html file gets replaced with Create Tasks. In jinja templates you can also make use of conditions such as if and for. Every other html file in the application will be an extension of this
base.html file and their contents will be filled into {% block content %} {% endblock content%}.{% extends "base.html" %}
{% block content %}
<div class="task_content categories" >
<div class="">
<div class="content">
<div class="welcome">
<button id="openbutton" class="openbtn" >☰</button>
<span class="welcome-text">Manage Your ToDo List</span>
</div>
<form action="" method="post" novalidate>
{{ form.hidden_tag() }}
<div class="inputContainer Task">
{{ form.title.label }}<br>
{{ form.title(size=20) }}
{% for error in form.title.errors %}
<span style="color: red;">[{{ error }}]</span>
{% endfor %}
</div>
<div class="inputContainer choice ">
{{ form.category.label}}<br>
{{ form.category}}
{% for error in form.category.errors %}
<span style="color: red;">[{{ error }}]</span>
{% endfor %}
</div>
<div class="inputContainer date ">
{{ form.date.label }}<br>
{{ form.date }}
{% for error in form.date.errors %}
<span style="color: red;">[{{ error }}]</span>
{% endfor %}
</div>
<div class="inputContainer time">
{{ form.time.label }}<br>
{{ form.time }}
{% for error in form.time.errors %}
<span style="color: red;">[{{ error }}]</span>
{% endfor %}
</div>
<div class="buttons">
{{ form.submit(class="taskAdd btn") }}
</div>
</form>
<!-- Task Delete Error alert -->
{% if check %}
<div class="alert alert-warning" role="alert">
<span class="closebtns" onclick="this.parentElement.style.display='none';">×</span>
{{check}}
</div>
{% endif %}
<!-- End Task Delete error alert -->
<form action="" method="post">
{{ form.hidden_tag() }} <!-- csrf token for security -->
<div class="tabs effect-1">
<!-- tab-content -->
<div class="tab-content">
<section id="tab-item-1">
<ul class="taskList">
{% for todo in todo %}
<li class="currentTaskItem">
<input type="checkbox" class="taskCheckbox" name="checkedbox" id="{{ todo.id }}" value="{{ todo.id }}" >
<label for="{{ todo.id }}"><span class="complete-">{{ todo.title }}</span></label>
<span class="taskDone" >at</span>
<strong class="taskDone"><i class="fa fa-clock-o"></i> {{ todo.time }}</strong>
<span class="taskDone" >on</span>
<strong class="taskDatee taskDone"><i class="fa fa-calendar"></i> {{ todo.date }}</strong>
<span class="categorypage-{{ todo.category }}">{{ todo.category }}</span>
<button class="taskDelete " name="taskDelete" formnovalidate="" type="submit" ><i class="fa fa-trash-o icon"></i></button>
</li>
{% endfor %}
</ul> <!--end All-Tasks-List -->
</section>
</div><!-- end tab content -->
</div><!-- end tab effect -->
</form>
</div><!-- end content -->
</div><!-- container -->
</div>
{% endblock %}The
form.hidden_tag() gets the csrf token which protects the form against cross site request forgery(csrf) attacks.In the first form in the HTML file, the labels set when creating the
TaskForm e.g {{ form.title.label }} are used as the labels for the input elements. While the input elements are created using the fields created in the form e.g {{ form.title(size=20) }}.The
size=20 argument is an example of how to pass classes/attributes to the form field inputs. This sets the width of the input field to 20. The
if check line confirms if an error message exists and then renders the error alert elements if it does. Otherwise, no error message is displayed. In the second form, you first need to confirm that a
todo list exists from the database query made in the view. Then, the result is looped through to get the title, time, date, and category variables and displayed as li elements accordingly. The
action attributes in the forms are left blank because they'll both be sending form data to the page url. Now let's see what has been built so far in the web browser. Run:
flask runYour web browser should still be displaying

Note that the title of the webpage was updated to what was specified in the render template function;
Hello there, Ace. Navigate to http://127.0.0.1:5000/create-task and you'll see the page below.Note that the title of the webpage was updated to what was specified in the render template function;
title='Create Tasks' and the form was rendered as a normal form even though you didn't exactly create form inputs in the HTML file. Flask-WTF handles this for you.Now, let's finish up the
task view so that it can handle POST data from the front end. Add the following conditions to the task function.if request.method == "POST":
if request.form.get('taskDelete') is not None:
deleteTask = request.form.get('checkedbox')
if deleteTask is not None:
todo = Todo.query.filter_by(id=int(deleteTask)).one()
db.session.delete(todo)
db.session.commit()
return redirect(url_for('task.tasks'))
else:
check = 'Please check-box of task to be deleted'
elif form.validate_on_submit():
selected= form.category.data
category= Category.query.get(selected)
todo = Todo(title=form.title.data, date=form.date.data, time= form.time.data, category= category.name)
db.session.add(todo)
db.session.commit()
return redirect(url_for('task.tasks'))All the logic here will only be run if the method is a
POST request. Otherwise, the empty form will be rendered once again without any data. The if condition contains two further conditions to check whether the user wants to delete or create a todo.Each
todo will be rendered as a form with a delete button attached to it so if a post request is made the first condition checks if it was one of the delete forms that was submitted using the name attribute taskDelete of the delete form's submit button specified in the task template file. If the condition passes, the next condition confirms that the checkbox was also checked before the
Todo table in the database is queried by filtering with the id of the particular todo whose delete button was clicked. .one() at the end of the query, limits the number of rows returned from the database to one and that would be only the todo with the specified id. If the checkbox was not checked before the submit(Delete button) was pressed, an error message is displayed notifying the user that it needs to be checked before the todo can be deleted.Then just like you did when the
categories were created in the python shell, you also need to pass the todo object obtained from the database to the session and then commit it so that the changes will be applied to the database. After this is done, the page is made to refresh with the redirect function by passing the same view function tasks as an argument. task.tasks is used here since you are working in the task blueprint and this lets the application know the path to the task view. However if the first condition evaluates to false, the second condition is executed and the form data is extracted after the data submitted by the user has been validated. The selected category comes back as an integer value(the id) not a string since the coerce argument was set to int() for the
selectField in the forms.py file. The id value is then used to query the Category table in the database to get its matching Category in the db. Next, all the data passed from the form is used to generate the object passed to the todo variable, passed to the session, and finally committed to the database for storage. Thus, creating a new todo in the database. When this is completed, the page is made to refresh as well with the redirect function by passing the same view function tasks as an argument.Your

task function should look exactly like 👇The create and delete functions have been created so you can put them to test now. Run your application:
flask runFill the task form and click on the

The button circled in red in the picture above is the delete button, click on it to delete the created todo. You'll get the error message specified in the
Add Task button. Upon submission you'll notice that the web page reloads, the form is reset to default and your new task gets displayed.The button circled in red in the picture above is the delete button, click on it to delete the created todo. You'll get the error message specified in the
task view which is to notify the user that the checkbox needs to be checked. This helps to introduce a form of control for the delete button, making it impossible for the user to delete a created todo by mistake. Check the box of the todo and click on the delete button once again. Now you'll notice that the todo gets deleted.Congratulations!! You have successfully created your first
FLASK application with create, read, and delete features. This is the end of part 2 of the Flask series. Authentication will be added to the application in part 3. Cheers!!!If you have any questions, feel free to drop them as a comment or send me a message on LinkedIn or Twitter and I'll ensure I respond as quickly as I can. Ciao 👋
28