
41
Starting with React-Redux
Hello everyone, this is my first post on Dev.to. In this post, I am trying to explain the use of Redux in ReactJS with an example. Here, I have taken some references from YouTube and Google for information. I will first explain to you the need for Redux and explain it with the code. For reference, you can check out Github to view the code anytime.
When a JavaScript Application grows big, it becomes difficult to manage its state. For example, in the given architecture, if I want to use the state defined in Child_C of the Contact.js in the Child_B of the Home.js, then I had to do prop-drilling, where I have to pass the state as props over various components.
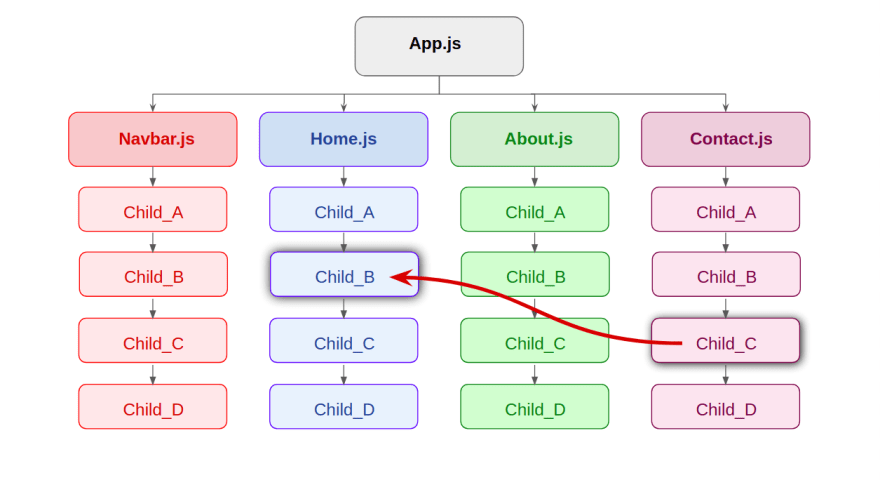
But Redux solves this problem by managing the application's state with the help of a single global object called
Store. This provides consistency to the application and makes testing easy.The Architecture consists of 4 components mainly -
Action, Reducer, Store and View. And believe me, they work in the same way as their name suggests.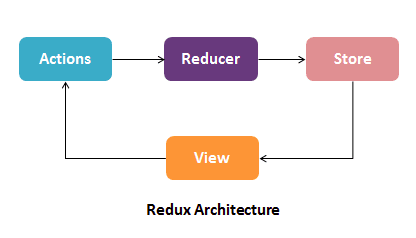
task_Array that the reducer will determine. It returns the new state and tells the store how to do it. Simply, it uses the action it receives to determine the change.Now, let's make our hands dirty and start coding with an example to understand Redux more deeply. I will tell you the concept and later, you can start with your stuff to do with it. Also, I have added some tasks for deep understanding in the end.
Here we try to create a webApp where we define the states in different components and perform onclick events from different components. The states we define are the
countValue and darkMode enabling.If you directly want to see the whole code, you can view it on Github. 🤠
Create a folder in your desktop named
redux-boilerplate and open it in the VSCode. Now, open the terminal and create the react app.npx create-react-app redux-boilerplateNote: You’ll need to have Node >= 14.0.0 and npm >= 5.6 on your machine.
If you are new , just simply copy the
<link> and <script> from both the links and paste it to the public>>index.html file at appropriate place.ProTip:To check bootstrap added successfully, just simply paste the code to App.js file and see red colored font.
import './App.css';
function App() {
  return (
    <>
      <h1 className="text-danger"> Hello World!</h1>
    </>
  );
}
export default App;
Create a folder components in
src folder. Now create a file Navbar.js & another file Shop.js both in components folder.import React from "react";
const Navbar = () => {
return (
<div>
<nav className="navbar navbar-expand-lg navbar-dark bg-dark">
<div className="container-fluid">
<a className="navbar-brand" href="/">
Redux BoilerPlate
</a>
<button
className="navbar-toggler"
type="button"
data-bs-toggle="collapse"
data-bs-target="#navbarSupportedContent"
aria-controls="navbarSupportedContent"
aria-expanded="false"
aria-label="Toggle navigation"
>
<span className="navbar-toggler-icon"></span>
</button>
<div className="collapse navbar-collapse" id="navbarSupportedContent">
<ul className="navbar-nav me-auto mb-2 mb-lg-0">
<li className="nav-item">
<a className="nav-link active" aria-current="page" href="/">
Home
</a>
</li>
<li className="nav-item">
<a className="nav-link" href="/about">
About
</a>
</li>
</ul>
</div>
<div>
<div className="form-check form-switch mx-4">
<input className="form-check-input" type="checkbox" id="flexSwitchCheckDefault" />
<label className="form-check-label text-light" htmlFor="flexSwitchCheckDefault">Darkmode</label>
</div>
</div>
<div>
<button className="btn btn-info mx-1">CountValue : 0 </button>
</div>
</div>
</nav>
</div>
);
};
export default Navbar;import React from 'react';
const Shop = () => {
return (
<>
<div className="container p-3">
<div className={`alert alert-success` } role="alert">
<h2>Redux BoilerPlate</h2>
</div>
<h3 className="my-5">Simple Starter template for redux-store</h3>
<div className="container my-5">
<h1 className="display-1">This is LightMode</h1>
</div>
<div className="container d-flex">
<button className="btn-lg btn-success mx-4" > + </button>
<h1 className="display-6">You Count Value = 0 </h1>
<button className="btn-lg btn-danger mx-4" > - </button>
</div>
</div>
</>
)
}
export default Shop;Paste the above code in Navbar.js & Shop.js respectively .Add the components in App.js using
import Navbar from './components/Navbar';
import Shop from './components/Shop';
.
.
.
  return (
    <>
      <Navbar />
       <div className="container p-3">
        <Shop />
      </div>
    </>
  );
}
This will show the navbar at top and Shop component on screen.
To install the redux , just open a new tab in terminal and run
npm i reduxnpm i react-reduxnpm i redux-thunkGet more info here .
Now we'll create action-creators and reducers function which will change the
countValue and enable darkMode.As discussed, action-creators create the action to change the state variable and reducer is a pure function that takes action & the previous state of the application and returns the new state.
Action consists of type and payload to be supplied to Reducer function. The type defines the action-type and the payload defines the value to be substituted with the previous one.
To do this, we will create a folder name
state inside the src folder. Inside the src folder, we create two more folders :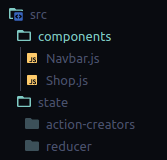
Now we create
index.js file in action-creators folder and write code for action-creator. We will create action here.export const increaseCount = (countValue) => {
return (dispatch) => {
dispatch ({
type: 'increase',
payload: countValue
})
}
}Here, increaseCount is a function that returns a function named
dispatch which dispatches type & payload. Try to write action-creators for
decreaseCount, enableDarkMode and enableLightMode in the same file.You can compare your code with the full code of
state/action-creators/index.js from here.Now we make
Reducers. Reducers need not to be a single one, for the different states, we have different reducers. Like here, we'll create two reducers file named countReducer.js and darkmodeReducer.js inside reducer folder, which will look after the countValue and darkMode state variables.Let's create
countReducer.js to change the count value.const reducer = (state=0, action) => {
if(action.type === 'increase') {
return state + action.payload;
}
else if(action.type === 'decrease') {
return state - action.payload
}
else {
return state;
}
}
export default reducer;As you can see above, it takes the state variable and action from the action creator as a parameter and returns the modified state with the help of the action payload.
Try to create
darkModeReducer.js by own first and compare your results from below.const reducer = (state= 'OFF', action) => {
if(action.type === 'darkmode') {
state = action.payload;
}
else if(action.type === 'lightmode') {
state = action.payload;
}
return state;
}
export default reducer;Since for large complex applications, we know that we require many reducers and handling them individually is a messy task. So redux provides us
combineReducers, which combines all the reducer functions and export them as a single reducer function.For this, create a file
index.js in reducer folder and paste the below code.import { combineReducers } from "redux";
import countValueReducer from './countReducer';
import darkmodeReducer from './darkmodeReducer';
//combinnig all the reducers here
const reducer = combineReducers({
countValue: countValueReducer,
darkmode: darkmodeReducer
})
export default reducer;To recall, a store is a global place where all the things defined is exposed to all the application. Simply, every part of the application gets access to the store.
Here, we will create a file
store.js inside the state directory. Use to code below for store.js.import { applyMiddleware, createStore } from "redux";
import thunk from "redux-thunk";
import reducer from "./reducer";
export const store = createStore(reducer,{}, applyMiddleware(thunk));You have seen many new things here, let's understand them one by one.
createStore : It takes the reducers, preloaded state and enhancer function(optional) to create the store. It returns an object that holds the complete state of your app.
applyMiddleware : Returns a store enhancer that applies the given middleware.
redux-thunk: Helps to execute asynchronous functions.
Hurray! store is created. ✨
Now I want to give access of store to the overall application. So we go to the file
src/index.js (main index.js file) and import the store here. The file will look likeimport React from 'react';
.
.
.
import { Provider } from 'react-redux';
import { store } from './state/store';
ReactDOM.render(
.
.
<Provider store={store}>
<App />
</Provider>
.
.
);See complete file here.
Also we create a file

index.js inside state directory.This will increase the accessbility of action-creators as we export all the action-creators from here to all the components like Navbar.js.
export * as actionCreators from './action-creators/index';As far as now, we have not added any function to the
+/ - button and darkmode toggle, but now we got access to the state variables through store, we can use them to display their values on the UI.import { useSelector } from "react-redux";and then use it as
.
.
 const countValue = useSelector((state) => state.countValue);
 const darkmode = useSelector((state) => state.darkmode);
.
.
And change the value of countValue from
0 to {countValue}, like this<button className="btn btn-info mx-1">CountValue : {countValue}</button>So far we have use the countValue state, we also need to use
darkMode state in App.js and Shop.js.import { useSelector } from "react-redux";
import './App.css';
import Navbar from './components/Navbar';
import Shop from './components/Shop';
function App() {
const darkmode = useSelector(state => state.darkmode);
let darkmodeStyle = {
backgroundColor:'#2d2d2d',
color:'whitesmoke'
}
return (
<>
<Navbar />
<div className="container p-3" style={darkmodeStyle}>
<Shop />
</div>
</>
);
}
export default App;In
shop.js, just simply import the useSelector hook like in Navbar.js usingimport { useSelector } from "react-redux";and then use it as inside
Shop component..
.
const darkmode = useSelector((state) => state.darkmode);
.
.Now we have access to the variables that we use to bring the changes on view.
Here, state values will be first changed by the user from the front-end. Then, we need to generate those actions, which triggers reducer functions and finally alter the values of the state on view.
To do this we use
useDispatch hook, which dispatches the action-creators and bindActionCreators to bind all action creators.Time to use them!
In
Navbar.js and Shop.js, import them asimport { useSelector, useDispatch } from "react-redux";
import { bindActionCreators } from 'redux';
import { actionCreators } from '../state/index';And in
Navbar.js, we use enableDarkMode action-creator to dispatch.const dispatch = useDispatch();//to dispacth the action creator functions
const {enableDarkMode} = bindActionCreators(actionCreators, dispatch);We will add this
darkMode functionality to toggle button present in navbar like this<input className="form-check-input" onClick={()=>{darkmode === 'OFF'?enableDarkMode('ON'):enableDarkMode('OFF')}} type="checkbox" id="flexSwitchCheckDefault" />And add the styling in the
App.js as.
.
const darkmode = useSelector(state => state.darkmode);
let darkmodeStyle = {}
if(darkmode === 'ON') {
darkmodeStyle = {
backgroundColor:'#2d2d2d',
color:'whitesmoke'
}
}
return (
<>
.
.Also change a div component in
Shop.js to switch the title on the main page from LightMode to DarkMode.<div className="container my-5">
<h1 className="display-1">This is {darkmode === "ON" ? "DarkMode" : "LightMode"}</h1>
</div>Now you will be able to change background color.

To use
countValue action-creator to dispatch, we need to code in Shop.js.const dispatch = useDispatch();
const balance = useSelector(state => state.countValue);
const {increaseCount, decreaseCount} = bindActionCreators(actionCreators,dispatch);We will add this
increaseCount/decreaseCount functionality to + and - buttons present in screen like this.<div className="container d-flex">
<button className="btn-lg btn-success mx-4" onClick={()=>(increaseCount(1))}> + </button>
<h1 className="display-6">You Count Value = {balance} </h1>
<button className="btn-lg btn-danger mx-4" onClick={()=>(decreaseCount(1))}> - </button>
</div>Now you will be able to change the countValue.

Cheers! 🍻, you have build the basic template for redux. Now you can come up with as many functionalities and components to the application. You can take up some challenges by trying tasks like adding a login page, displaying the profile page, or categorizing the type of users.
Try to come up with your own ideas and send the PRs over here.
Thank you for your time. Since this is my first post, please share your valuable feedback in comments also.
Happy Coding ! ☘️
41