
30
Add the Telegram Messaging API to your React application
Telegram is one of the most popular messaging apps and probably the most loved by developers. By championing privacy in a time where it seems increasingly elusive, Telegram has seen its popularity soar - crossing the 500 million monthly active users mark in the first quarter of 2021. This makes it a viable notification medium for web applications - seeing as it is also available on the app store for android and iOS devices. Additionally, being open source and providing a developer-friendly API, integrating a Telegram-based messaging feature on your application is relatively easier than other popular messaging applications.
In this guide, I will show you how to integrate Telegram messaging into your React application. Using Sanity to provide movie content, we will use Telegram to send ourselves movie information- for further research and possibly an outing to the cinema 🙂. The app we will build (and its messaging functionality) is shown in the gif below.
The code for the complete project is available on Github should you get stuck at any point.
Since we'll be working with Telegram, you need to be signed up and have a Telegram app (either mobile or desktop) running.
To keep up with the concepts that will be introduced in this article, you will need a fair grasp of Javascript ES6. You will also need to have an understanding of some basic React concepts like hooks and functional components.
You will also need to have the following installed on your workstation:
The first thing we need to do is set up a Telegram bot. A ‘bot’ – short for robot – is a software program that performs automated, repetitive, pre-defined tasks. In our case, the bot sends messages with movie content.
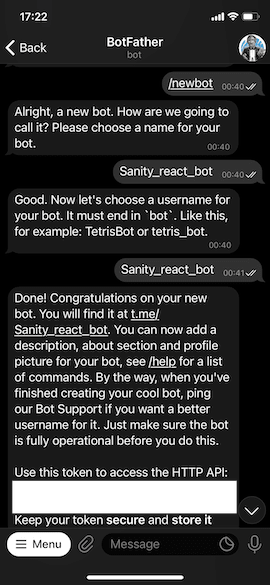
With your API token, you can track updates (i.e. activity related to your bot) including when messages are sent to your bot. To do this, visit the URL
https://api.telegram.org/bot[TOKEN]/getUpdates where TOKEN is the token given to you by the botfather. Telegram has a different system for identifying users - deviating from phone numbers or email addresses as a unique identifier. To send messages to a user, we need the user id. The simplest way to get our chat id is by starting a conversation with our bot and checking for the chat id in the
getUpdates URL. To start a conversation with your bot, visit the URL https://t.me/[BOT_USERNAME]/start where BOT_USERNAME refers to the username for your Telegram bot. You will be directed to the Telegram app where you will see something similar to the screenshot below.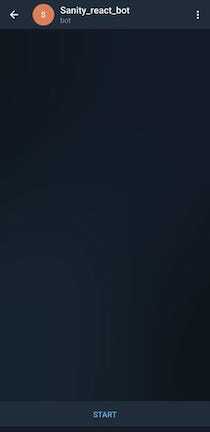
Click the START button to start a conversation with your bot. Back in the
getUpdates URL, you'll see a new update.
In the
from node, we can see the id of the message sender. Make a note of the displayed id as we'll use this later on. It doesn't stop there, however. While this is extracurricular in the context of this article, it is also possible to get our user id or that of others via Telegram's deep linking mechanism. By adding a start query parameter to your bot URL (
https://t.me/[BOT_USERNAME]), you can identify users on your system and get their Telegram user ID. This can be done via the following steps:https://t.me/[BOT_USERNAME]?start=[UNIQUE_STRING]) where UNIQUE_STRING represents the string generated in step 1.getUpdates URL and filter the results for a message update with text /start [UNIQUE_STRING]. An implementation in Javascript is shown below.
const getBotUpdates = () =>
  fetch(
    "[https://api.telegram.org/bot{token}/getUpdates](https://api.telegram.org/bot%7Bbot_token%7D/getUpdates)"
  ).then((response) => response.json());

const getUserTelegramId = async (uniqueString) => {
  const { result } = await getBotUpdates();

  const messageUpdates = result.filter(
    ({ message }) => message?.text !== undefined
  );

  const userUpdate = messageUpdates.find(
    ({ message }) => message.text === `/start ${uniqueString}`
  );

  return userUpdate.message.from.id;
};
This id can be saved for the user in the database and used anytime a notification is to be sent via Telegram.
For this article, however, we will not use deep linking as we only want to send messages to ourselves.
Sending a notification is as simple as sending a
GET request to https://api.telegram.org/bot[TOKEN]/sendMessage with chat_id and text as the query parameters. Remember, TOKEN is the token given to you by the botfather. Optionally, you can also include a third query parameter, parse_mode that allows you to send HTML or Markdown content to the recipient.To see this in action, open the URL
https://api.telegram.org/bot[TOKEN]/sendMessage?chat_id=[USER_ID]&text=Hello%20from%20your%20new%20bot in your browser where token is the token given to you by the botfather and USER_ID is the id of the message sender you copied earlier. You will see a response similar to the screenshot below.
Meanwhile, in your Telegram app, you will have received a message from your bot.

Just like that, you can send notifications to yourself. Pretty neat right?
Having understood the process of setting up a telegram bot and sending a notification via Telegram, let's see how we can use this in an application. Let's build an application to display the latest movies, along with actors and upcoming screenings. We'll use Next.js for this tutorial. Next.js is a framework built on React.js which provides several extra features, including server-side rendering and generating static websites. Create a new project using the following command.
npx create-next-app telegram-reactFor content management, we'll be using Sanity. Let's initialise a new Sanity project. To do this, we'll create a new folder called
studio and initialise the project using the sanity init command.cd telegram-react
mkdir studio
sanity initRespond to the CLI prompts as shown below.
? Select project to use: Create new project
? Your project name: telegram-react
? Select dataset to use: production
? Project output path: telegram-react/studio
? Select project template: Movie project (schema + sample data)
? Add a sampling of sci-fi movies to your dataset on the hosted backend? YesOnce the Sanity CLI completes the setup process, we can add the dependencies for our project.
To interact with the Sanity backend, we'll use the Sanity.io toolkit for NextJs, sanity-next. Add it using the following command.
npm i next-sanityFor styling our pages, we'll use Chakra UI, a simple, modular, and accessible component library that gives you the building blocks you need to build your React applications. Add Chakra and its dependencies using the following command.
npm i @chakra-ui/react @emotion/react@^11 @emotion/styled@^11 framer-motion@^4While we're developing, we'll need the sanity CLI installed. Additionally, we need to run our next application and sanity studio simultaneously. We can do that using the concurrently package. Install both of them using the command below.
npm i --save-dev @sanity/cli concurrentlyFinally, modify the
scripts node in package.json to match the following."scripts": {
"dev": "concurrently \"next\" \"cd studio && sanity start\"",
"build": "echo 'Building Sanity to public/studio…' && cd studio && sanity build ../public/studio -y && cd .. && next build",
"start": "next start",
"lint": "next lint"
},To inject Chakra into our application, we need to update the
pages/_app.js file and inject the ChakraProvider. Open pages/_app.js (you can create the file if it doesn't exist) and add the following.import '../styles/globals.css'
import {ChakraProvider, Container} from "@chakra-ui/react";
function MyApp({Component, pageProps}) {
return (
<ChakraProvider>
<Container maxW='container.xl' centerContent>
<Component {...pageProps} />
</Container>
</ChakraProvider>
);
}
export default MyAppNext, we'll set environment variables so we can safely load the credentials we need to interact with Telegram and sanity. Create a new file called
.env.local and add the following to the env file.# Telegram
TELEGRAM_BOT_TOKEN = "your_telegram_bot_token"
TELEGRAM_USER_ID = "your_telegram_user_id"
# For Next Locally
NEXT_PUBLIC_SANITY_PROJECT_ID = "your_project_id"
NEXT_PUBLIC_SANITY_DATASET = "production"Before we build the pages of our application, let's write some utility functions that will help us with tasks like making requests to Sanity, formatting data, or making API requests. Create a new folder at the root of your project named
utility. Next, create a new file called
api.js in the utility directory. This file will contain a helper function for making API requests. In this file add the following code.export const makePostRequest = (url, details) => {
return fetch(url,
{
method: "POST",
headers: {
"Content-Type": "application/json",
},
body: JSON.stringify(details),
})
.then((response) => response.json());
};Here, we declare a function named
makePostRequest which takes the endpoint URL and the values of the POST request and uses Fetch to send a POST request accordingly. The function returns a promise which resolves to the JSON content of the API response. Next, create a new file called
telegram.js in the utility directory. This file will contain a helper function that will help us to interact with the Telegram Bot API easily. In this file add the following code.import {makePostRequest} from "./api";
const telegramBotKey = process.env.TELEGRAM_BOT_TOKEN;
const chat_id = process.env.TELEGRAM_USER_ID;
export const sendNotification = async (text, parse_mode) => {
const endpoint = `https://api.telegram.org/bot${telegramBotKey}/sendMessage`;
await makePostRequest(endpoint,
{
text,
parse_mode,
chat_id
});
};The
sendNotification function takes the text of the notification and the mode which Telegram should use in parsing it. For this guide, we will use HTML formatted text. You can read more about formatting options for Telegram messages here. Next, create a new file called
objectFormat.js in the utility directory. This file will contain a helper function that we can use to generate the appropriate HTML formatted text for Telegram requests based on the provided object. In this file, add the following code.const capitalize = (input) =>
`${input.charAt(0).toUpperCase()}${input.slice(1)}`;
const capitalizeKey = (input) =>
input.split(/(?=[A-Z])/).map(word => capitalize(word)).join(' ');
const newLineToken = '\n';
const lineBreak = newLineToken.repeat(2);
const formatTitle = title => `<b><i>${title}</i></b>`;
const formatArray = childArray =>
childArray.map((child, index) => `${index + 1}. ${child}`).join(newLineToken);
const formatEntry = ([key, value]) => {
const formattedTitle = formatTitle(capitalizeKey(key));
const formattedBody = Array.isArray(value) ? formatArray(value) : value;
return `${formattedTitle}${newLineToken}${formattedBody}`;
};
export const toHtmlFormat = (title, body) => {
const formattedTitle = formatTitle(title);
const formattedBody = Object.entries(body).map(formatEntry).join(lineBreak);
return `${formattedTitle}${lineBreak}${formattedBody}`;
};The
toHtmlFormat function takes the title (the content of the first line of the formatted text) and the body (which is an object). It maps through the object, capitalises the object keys, and then returns the key formatted as a title and the value of the object underneath. If the value of a key is an array, the
formatArray function is used to iterate through each member of the array and format each child. This function is naive in the sense that it assumes that the array provided is comprised only of strings.Next, create a new file called
dateFormat.js in the utility directory. This file will contain a helper function that will allow us to present dates in a human-readable format. In it add the following code.export const formatDate = date =>
new Date(date).toLocaleString('en-GB', {
month: 'long',
weekday: 'long',
day: 'numeric',
year: 'numeric'
});Finally, we need helper functions to ease the interaction with our Sanity backend as well as provide assistance with Sanity image resources and portable text serialisation. Create a new file called
sanity.js in the utility directory. In it, add the following code.import {createClient, createImageUrlBuilder, createPortableTextComponent,} from "next-sanity";
const config = {
dataset: process.env.NEXT_PUBLIC_SANITY_DATASET,
projectId: process.env.NEXT_PUBLIC_SANITY_PROJECT_ID,
useCdn: process.env.NODE_ENV === "production",
apiVersion: '2021-10-12'
};
if (!config.projectId) {
throw Error("The Project ID is not set. Check your environment variables.");
}
if (!config.dataset) {
throw Error("The dataset name is not set. Check your environment variables.");
}
export const urlFor = (source) => createImageUrlBuilder(config).image(source);
export const PortableText = createPortableTextComponent({
...config,
serializers: {},
});
export const sanityClient = createClient(config);The
urlFor helper function will be used for generating image URLs with only the asset reference data in your documents.The
PortableText constant returns a component that we can use to render block content from Sanity Studio. In this guide, we'll be using it to render the overview of a movie. The
sanityClient is used for fetching data in the getProps page functions.With our Utility functions in place, let's build our components.
In the
components directory, create a new file called MovieCard.js. When we display the movies in a grid, each movie will be rendered with the MovieCard component. In the components/MovieCard.js file, add the following.import React from "react";
import {Box, Image} from "@chakra-ui/react";
import {urlFor} from "../utility/sanity";
import Link from 'next/link';
import {formatDate} from "../utility/dateFormat";
const MovieCard = ({_id, title, poster, releaseDate, slug}) => {
return (
<Link href={`/movies/${slug.current}`}>
<a>
<Box
maxW="sm"
borderWidth="1px"
borderRadius="lg"
overflow="hidden"
>
<Image
src={urlFor(poster).width(300).height(300)}
alt={`${title} movie poster`}
/>
<Box p='6'>
<Box
mt="1"
fontWeight="semibold"
as="h3"
isTruncated
>
{title}
</Box>
<Box
color="gray.500"
fontWeight="semibold"
letterSpacing="wide"
fontSize="xs"
>
Released on {formatDate(releaseDate)}
</Box>
</Box>
</Box>
</a>
</Link>
);
};
export default MovieCard;This component destructures the movie which it receives as a prop and renders the movie poster (using the
urlFor helper function we created earlier), the title, and the release date (formatted using the formatDate helper function we created earlier). In the
components directory, create a new file called MoviesPage.js and add the following code to it.import React from "react";
import {SimpleGrid} from "@chakra-ui/react";
import MovieCard from "./MovieCard";
const MoviesPage = ({movies}) => {
return (
<SimpleGrid columns={4} spacing={20} padding='10'>
{movies.map(movie => (
<MovieCard key={movie._id} {...movie}/>
))}
</SimpleGrid>
);
};
export default MoviesPage;This component renders the movies passed as a prop in a grid with 4 columns. Each movie is rendered using the
MovieCard component we created earlier. In the
components directory, create a new file called Team.js. This component will be used to render teams (either the crew members or the cast of a movie). Add the following code to the component.import React from "react";
import {urlFor} from "../utility/sanity";
import {Box, Image, SimpleGrid} from "@chakra-ui/react";
const Team = ({members, isCast}) => {
const defaultImageUrl = "https://bit.ly/3aUzAKZ";
return (
<SimpleGrid columns={3} spacing={10} padding='5'>
{members.map(member => {
const {name, _key, image} = member.person;
const imageUrl = image ? urlFor(image).width(50).height(50) :
defaultImageUrl;
const extra = isCast ? member.characterName : member.job;
return (
<Box key={_key}>
<Image
src={imageUrl}
alt={`${name}`}
w={50}
h={50}
/>
<Box key={1}>{name}</Box>
<Box
key={2}
color="gray.500"
fontWeight="semibold"
letterSpacing="wide"
fontSize="xs"
>
{extra}
</Box>
</Box>
)
})}
</SimpleGrid>
);
};
export default Team;The
Team component takes two props - the members of the team and a boolean variable named isCast which represents whether or not the team to be rendered is the cast of the team. In the
components directory, create a new file called MoviePage.js and add the following code to it. This should not be confused with the MoviesPage.js component we built earlier. This component is rendered when a movie card is clicked. It takes a movie as a prop and renders the movie details. It also adds a button which when clicked, shares the movie details via Telegram.import React, {useState} from "react";
import {
Alert,
AlertIcon,
Box,
Breadcrumb,
BreadcrumbItem,
BreadcrumbLink,
Button,
Center,
CloseButton,
Heading,
Image,
Stack
} from "@chakra-ui/react";
import {PortableText, urlFor} from "../utility/sanity";
import Link from 'next/link';
import Team from "./Team";
import {toHtmlFormat} from "../utility/objectFormat";
import {formatDate} from "../utility/dateFormat";
import {makePostRequest} from "../utility/api";
const MoviePage = ({movie}) => {
const [shouldShowAlert, setShouldShowAlert] = useState(false);
const [alertContent, setAlertContent] = useState(null);
const hideAlert = () => {
setAlertContent(null);
setShouldShowAlert(false);
};
const formattedReleaseDate = formatDate(movie.releaseDate);
const getDetailsFromCastMember = ({characterName, person}) =>
`${person.name} as ${characterName}`;
const getDetailsFromCrewMember = ({job, person}) =>
`${person.name} - ${job}`;
const sendMovieInfoToUser = async () => {
const {cast, crew, popularity, overview, title} = movie;
const detailsToSend = {
releaseDate: formattedReleaseDate,
cast: cast.map(getDetailsFromCastMember),
crew: crew.map(getDetailsFromCrewMember),
popularity,
summary: overview[0].children[0].text
};
const response = await makePostRequest("/api/share", {
text: toHtmlFormat(title, detailsToSend),
parseMode: 'html'
});
setAlertContent(response.message);
setShouldShowAlert(true);
setTimeout(hideAlert, 3000);
}
return (
<Stack spacing={3} padding='10'>
{shouldShowAlert && (
<Alert status="success">
<AlertIcon/>
{alertContent}
<CloseButton
position="absolute"
right="8px"
top="8px"
onClick={hideAlert}
/>
</Alert>
)}
<Box maxW="3xl" borderRadius="lg" overflow="hidden">
<Breadcrumb>
<BreadcrumbItem>
<Link href="/">
<BreadcrumbLink>Movies</BreadcrumbLink>
</Link>
</BreadcrumbItem>
<BreadcrumbItem isCurrentPage>
<Link
href={`/movies/${movie.slug.current}`}
>
<BreadcrumbLink>{movie.title}</BreadcrumbLink>
</Link>
</BreadcrumbItem>
</Breadcrumb>
<Center>
<Heading as='h1'>{movie.title}</Heading>
</Center>
<Center>
<Box p='6'>
<Image
src={urlFor(movie.poster).width(300).height(300)}
alt={`${movie.title} movie poster`}
/>
<Center mt={2}>
<Box>
<Box
color="gray.500"
fontWeight="semibold"
letterSpacing="wide"
fontSize="xs"
>
Released on {formattedReleaseDate}
</Box>
<Box
color="gray.500"
fontWeight="semibold"
letterSpacing="wide"
fontSize="xs"
>
Popularity: {movie.popularity}
</Box>
<Center>
<Button
colorScheme="teal"
variant="outline"
mt='1'
onClick={sendMovieInfoToUser}
>
Share details via Telegram
</Button>
</Center>
</Box>
</Center>
</Box>
</Center>
<Box>
<Heading as='h3' size='lg'>Overview</Heading>
<PortableText blocks={movie.overview}/>
</Box>
<Box pt='10'>
<Heading as='h3' size='lg'>Cast</Heading>
<Team members={movie.cast} isCast={true}/>
</Box>
<Box pt='10'>
<Heading as='h3' size='lg'>Crew</Heading>
<Team members={movie.crew} isCast={false}/>
</Box>
</Box>
</Stack>
);
};
export default MoviePage;In the
MoviePage component, we make a request to api/share to send the movie details, let's create a handler for this endpoint. We can do this in our current project as Next.js provides a solution for us to build APIs with it.In the
pages/api folder, create a new file called share.js. In it, add the following code.import {sendNotification} from "../../utility/telegram";
const handler = async (request, response) => {
switch (request.method) {
case "POST":
const {text, parseMode} = request.body;
await sendNotification(text, parseMode);
response.status(200)
.json({message: 'Details shared successfully'});
break;
default:
response.status(405)
.end("This method is not allowed for this route.");
}
};
export default handler;This route only accepts POST requests. When such a request is received, we retrieve the text and parse mode from the request, and using the
sendNotification helper function we declared earlier, we send the details to our Telegram bot and eventually us!!The last thing to do is build the pages for the application. The application will have two pages - the index page which shows all the movies and the movie page which displays the information for a single movie.
Update the
pages/index.js file to match the following.import {sanityClient} from "../utility/sanity";
import MoviesPage from "../components/MoviesPage";
import {groq} from "next-sanity";
const query = groq`*[_type == "movie" && defined(slug.current)]`;
const Home = ({movies}) => {
return (
<MoviesPage movies={movies}/>
)
}
export const getStaticProps = async () => {
const movies = await sanityClient.fetch(query);
return {
props: {
movies,
},
};
}
export default Home;In the
getStaticProps we fetch all the movies with a defined slug from the backend, this is passed as a prop the MoviesPage component we created earlier. Next in the
pages directory, create a new folder called movies. In the movies folder, create a new file called [slug].js. By taking advantage of Next.JS's file-based router system, this folder and file naming structure will allow us requests to the URL /movies/{slug} where slug corresponds to the slug of the selected movie. Add the following code to pages/movies/[slug].js.import {sanityClient} from "../../utility/sanity";
import {groq} from "next-sanity";
import {useRouter} from "next/router";
import Error from "next/error";
import MoviePage from "../../components/MoviePage";
const query = groq`*[_type == "movie" && slug.current == $slug][0]{
releaseDate, overview, popularity, poster, title, slug,
'crew': crewMembers[]{_key, department, job, person->{_id, name, image}},
'cast': castMembers[]{_key, characterName, person->{_id, name, image}}
}`;
const MoviePageContainer = ({movie}) => {
const router = useRouter();
if (!(router.isFallback || movie?.slug)) {
return <Error statusCode={404}/>;
}
return <MoviePage movie={movie}/>;
};
export const getStaticProps = async ({params}) => {
const movie = await sanityClient.fetch(query, {
slug: params.slug,
});
return {
props: {movie},
};
}
export const getStaticPaths = async () => {
const paths = await sanityClient.fetch(
`*[_type == "movie" && defined(slug.current)][].slug.current`
);
return {
paths: paths.map((slug) => ({params: {slug}})),
fallback: true,
};
}
export default MoviePageContainer;With that in place, our application is ready to go! Run the application using the following command.
npm run devNavigate to http://localhost:3000/ to see your application in action.
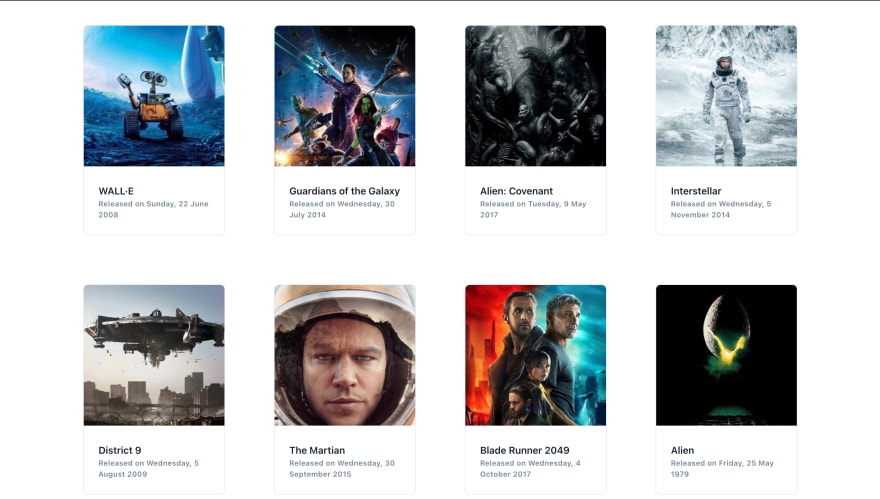
Click on a movie card to display more details of the movie and you can also send the details to yourself via Telegram. Nice!!!

In this guide, we saw how telegram can be integrated into a react app, walking through the process of creating a bot to sending a message to a telegram user via the Telegram Bot API. We also saw how to connect our application to Sanity studio for content management.
Sending notifications is just a tip of what developers can take advantage of. Telegram also offers tdlib (Telegram Database Library), a cross-platform, fully functional Telegram client which allows anyone to build their own custom messaging apps operating in the Telegram cloud.
The code for the complete project is available on Github should you get stuck at any point.
30