
40
Building Internal Tools Using Appsmith, Flask And Heroku
In this article I will be showing you how to build a simple inventory management tool using Appsmith and Flask, which will serve data to the Appsmith environmennt. You will see how to build and configure a simple backend api using flask as well as how to properly integrate your Appsmith application with the backend api.
In order to follow along with this tutorial, you will need to have the following setup:
We'll start by creating a new folder to host our backend application, you can call this whatever you want - mine is called
core. Navigate to this folder from the terminal and create a new file called server.py, add another file called Procfile after doing this your project folder should look like the following:core/
|__server.py
|__ProcfileWhile we're in this folder from the terminal, let's create a new virtual environment using the python package
virtualenvvirtualenv serverOnce this is done, activate the virtual environment as follows:
source server/bin/activateor if you're on windows:
.\server\scripts\activateOnce you do this you should see your current file path on the terminal prefixed with the name of the virtual environment in parentheses.

Now using the pip command install
Flask and Flask-Sqlalchemy,gunicorn, Flask-CORS and Flask-Marhsmallow as shown below:pip install flask flask-sqlalchemy flask-cors gunicorn flask-marshmallow marshmallow-sqlalchemyOnce they're installed we can start writing our flask server, so open the
server.py file and add the following lines of code:from flask import Flask, request, jsonify
from flask_sqlalchemy import SQLAlchemy
from flask_marshmallow import Marshmallow
from flask_cors import CORS
import os
basedir = os.path.abspath(os.getcwd())
# instantiate new flask app
app = Flask(__name__)
# app config for database
app.config['SQLALCHEMY_DATABASE_URI'] = f"sqlite:///{basedir}/demo.db"
app.config['SQLALCHEMY_TRACK_MODIFICATIONS'] = False
CORS(app)
# database models
db = SQLAlchemy(app)
ma = Marshmallow(app)
class Product(db.Model):
id = db.Column(db.Integer, primary_key=True)
name = db.Column(db.String(50))
price = db.Column(db.Float)
description = db.Column(db.Text)
quantity = db.Column(db.Integer)
class ProductSchema(ma.SQLAlchemyAutoSchema):
class Meta:
model = Product
load_instance = True
products_schema = ProductSchema(many=True)
@app.route('/get_products')
def fetch_products():
all_ = Product.query.all()
return jsonify(products_schema.dump(all_)), 200
@app.route('/add_product', methods=['POST'])
def add_note():
data = request.get_json(force=True)
new_product = Product(
name=data['name'],
price=data['price'],
description=data['description'],
quantity=data['quantity']
)
try:
db.session.add(new_product)
db.session.commit()
return {
"status": "Success"
}, 200
except Exception as e:
print(e)
return {
"status": "Error"
}, 500
@app.route('/edit_product', methods=['PUT'])
def edit_note():
data = request.get_json(force=True)
# find product
product = Product.query.filter_by(id=data['id']).first()
for key, value in data.items():
setattr(product, key, value)
try:
db.session.commit()
return {
"status": "Success"
}, 200
except Exception:
return {
"status": "Error"
}, 500
@app.route('/delete_product', methods=['DELETE'])
def delete_note():
data = request.get_json(force=True)
# find product
product = Product.query.filter_by(id=data['id']).first()
db.session.delete(product)
try:
db.session.commit()
return {
"status": "Success"
}, 200
except Exception:
return {
"status": "Error"
}, 500
if __name__=="__main__":
db.create_all()
app.run(debug=True)In the
server file, we import the required dependencies, create a new flask app instance, add some necessary configurations including "cors" and database config, and specified three endpoints to which we can send requests.Save this file and run the script from the terminal using the following command:
python server.pyYou should see the server start running with logs similar to these :

This is great but in order for our server to be publicly accessible we must deploy it to a cloud service provider, and for that we would be using
Heroku.Heroku is a PaaS cloud service provider that helps us to deploy application really easily without having to worry about the kind of machine to provision for the software and how to scale them - Heroku does all that on our behalf, all we have to do is tell them howto run our application, and we do that using the Procfile that we created earlier on.
Once you have the cli tool installed, open up a new terminal and navigate to the project directory, and login using the command:
heroku loginThis would prompt you to open your browser and log you in from there, by the time its done you should be logged in from the terminal as well, you can now create a new heroku app as follows:
heroku create appsmith-serverI called mine
appsmith-server, you can give yours any name as well. Since Heroku doesn't allow shared names you might have to come up with a much cooler name.Now that our heroku application has been created, let's tell heroku what to run in the
Procfile, so open the Procfile and add the following to it:web: python gunicorn:appThe
Procfile deployment specification follows the format of[process_type]: [command]Likewise, I have specified that the
"process_type" be of type "web", meaning the application to be deployed is a web application. The "command" to run the application has also been specified (its supposed to run the flask server using gunicorn). What this means is that when Heroku wants to spin up an instance of our application it looks at the Procfile and uses the instructions there to run the application.Before we finally deploy we need to tell Heroku, of the things it needs to install before running the application, and this is done using the
which Heroku will automatically look for during deloyment. We can easily append the requirements from our virtual environment using pip as follows:
requirements.txt filewhich Heroku will automatically look for during deloyment. We can easily append the requirements from our virtual environment using pip as follows:
pip freeze>requirements.txtThis wll automatically take all the installed dependencies and add them to a file called
requirements.txt, so you should find that it created a new file for you by that name that has the following contents, or at least similar contents:click==8.0.3
colorama==0.4.4
Flask==2.0.2
Flask-Cors==3.0.10
Flask-SQLAlchemy==2.5.1
greenlet==1.1.2
itsdangerous==2.0.1
Jinja2==3.0.2
MarkupSafe==2.0.1
six==1.16.0
SQLAlchemy==1.4.26
Werkzeug==2.0.2To deploy the application, we'll be using
git, so head back to the terminal ad initialize a git repository in the project folder using the init command, and then add and commit the changes to version control history.Now we will add a remote origin for the heroku application, so that we can push and in effect deploy the application from the terminal using git.
heroku git:remote -a <Your-heroku-app-name>This will create a private repository on heroku that your updates will be pushed to when you push to heroku. Now we can finally deploy our application by pushing the committed code as follows:
git push heroku mainThis would begin the deployment opertaion with logs similar to these:

Once its done it should give you a link to the application instance, this link is usually of the format:
(your-app-name).herokuapp.com. Copy this link and paste it in a browser, and add any of the url prefix for any of the endpoints on the serer like /add_product for example
We see that the request goes through, and this is sign that the server is up and running and is accessible publicly. Let's head over to appsmith and build the interface for this tool.
To begin with you want to login to your Appsmith dashboard and create a new application, this should bring you to the development environment like the one shown below:
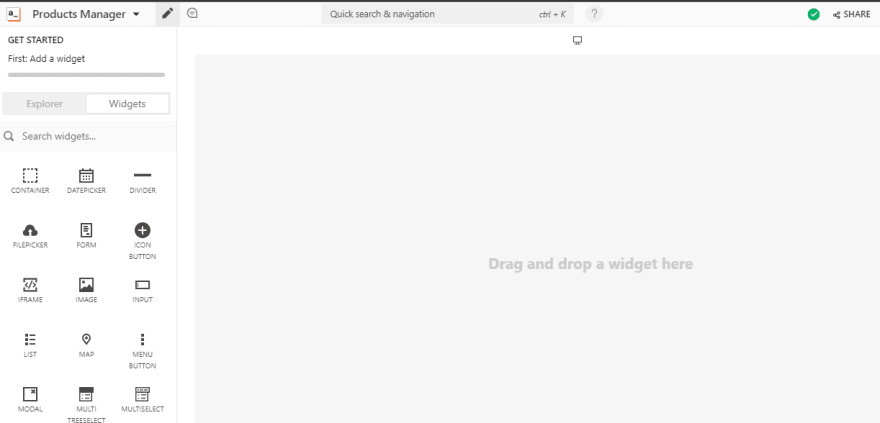
This environment is where we'd be building our "application" and its mostly a drag and drop environment with widgets and other build tools on the left pane and the wider space to the right is the development area where you drag widgets on.
We'll start by clicking and dragging a
table widget unto the right area, this table will display a business's product inventory, and the details of each one: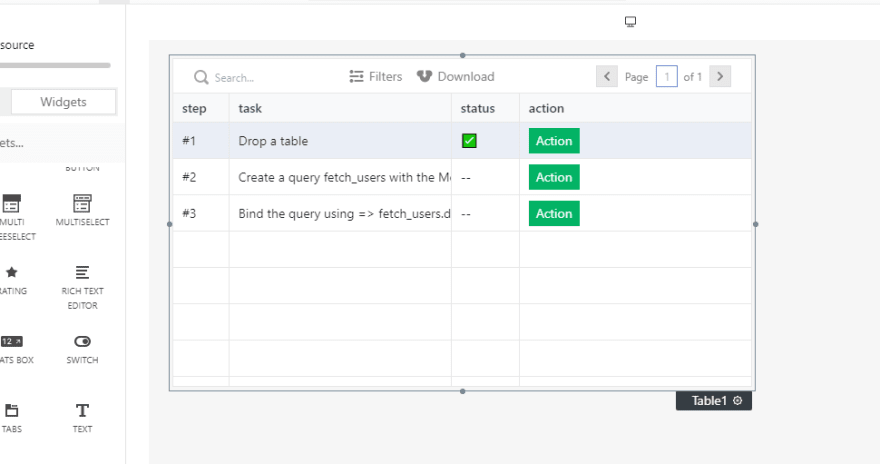
Resize the table by dragging on the edges, however leave some space so that we can add one more widget - a form. This form will collect information for a new product to be added to the list and will also serve as a means of editing already existing products in the catalogue.
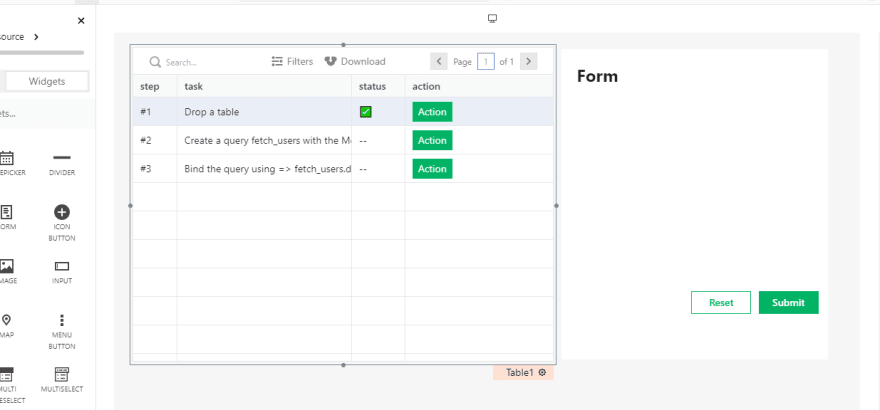
Click and drag the form widget onto the right area so that it fits to the right of the table as shown below, you may need to do some resizing to get it to fit in there:
To create a form, we'll need the
Text and Input widgets which will help us to name and create the input fields for the form. For this form we need fields that will hold details of each product including the name, description, price, and quantity. So drag text labels and input widgets for each field, as shown below:
Also rename the buttons on the form to be
Add new and Update, as they will serve to create new products and update existing onesLet's try to create a new product using the form we created earlier on. So head back to the appsmith dashbord and under the
Datasources section click on the create new API option to add a new API to communicate with from your appsmnith application
It should prompt you to enter details about your api on a new page, these includes a name for the API (I called mine "AddProduct"), the URL, headers and data or request body to be sent to the Api. Fill the details as shown below:

Here we have added the url to our heroku deployment and added the endpoint
add_product that sends a POST request to add a new product to the database. In the body add the following to create a payload that contains data from the form.{
"name": {{Input1.text}},
"price": {{Input2.text}},
"description": {{Input3.text}},
"quantity": {{Input4.text}}
}Let's now tie this with the
Add new button so that when we edit the form and click Add new the this api is called. Head over to the Add new widget and bring up the settings pane, and under the Actions section choose the onClick option, and choose the option to Execute a query and then select the AddProduct api from the list of options showed.
Next to this
onClick action is the onSuccess option, and this will trigger on success of the request sent when the button is clicked. We want the table to be updated when we add a new product from the form, so we will create a new api to fill the table with data from the database, and then call that api whenever we add a new product from the form as the onSuccess action.What this will do is to refresh the table each time we add a new product to the database. So head over to the datasources and create a new API called
getProducts that sends a GET request to the server endpoint of get_products as shown below: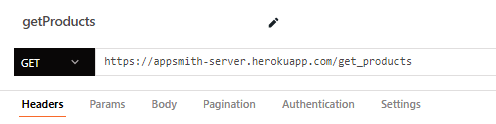
Head back to the
onSuccess action of the Add new button from earlier and choose the option to Execute a query and then select the getProducts api from the list of options showed.
Now head to the table widget and we'll ask the table to fetch data from this api instead of the hard-coded data in it. Click on the table widget and its context manager should pop-up right beside it, and under the field that reads -
Table Data, you want to clear out the hard-coded data in it and add the following instead:{{getProducts.data}}You should see the data show up on the table, we can now add a new product from the form and then when we click the
Add new button on the form the new data should create a new row in the table.We also want to be able to prefill the form fields when any product is selected on the table so that we can edit them on the form. To do this we leverage on the
Default value property of the input widget and add moustache syntax to fetch data on the selected row and add it to the field. Add the following to the
Default value entry on the Name field to prefill it with the name of the product on a selected row.{{Table1.selectedRow.name}}If you don't see the details of the input widget, click on the settings icon beside it to bring up the properties of the widegt, as shown below

Do this for the other fields adding in the corresponding column name for each one. Also set the
Data type property for the input fields: quantity, and price to type of Number. This way we can edit any product by clicking on it making the changes in the form and then use the Update button on the form to submit the edit to the database.Let's create a new API to handle the product update, so as before create a new api and name it
updateProduct, that sends a PUT request to the server on the /edit_product endpoint. Add the following to the body of the request:{
"id": {{Table1.selectedRow.id}},
"name": {{Input1.text}},
"price": {{Input2.text}},
"description": {{Input3.text}},
"quantity": {{Input4.text}}
}Now link this to the
update button just like we did for the Add new button as an onClick action, also specify the getProducts api as an onSuccess action so that the table reloads the data. Now we can click on any row and edit a product from the form and it'll be automatically updated on the table.In order to delete a product we can add a third button widget to the form, create a
deleteProduct api that sends a DELETE request to the server on the /delete_product endpoint, with a payload defined as follows:{
"id": {{Table1.selectedRow.id}}
}Tie this to the new
delete button and add an onSuccess action to call the getProducts api once again like before.We have come quite a long way, now haven't we?. In this article, we have seen how to build and deploy a server using flask and heroku, we worked with Appsmith to build a simple product inventory management tool for business owners, and connected it to our API. There's more that we could possibly accomplish using Appsmith and a traditional web server, for example we could embed the appsmith tool we built directly on a web page and serve the web page on our flask server.
That is just one of the many possibilities with Appsmith and I'm hoping this article has further shown you what is possible with serverless technologies like Appsmith.
That is just one of the many possibilities with Appsmith and I'm hoping this article has further shown you what is possible with serverless technologies like Appsmith.
Thanks for sticking with me till the end, happy coding!.
40