
32
How to Build an Ecommerce Application using React, MongoDB, Strapi and Socket.io
There are many ways to build e-commerce applications. This article will look at how to build an e-commerce application using React, MongoDB, Strapi, and Socket.io.
We will use React for the frontend, MongoDB for the database, Strapi as our Content Management System (CMS, also serves as our backend tool), and Socket.io for real-time bi-directional communication between the client and the server.
- Setting up MongoDB
- Setting up a Strapi project
- Building the collections
- Building the frontend with React
- Integrating Socket on the Backend
- Integrating Socket on the Frontend
- Adding products in real-time
- Adding reviews in real-time
In this article, you will learn how Socket.io works and how it is integrated into Strapi and frontend environments as well as how Strapi makes backend development seamless.
To get the best of this tutorial, you need prior knowledge of the following:
Also, download and install Node.js if you haven't already.
In a concise form, Strapi is a headless CMS. As the term headless implies, the CMS has no head. It's decoupled.
If that doesn't make sense yet, think about WordPress. When using WordPress, they manage your frontend, backend, data, and, possibly your hosting too.
With headless CMSs like Strapi, while managing your content, you choose where your data stays, decide where your application is hosted, and make up your frontend yourself—basically giving you more control over how your application is structured.
Strapi allows you to develop and manage your content using APIs (REST and GraphQL).
Here's more information: Strapi Developer Documentation.
Socket.io is a library that makes working with Websockets easier on browsers and Node.js servers.
The traditional way of building websites involves the client requesting resources from the server and responding to the client. After that response, the server cannot send any other response. It has to wait until there's a request.
Websockets make things different. With them, servers and clients work together using events. The client emits an event, the server listens for that event and acts accordingly, and vice versa.
This way, even when the client doesn't request data, the server can emit an event (at any time), and the client's listeners will handle the event.
The e-commerce application we'll be building has two collections—products and reviews. Each Product can have reviews. We'll show how to achieve this seamlessly using the above tools.
The work of Socket.io here is to improve the interaction in the web application. Here are few things we'll see with Socket.io:
Let's get started building.
Before starting with our project, we want to ensure our database is ready. Follow the instructions in this detailed article: MongoDB - Strapi Developer Documentation.
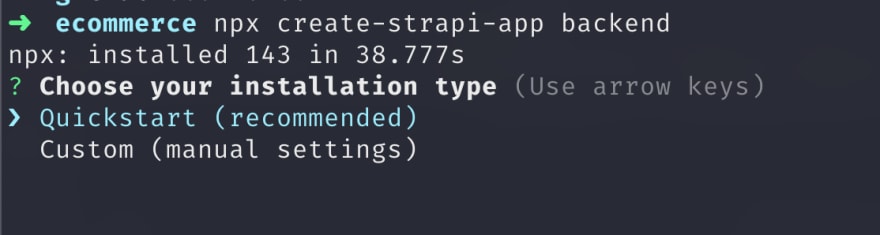
Setting up a Strapi project is pretty straightforward. Just like
create-react-app, @vue/cli, and the rest of them, Strapi has create-strapi-app.Run the following command:
mkdir ecommerce
    npx create-strapi-app backend
First, we create a new directory for our frontend and backend application. Then using npx (used for executing npm libraries without installing them, you can choose to install the
create-strapi-app globally and use directly), we set up the backend.While setting up, you'll be asked some questions. Here's one:
For this tutorial, we want to use MongoDB. Using Quickstart, the default database (SQLite) will be used. So, select custom.
And the next question:

Templates are not starters—they are not apps. They are just already made with Strapi configurations, components, and plugins. Here's a list of them: Strapi Templates
For this tutorial, we won't be using them. To enter
n and press enter.Next question:

You know what to select 😅
With your mongo background service running, enter
eCommerce as the database name:
For the remaining inputs, use the default, with the username and password empty.


Now the backend code (built with Strapi) exists in the backend directory.
We will need two collection types for this tutorial. A Product Collection and the Review Collection will have a relationship with the Product.
First, ensure you're in the backend directory:
cd backendThen, run
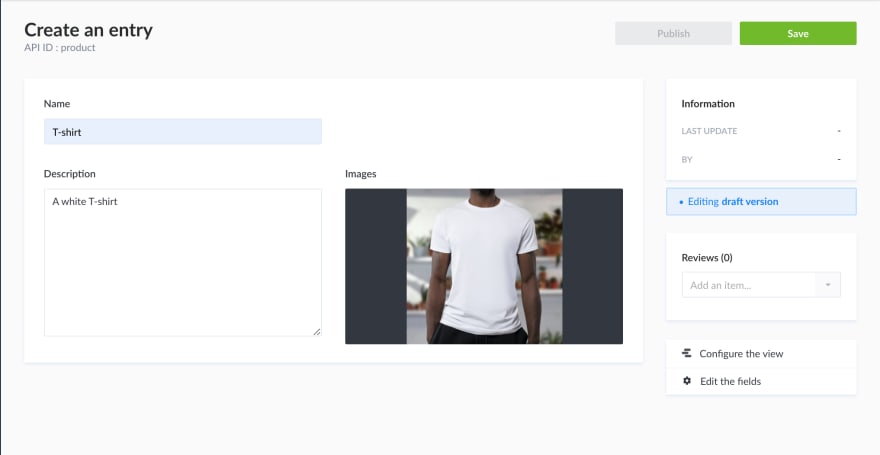
yarn develop. The admin UI will be built with the development configuration, and your browser will open the page at http://localhost:1337/admin/auth/register-admin: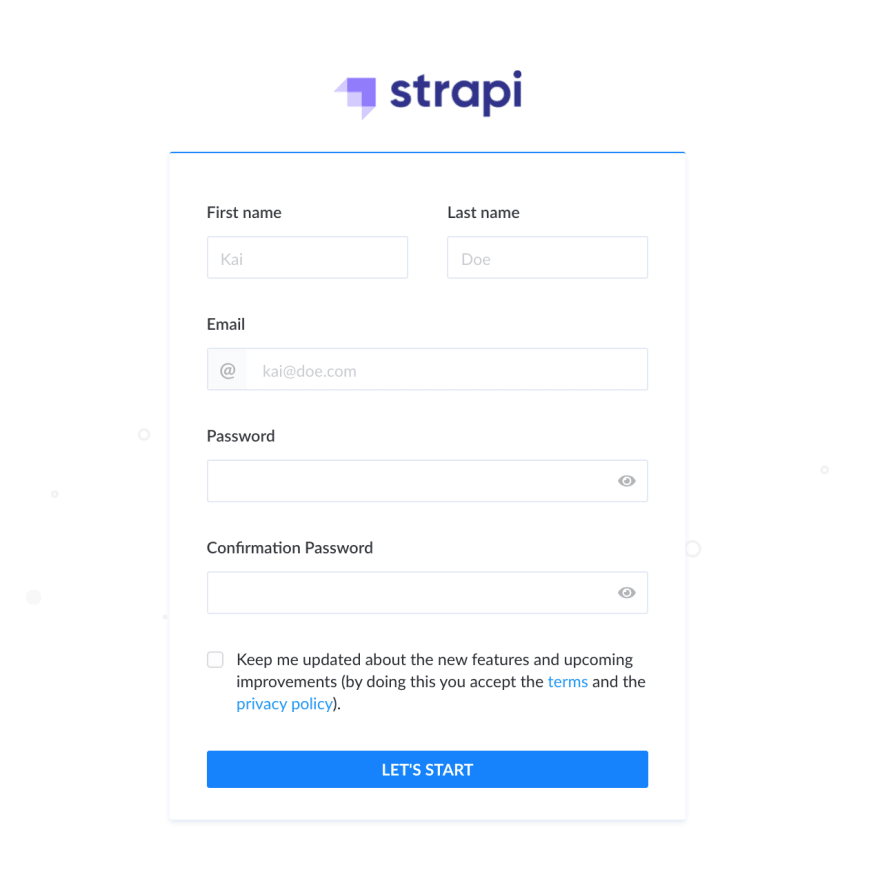
You have to register as an administrator, so fill the form (take note of your credentials) and click on "Let's Start." And then you have this:
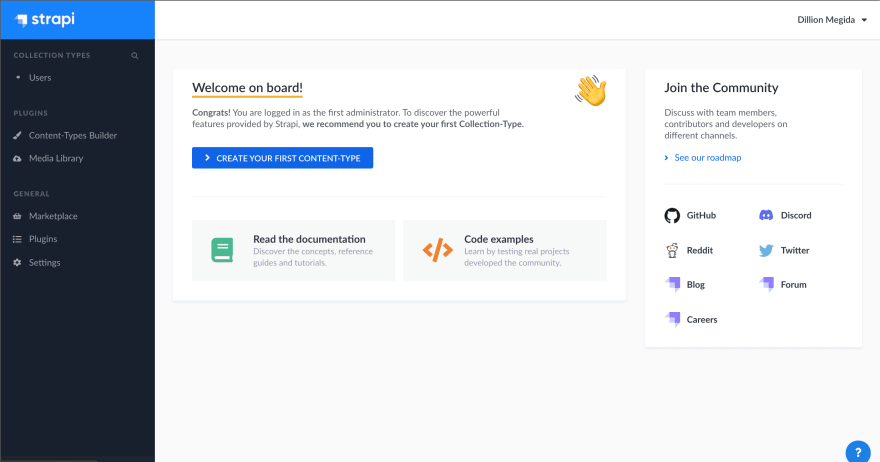
So, for our first Content-Type, click on
Create your first Content-Type: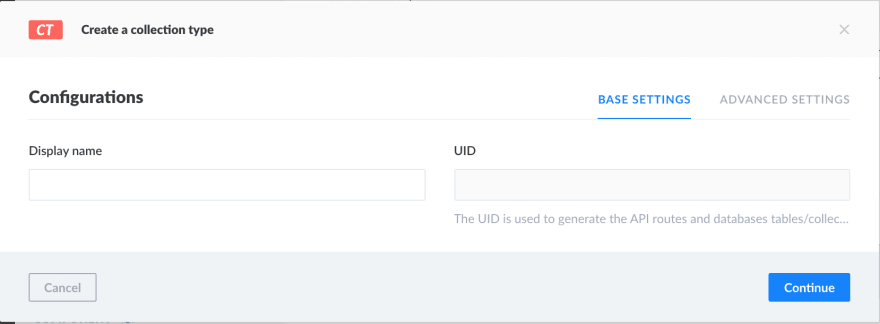
On the Display name, enter
Product, then click Continue. Next, you're to enter some fields: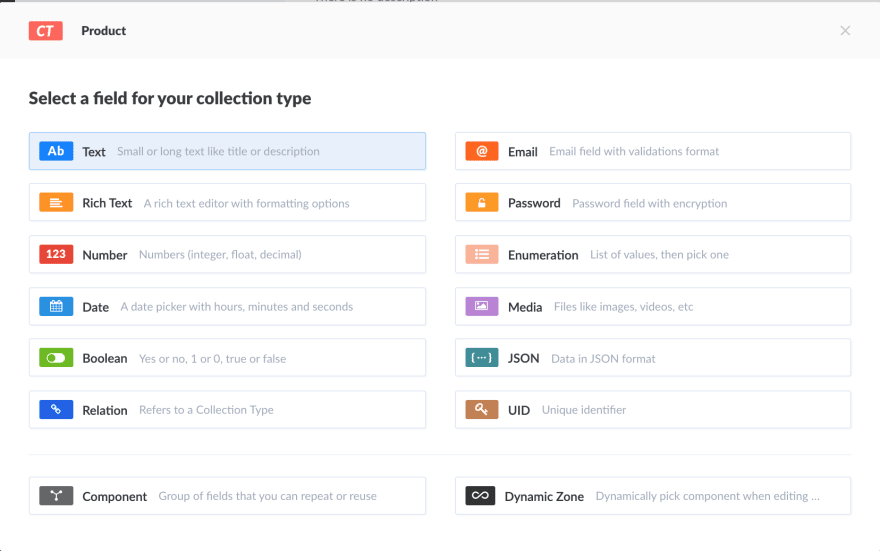
Select Text:
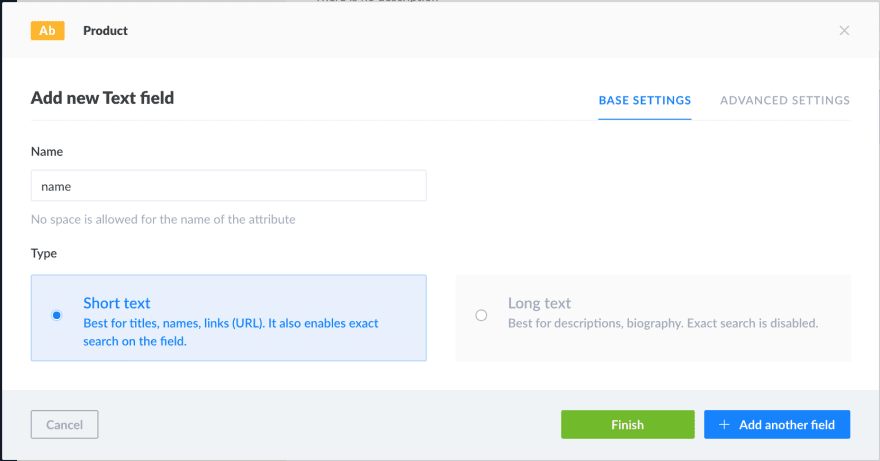
In the Name field, enter
name, which will be the name of the Product. Then, click on Advanced settings: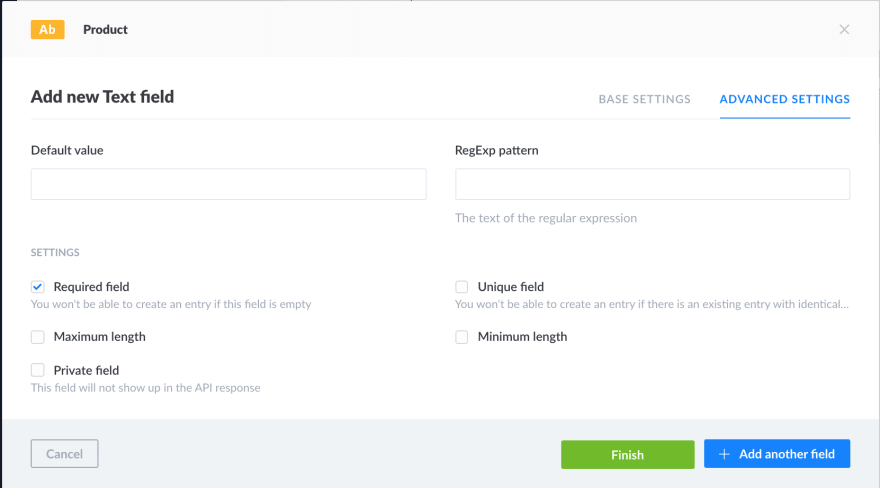
Select the
Required field checkbox. With this selected, during creation (through the API), there would be a validation error if this field is not provided. You can also set a maximum or minimum length if you want.Then click
Add another field.In this second field, select Media, and use
images as the name. In the Advanced settings:
Change the
allowed types of media to Images only and check the Required checkbox.Click
Add another field for the last field. Select text, and enter description as the name.
Also, select
Long text. Go to the advanced settings again and make it required. And then click Finish.Then, click
Save at the top to add that collection. The server would restart with the new collection saved.Then we have to repeat the same process for the Review collection. Click on
Content-Types Builder from the left-side navigation, and click on Create new collection type in the Collection Types section.The display name here would be
Review, and the fields here are:reviewer_name, required, of short textreview, required, of long textAnd the last field is of the
Relation type. The field name on the Review collection is product, and the field name on the Product collection is reviews with a Many to One relationship: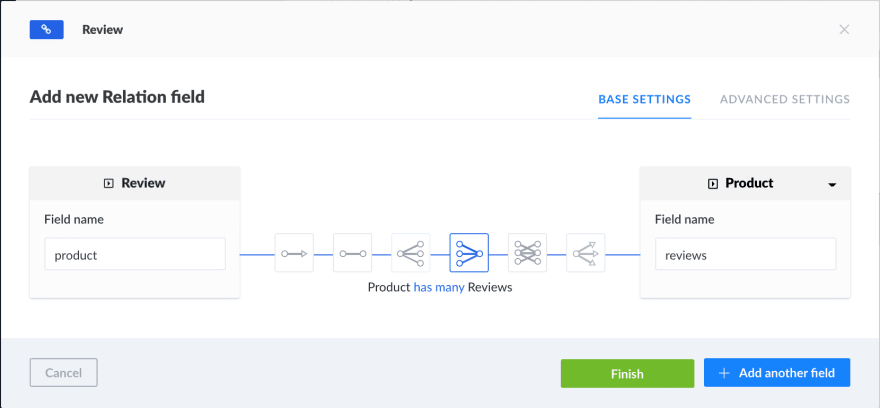
This means one Product can have many reviews. Then click Finish and Save.
Our collections are ready. Under the
Collection Types in the navigation, we can select a collection and add data directly on the UI.Go to the Product collection, and add two products of your choice. Here's the information I'm using:
Then click Save and Publish.
Repeat the same for another entry of your choice.
Go to the
Review collection and add three reviews—two for one Product and one for the other.When adding reviews, you can select the
Product you're adding a review for because Reviews have a relationship with Products:
Now let's build our frontend and call the available APIs.
We'll be building the Frontend app with React. You can use any other framework as this serves as the UI and then calling APIs.
In the
eCommerce directory, run the following in the terminal.npx create-react-app clientThen run the following:
cd client
    npm run start
We'll have three pages. First page is to view all products, the second page is to view the detail of a particular product (with the reviews), and the third one to add a product.
We need a
react-router set up for this. Do the following:npm install react-router-domOpen the
App.js file and replace the code there with this:import React from 'react'
import { BrowserRouter as Router, Switch, Route } from 'react-router-dom'
import Home from './components/Home'
export default function App() {
return (
<Router>
<Switch>
<Route exact path="/">
<Home />
</Route>
<Route path="/:product_id"></Route>
<Route path="/add-product"></Route>
</Switch>
</Router>
)
}Create a
components directory under src and Add the Home.js file:export default function Home() {
return <h1>Homepage</h1>
}Now, when you go to http://localhost:3000, you should see the Homepage heading.
Now, let's fetch the products from the backend. To call the APIs on the backend, a user would need to be authenticated. Since that's not our focus, we can make some request methods public.
To do this, go back to your
backend directory and run yarn develop, and open the admin dashboard at http://localhost:1337/admin. Then log in with your details.On the left navigation, go to Settings. Under
USERS & PERMISSIONS PLUGIN, click on Roles: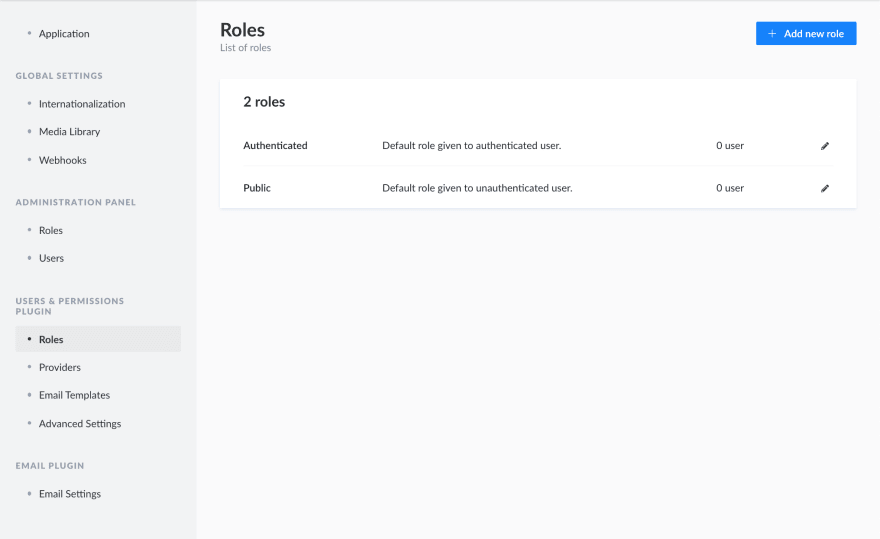
Then click on Public. Scroll to Permissions and select all:

Then click Save.
Note that this isn't ideal for a public app. Users need to be authenticated.
Install Axios on our frontend for calling the API:
npm install axiosUpdate
Home.js to the following:import axios from 'axios'
import { useEffect, useState } from 'react'
import './Home.css'
import { Link } from 'react-router-dom'
export default function Home() {
const [products, setProducts] = useState([])
useEffect(() => {
axios({
method: 'get',
url: 'http://localhost:1337/products',
}).then((res) => {
setProducts(res.data)
})
}, [])
return (
<div className="container">
<h1>Products</h1>
<div className="products-container">
{products.map((product) => (
<Link className="product" to={`/${product.id}`}>
<img src={`http://localhost:1337${product.images[0].url}`} />
<h2 className="product-name">{product.name}</h2>
<p className="product-desc">{product.description}</p>
</Link>
))}
</div>
</div>
)
}The images field is an array because when setting up the collection, we accepted multiple media. And the
URL field on each image is in the form of /uploads/… which means we have to append that to the backend's server's URL to get the complete URL.And also, add a
Home.css file in the same directory as Home.js, with the following code:.products-container {
display: grid;
grid-template-columns: repeat(3, 1fr);
grid-gap: 20px;
}
.product {
text-decoration: none;
border: 1px solid rgb(236, 235, 235);
}
.product-image img {
height: 400px;
color: rgb(229, 224, 224);
}
.product-details {
padding: 15px;
}
.product-name {
margin: 10px 0 0;
color: rgb(103, 103, 103);
}
.product-desc {
margin: 10px 0 0;
color: rgb(187, 187, 187);
}Also add the
.container class in the index.css file as so:.container {
padding: 40px;
max-width: 1000px;
margin: 0 auto;
}
* {
box-sizing: border-box;
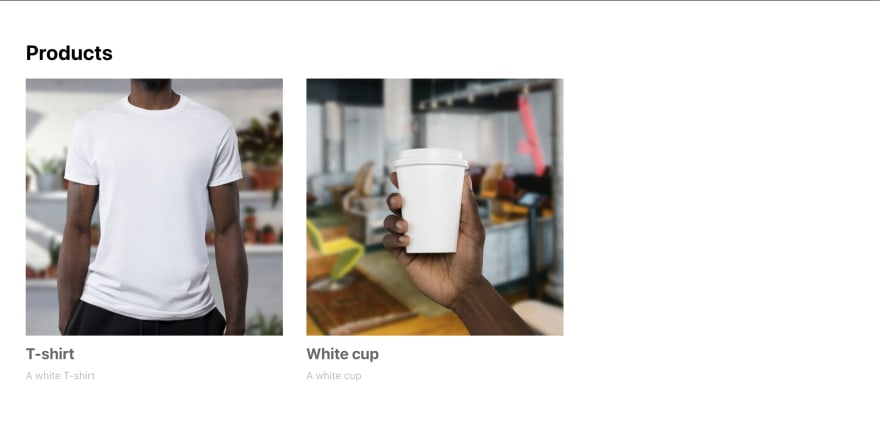
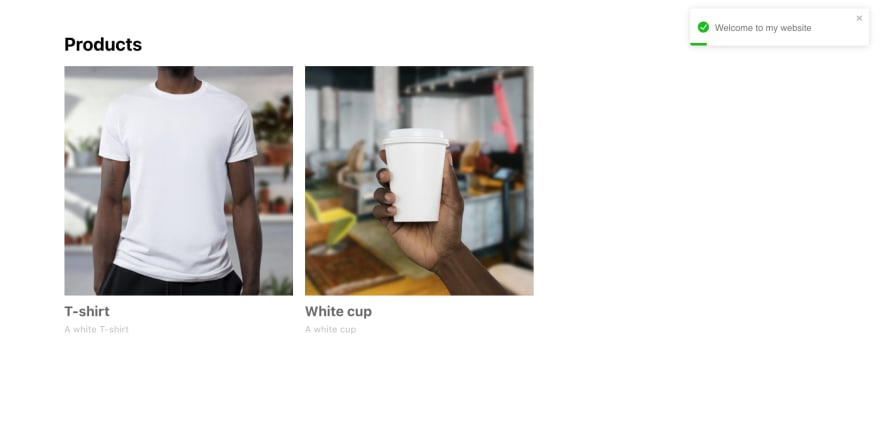
}Now, I have this:
On clicking each Product, I expect to see a dedicated page for that Product with the reviews. So, create a
ProductDetail component at the components directory:import axios from 'axios'
import { useEffect, useState } from 'react'
import { useParams } from 'react-router-dom'
import './ProductDetail.css'
export default function ProductDetail() {
const { product_id } = useParams()
const [product, setProduct] = useState(null)
useEffect(() => {
axios({
method: 'get',
url: `http://localhost:1337/products/${product_id}`,
}).then((res) => {
setProduct(res.data)
})
}, [])
return (
<div className="container">
{!product ? (
<span>Loading...</span>
) : (
<div className="product-detail-container">
<h1>{product.name}</h1>
<div className="product-img-container">
<img src={`http://localhost:1337${product.images[0].url}`} />
</div>
<p>{product.description}</p>
<div className="product-reviews">
<h2>Reviews ({product.reviews.length})</h2>
{product.reviews.map((review) => (
<div className="product-review">
<h3>{review.reviewer_name}</h3>
<p>{review.review}</p>
</div>
))}
</div>
</div>
)}
</div>
)
}And a
ProductDetail.css file at the same directory:.product-img-container {
height: 500px;
overflow: hidden;
}
.product-img-container img {
object-fit: cover;
width: 100%;
height: 100%;
}
.product-reviews {
padding-top: 20px;
border-top: 1px solid #ccc;
}
.product-review {
background-color: #eeecec;
padding: 15px;
}Also, go back to
App.js and update the second Route component to this:...
<Route path="/:product_id">
<ProductDetail />
</Route>
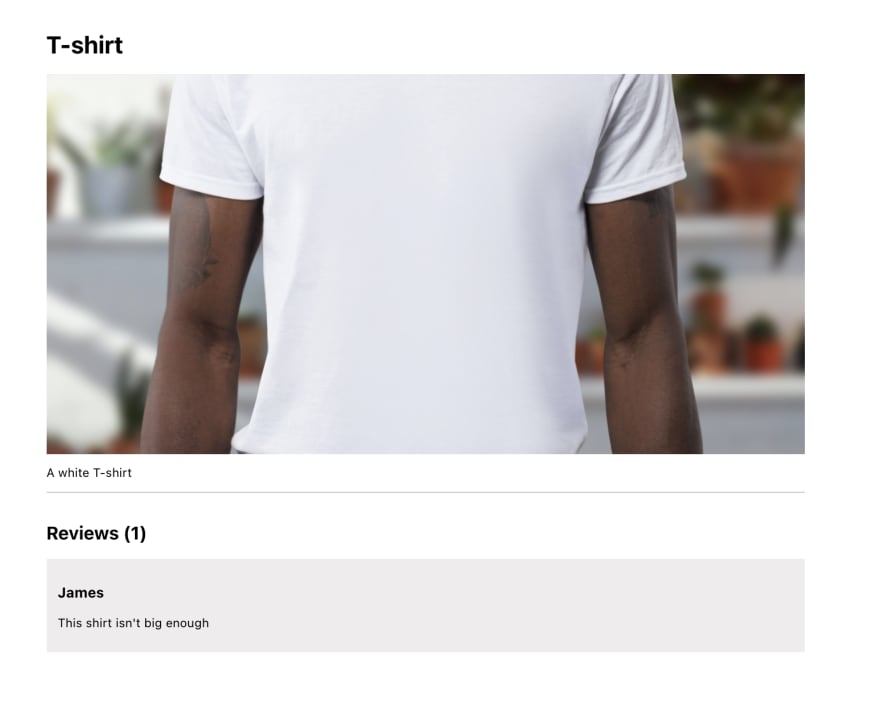
...Now when you click on a product, you get this:
As our application is currently, there is communication between the frontend and the backend. But we want this communication to be bi-directional and in real-time so let's integrate sockets.
npm install socket.ioThe config/functions/bootstrap.js file is the starting point that Strapi uses when your development starts. So it's in here we integrate Sockets—our listeners and emitters and so on.
Replace the bootstrap file with the following:
module.exports = () => {
      const io = require("socket.io")(strapi.server, {
        cors: {
          origin: "http://localhost:3000",
          methods: ["GET", "POST"],
        },
      });
      io.on("connection", function (socket) {
        // send message on user connection
        socket.emit("hello", JSON.stringify({ message: "Welcome to my website" }));
      });
    };
We've configured the
socket.io library to use Strapi's server, with some cors permissions. When any client connects to the server, the connection event is automatically emitted, and the server can listen to it and do whatever it wants.In this example, on
connection, the server emits the hello event, and the client can listen to it and display the message.Install the socket.io client library:
npm i socket.io-client react-toastifyThe react-toastify library is used for adding notifications to our app.
In the
App.js file, add the following:// other imports
import { ToastContainer } from 'react-toastify'
import 'react-toastify/dist/ReactToastify.css'
...
<Router>
<ToastContainer />
<Switch>...Create a new directory called
config, and in it, create a socket.js file with the following code:import { io } from 'socket.io-client'
export const socket = io('http://localhost:1337')And back in the
Home.js file, update to the following:// other imports
import { socket } from '../config/socket'
import { toast } from 'react-toastify'
socket.on('hello', (res) => {
toast.success(res.message)
})
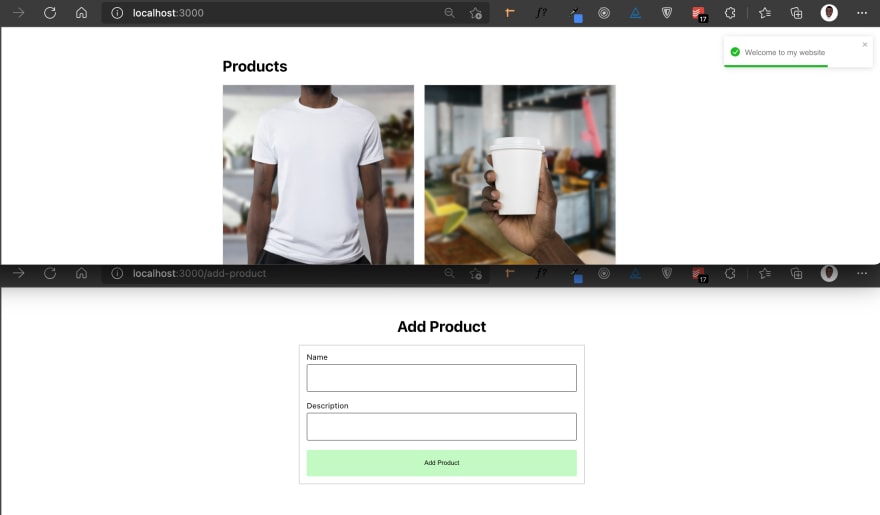
export default ...Now, when you load the products page, you get:
There is indeed a socket connection.
The next thing we want to do is emit an event when a product is added.
Let’s create the component--
AddProduct.js:import { useState } from 'react'
import { toast } from 'react-toastify'
import { socket } from '../config/socket'
import './AddProduct.css'
export default function AddProduct() {
const [name, setName] = useState(null)
const [description, setDescription] = useState(null)
const [processing, setProcessing] = useState(false)
const formSubmit = (e) => {
e.preventDefault()
setProcessing(true)
socket.emit('addProduct', { name, description }, (product) => {
setProcessing(false)
toast.success('Product added successfully!')
setTimeout(() => {
window.location.href = `/${product.id}`
}, 1000)
})
}
return (
<div className="container">
<div className="add-product">
<h1>Add Product</h1>
<form onSubmit={formSubmit}>
<div className="input-group">
<label htmlFor="name">Name</label>
<input onChange={(e) => setName(e.target.value)} />
</div>
<div className="input-group">
<label htmlFor="description">Description</label>
<input onChange={(e) => setDescription(e.target.value)} />
</div>
<button disabled={processing} type="submit">
{processing ? 'Processing' : 'Add Product'}
</button>
</form>
</div>
</div>
)
}In the form submit handler, we emit an event named
addProduct with an object of the Product's properties. Notice we aren't using Axios for the POST request? Because sockets do that already.We also add a callback function with the argument
product, which will be passed from the backend when created. Then we navigate to that Product's detail page after 1 second.And the
AddProduct.css file:.add-product h1 {
text-align: center;
}
.add-product form {
max-width: 600px;
margin: 0 auto;
border: 1px solid #ccc;
padding: 15px;
}
.input-group {
width: 100%;
margin-bottom: 20px;
}
.input-group label {
display: block;
margin-bottom: 5px;
}
.input-group input {
padding: 20px;
width: 100%;
}
.add-product form button {
width: 100%;
padding: 20px;
border: none;
background: none;
background-color: rgb(193, 251, 193);
cursor: pointer;
}After adding the AddProduct component in
App.js , /add-product/ gives us: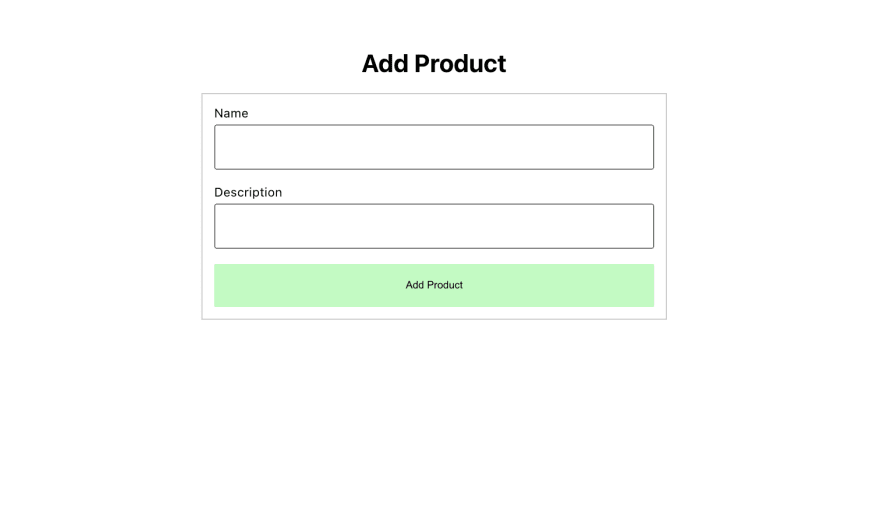
We'll leave adding the image for the Product on the Strapi admin dashboard. In the
img src in the homepage and product detail page, change it to:<img
src={
product.images[0]
? `http://localhost:1337${product.images[0].url}`
: '/empty-box.svg'
}
/>This way, we check if there's an image, and if there isn't, we use a default image. In the public directory at the root, add an
empty-box.SVG file and paste the following:<svg xmlns="http://www.w3.org/2000/svg" viewBox="0 0 24 24" width="24" height="24">
<path fill="none" d="M0 0h24v24H0z" />
<path
d="M3 10h18v10.004c0 .55-.445.996-.993.996H3.993A.994.994 0 0 1 3 20.004V10zm6 2v2h6v-2H9zM2 4c0-.552.455-1 .992-1h18.016c.548 0 .992.444.992 1v4H2V4z"
fill="rgba(177,177,177,1)" />
</svg>Also, go back to
Home.js and add listen to the product added event:...
socket.on('hello', (res) => {
toast.success(res.message)
})
socket.on('newProductAdded', (res) => {
toast.info('A new product has been added')
setProducts((products) => [res.product, ...products])
})
...When the backend emits this event, we can listen to it on the homepage (opened in another tab or window), show the toaster, and add the products to the existing products array.
Now for the backend work. In the
config directory, create a utils directory, and in it, create a product-database.js file. In that file, paste the following:async function createProduct({ name, description }) {
try {
const product = await strapi.services.product.create({
name,
description,
});
return product;
} catch (err) {
console.log({ err });
return "Product cannot be created. Try again";
}
}
module.exports = {
createProduct,
};Here, we're using the Strapi product service to create the Product, which would add that to the database.
Now, go back to the
bootstrap.js file and after the hello emitted event, add the following:...
socket.on("addProduct", async ({ name, description }, callback) => {
try {
const product = await createProduct({
name,
description,
});
if (product) {
callback(product);
socket.broadcast.emit("newProductAdded", { product });
}
} catch (err) {
console.log({ err });
callback({ type: "error", message: err });
console.log("Error occured. Please try again");
}
});
...We listen to the
addProduct event, add the Product to the database, pass the Product as the argument to the client's callback, and emit the event newProductAdded with the Product.Notice we aren't using a
socket.emit but socket.broadcast.emit instead since socket.emit emits the event to the client that emitted the addProduct event. We don't want this because the client is currently on the add product page, which means the homepage will never listen to the event.But with
socket.broadcast.emit, we're emitting the event to every other connected event, except the client that sent the addProduct event.Now, let's test what we have. I'm using two windows for this. Here are the two pages:
After adding a product, then this:
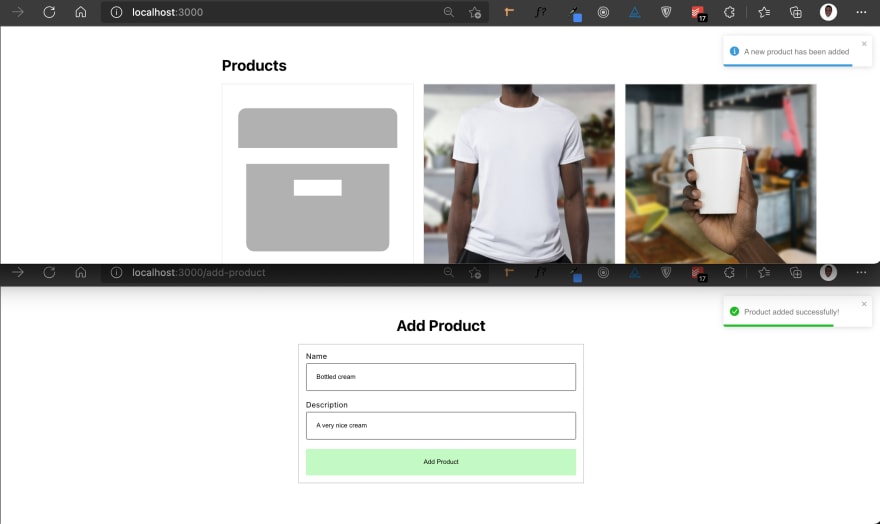
Notice in the homepage, the Product is added, and the toaster notifies the user? This is very similar to Twitter telling you, "New tweets available."
The same thing can be done with reviews. The basic idea is to have a
ProductReviews component that has a form where users can enter reviews.On the same Product Reviews component, there'd be a listener for the
newReviewAdded event. And we can broadcast emit to other connected clients, letting them know of the newly added review.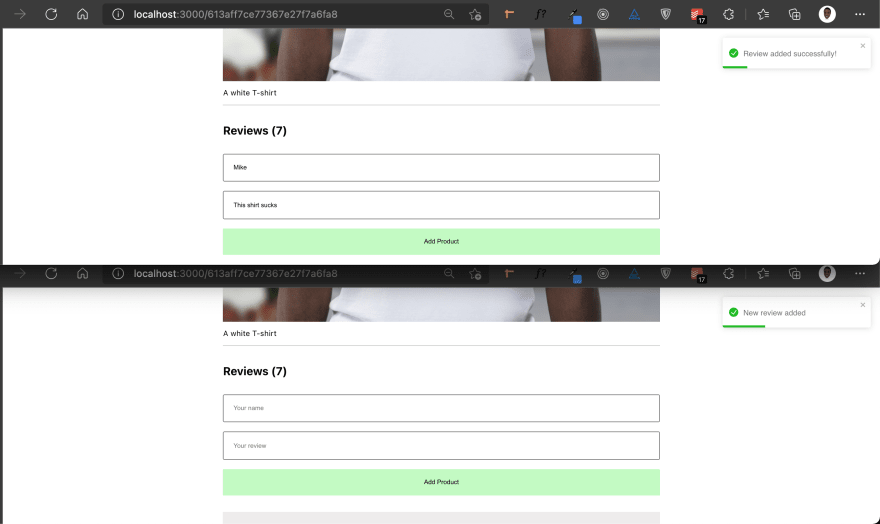
In the screenshot above, the upper window was the client that sent the review. In contrast, the window below is just another client that is notified of an added review.
Here’s the source code for the tutorial: https://github.com/dillionmegida/ecommerce-socket-io-strapi
We don't. For getting the products initially, we can emit an event from the backend called
loadedProducts and listen to that event on the frontend to fetch and display the products.In this article, we've seen how to create a full-stack e-commerce application with Strapi managing the backend and React for the frontend. We also saw how to integrate web sockets to improve the communication and interaction between the client and the server.
For further reading, check out: Real-time Chat Forum using Strapi, Socket.io, React, and MongoDB
32