68
loading...

dangerouslySetInnerHTML prop, instead React markdown uses a syntax tree to build a virtual DOM for your markdown. dangerouslySetInnerHTML, however react-markdown uses a syntax tree to build the virtual DOM that allows for updating only the changing DOM instead of completely overwriting it. React markdown also supports CommonMark and has extensions to support custom syntax and a list of plugins to extend it’s features. npx create-react-app react-markdown-blog --template typescriptyarn add autoprefixer postcss-cli postcss tailwindcss moment react-markdownpostcss-cli, postcss for transforming styles with JS plugins and help us lint our CSS and tailwindcss for our styling, react-markdown for rendering our markdown component, and moment for parsing our dates, autoprefixer for adding vendor prefixes to our CSS rules. npx tailwind init tailwind.config.js@tailwindcss/typography according to documentation,The @tailwindcss/typography plugin adds a set of customizable prose classes that you can use to add beautiful typographic defaults to any vanilla HTML, like the output you'd get after parsing some Markdown, or content you pull from a CMS.
@tailwindcss.config.js file, add the code belowmodule.exports = {
purge: [],
darkMode: false, // or 'media' or 'class'
theme: {
extend: {
typography: {
DEFAULT: {
css: {
color: "#FFF",
a: {
color: "#4798C5",
"&:hover": {
color: "#2c5282",
},
},
h1: {
color: "#FFF",
},
h2: {
color: "#FFF",
},
h3: {
color: "#FFF",
},
h4: { color: "#FFF" },
em: { color: "#FFF" },
strong: { color: "#FFF" },
blockquote: { color: "#FFF" },
code: { backgroundColor: "#1A1E22", color: "#FFF" },
},
},
},
},
},
variants: {
extend: {},
},
plugins: [require("@tailwindcss/typography")],
};touch postcss.config.jsconst tailwindcss = require('tailwindcss');
module.exports = {
plugins: [
tailwindcss('./tailwind.config.js'),
require('autoprefixer')
],
};styles in src and add 2 files main.css (where generated tailwind styles will enter) and tailwind.css for tailwind imports.tailwind.css, add the codes below@import "tailwindcss/base";
@import "tailwindcss/components";
@import "tailwindcss/utilities";package.json to build tailwind styles when the dev server starts"scripts": {
"start": "npm run watch:css && react-scripts start",
"build": "npm run watch:css && react-scripts build",
"test": "react-scripts test",
"eject": "react-scripts eject",
"watch:css": "postcss src/styles/tailwind.css -o src/styles/main.css"
}main.css to src/index.ts, the file should like this;import React from "react";
import ReactDOM from "react-dom";
import "./styles/main.css";
import "./index.css";
import App from "./App";
ReactDOM.render(
<React.StrictMode>
<App />
</React.StrictMode>,
document.getElementById("root")
);yarn startnpm startsrc folder and inside it, create a new folder named components, this will house all of our project components. Inside your components folder, create a new directory called Navbar, inside this directory, create a new file called Navbar.tsx. react-router-dom for navigation within the app and two react-markdown plugins to extends react-markdown features; we’ll be passing them to the Markdown component.yarn add react-router-dom remark-gfm rehype-rawNavbar with the code block below:import { Link, NavLink } from "react-router-dom";
const Navbar = () => {
return (
<nav className="mt-6 w-10/12 mx-auto flex justify-between items-center">
<Link
style={{ fontStyle: "oblique" }}
className="text-xl tracking-widest logo"
to="/"
>
Markdown Blog
</Link>
<div className="flex-items-center">
<NavLink
activeClassName="border-b-2"
className="mr-6 tracking-wider"
to="/write-article"
exact
>
Write An Article
</NavLink>
<NavLink
activeClassName="border-b-2"
className="tracking-wider"
to="/profile"
exact
>
Profile
</NavLink>
</div>
</nav>
);
};
export default Navbar;Navbar, inside it we created a Navbar component, giving our application a title, we also added links to a Profile page and to a page where user can write an article. react-markdown to render the articles in plain text with styles. Let’s do that in the section below.src folder create a folder called utils, in there create a new file and name it helperFunctions.ts add the code block below.import moment from "moment";
export const truncateText = (text: string, maxNum: number) => {
const textLength = text.length;
return textLength > maxNum ? `${text.slice(0, maxNum)}...` : text;
};
export const formatDate = (date: Date) => {
return moment(date).format("Do MMM YYYY, h:mm:ss a");
};textTruncate that accepts in two arguments; text and maxNum.formatDate basically formats a date object passed to it to the format we want to display in our app. Let’s add more functions to manipulate our posts with below.utils and name it server.ts it will contain the functions to add, delete, fetch and edit a post. Add the code belowimport { IBlogPost } from "../components/BlogCard/BlogCard";
export const savePost = (post: Partial<IBlogPost>) => {
if (!localStorage.getItem("markdown-blog")) {
localStorage.setItem("markdown-blog", JSON.stringify([post]));
} else {
const posts = JSON.parse(localStorage.getItem("markdown-blog") as string);
localStorage.setItem("markdown-blog", JSON.stringify([post, ...posts]));
}
};
export const editPost = (newPostContent: IBlogPost) => {
const posts: IBlogPost[] = JSON.parse(
localStorage.getItem("markdown-blog") as string
);
const postIdx = posts.findIndex((post) => post.id === newPostContent.id);
posts.splice(postIdx, 1, newPostContent);
localStorage.setItem("markdown-blog", JSON.stringify(posts));
};savePost functions takes in an object of type BlogPost which we will create in our BlogCard component. It checks if we have saved any post to our browser’s localStorage from this app with the key markdown-blog, if **none is found we add the post to an array and save it to localStorage. Otherwise we fetch the posts we already have and include it before saving.editPost which we will use to edit posts, it takes in the newContent object which will contain updated post properties, in here we fetch all posts, find the index of the post we want to edit and splice it out and replace it with the newContent at that index in the array as seen in line 34. after splicing we save it back to locatStorage. export const getPosts = () => {
if (!localStorage.getItem("markdown-blog")) {
return [];
} else {
const posts = JSON.parse(localStorage.getItem("markdown-blog") as string);
return posts;
}
};
export const deletePost = (id: string) => {
const posts: IBlogPost[] = JSON.parse(
localStorage.getItem("markdown-blog") as string
);
const newPostList = posts.filter((post) => post.id !== id);
localStorage.setItem("markdown-blog", JSON.stringify(newPostList));
};getPost functions fetches our posts from localStorage and returns them if we have that post in localStorage or an empty array if we don’t.deletePost takes in an id as an argument, fetches the all posts from loalStorage, filters out the one with the id passed to this function and saves the rest to localStorage.type of each prop to be passed to the BlogCard component, next we will create our BlogCard component, let’s do that belowimport { Link } from "react-router-dom";
import ReactMarkdown from "react-markdown";
import gfm from "remark-gfm";
import rehypeRaw from "rehype-raw";
import { formatDate, truncateText } from "../../utils/helperFunctions";
import { deletePost } from "../../utils/server";
export interface IBlogPost {
id: string;
title: string;
url: string;
date: Date;
body: string;
refresh?: () => void;
}
const BlogCard: React.FC<IBlogPost> = ({
id,
title,
body,
url,
date,
refresh,
}) => {
const formattedDate = formatDate(date);
const content = truncateText(body, 250);
const handleDelete = () => {
const yes = window.confirm("Are you sure you want to delete this article?");
yes && deletePost(id);
refresh && refresh();
};BlogCard component, imported React-Markdown and the plugins we installed earlier and also helper functions to delete the post, format the post date and truncate the post text.gfm is a remark plugin that adds support for strikethrough, table, tasklist and URLs rehypeRaw makes react-markdown parse html incase we pass html elements inbetween markdown text. This is dangerous and usually not adviceable as it defeats the purpose of react-markdown not rerendering html to prevent html injection but for the purpose of of learning we will use it.return (
<section
style={{ borderColor: "#bbb" }}
className="border rounded-md p-4 relative"
>
<div className="controls flex absolute right-4 top-3">
<Link
title="Edit this article"
className="block mr-5"
to={`/edit-article/${id}`}
>
<i className="far fa-edit" />
</Link>
<span
role="button"
onClick={handleDelete}
title="Delete this article"
className="block"
>
<i className="fas fa-trash hover:text-red-700" />
</span>
</div>
<h3 className="text-3xl font-bold mb-3">{title}</h3>
<div className="opacity-80">
<ReactMarkdown
remarkPlugins={[gfm]}
rehypePlugins={[rehypeRaw]}
className="prose"
children={content}
/>
<Link
className="text-blue-500 text-sm underline hover:opacity-80"
to={`${url}`}
>
Read more
</Link>
</div>
<p className="mt-4">{formattedDate}</p>
</section>
);
};
export default BlogCard;react-markdown is passed to the children prop and the other plugins added. The className prose is from tailwind, we get it from the tailwindcss/typography plugin we installed and added to our tailwind config to provide support for markdown styles.index.html file in public folder and replace the file’s content with the code block below.<!DOCTYPE html>
<html lang="en">
<head>
<meta charset="utf-8" />
<link rel="icon" href="%PUBLIC_URL%/favicon.ico" />
<meta name="viewport" content="width=device-width, initial-scale=1" />
<meta name="theme-color" content="#000000" />
<meta
name="Markdown Blog"
content="A markdown blog built with React, TS and react-markdown"
/>
<link rel="apple-touch-icon" href="%PUBLIC_URL%/logo192.png" />
<link rel="manifest" href="%PUBLIC_URL%/manifest.json" />
<!-- Fontawesome CDN link here -->
<link
rel="stylesheet"
href="https://cdnjs.cloudflare.com/ajax/libs/font-awesome/5.15.3/css/all.min.css"
integrity="sha512-iBBXm8fW90+nuLcSKlbmrPcLa0OT92xO1BIsZ+ywDWZCvqsWgccV3gFoRBv0z+8dLJgyAHIhR35VZc2oM/gI1w=="
crossorigin="anonymous"
referrerpolicy="no-referrer" />
<!-- End of Fontawesome CDN link here -->
<title>Markdown blog</title>
</head>
<body>
<noscript>You need to enable JavaScript to run this app.</noscript>
<div id="root"></div>
</body>
</html>Home page will contain all the posts in the app, we will also add a ‘no data’ state for when there are no posts to show. To do this, first create a new folder called pages in our project src file, and inside it create another directory called home, in here create a new file called index.tsx.// src/pages/home/index.tsx
import { useEffect, useState } from "react";
import { Link } from "react-router-dom";
import BlogCard, { IBlogPost } from "../../components/BlogCard/BlogCard";
import { getPosts } from "../../utils/server";
const Homepage = () => {
const [articles, setArticles] = useState<IBlogPost[]>([]);
const [refresh, setRefresh] = useState(false);
useEffect(() => {
const posts = getPosts();
setArticles(posts);
}, [refresh]);useEffect and useState from react, next we imported Link from react-router this will help us navigate to write an article page. We also imported our BlogCard component alongside IBlogPost interface, to render out each post from the array of posts. Finally, we imported the getPosts object from our utils directory.useEffect hook, we are fetching all posts we have saved to localStorage and adding the array of posts to our component state (useState), we also created a state which will enable us to make the useEffect refetch posts whenever a post is deleted. Home page using the code block below:return (
<div className="mt-8 mb-20 w-3/5 mx-auto">
<h1 className="mb-6 text-xl">Welcome back, Fortune</h1>
<section className="articles mt-4">
{articles?.length ? (
articles.map((article) => (
<article key={article?.id} className="my-4">
<BlogCard
title={article?.title}
id={article?.id}
url={`/article/${article?.id}`}
body={article?.body}
date={article?.date}
refresh={() => setRefresh(!refresh)}
/>
</article>
))
) : (
<div className="mt-20 flex flex-col items-center justify-center">
<h2 className="text-2xl">No article right now.</h2>
<Link className="block text-blue-500 underline text-sm mt-6" to="/write-article">Add article</Link>
</div>
)}
</section>
</div>
);
};
export default Homepage;Home page with styles using tailwind classes, we mapped through the array of posts and rendered them with our BlogCard component and also added a no data state incase there are posts to render.pages directory, create a new folder called post and inside it create a new file named index.tsx, add the code block below:import { useParams } from "react-router-dom";
import ReactMarkdown from "react-markdown";
import gfm from "remark-gfm";
import rehypeRaw from "rehype-raw";
import { formatDate } from "../../utils/helperFunctions";
import { getPosts } from "../../utils/server";
import { IBlogPost } from "../../components/BlogCard/BlogCard";id param from our url with useParams, rendering our post body with ReactMarkdown. let’s do that in the code block belowconst Blog = () => {
const { id } = useParams<{ id: string }>();
const post = getPosts().find((post: IBlogPost) => post.id === id);Blog component and added retrieving the post id from the url to get the post from all posts (line 4). Next, we will render our post content belowreturn (
<div className="w-4/5 mx-auto mt-16 mb-24">
{post ? (
<>
<header
style={{ background: "#1C313A" }}
className="rounded-md mb-10 max-w-9/12 py-12 px-20"
>
<h1 className="text-2xl text-center font-semibold uppercase">
{post?.title}
</h1>
<p className="mt-4 text-sm text-center">{formatDate(post?.date as Date)}</p>
</header>
<ReactMarkdown
className="prose"
remarkPlugins={[gfm]}
rehypePlugins={[rehypeRaw]}
children={post?.body as string}
/>
</>
) : (
<h3>Post not found!</h3>
)}
</div>
);
};
export default Blog;
write inside your pages folder and inside it create a index.tsx file and add the code snippet belowimport { useEffect } from "react";
import { useState } from "react";
import { useHistory, useParams } from "react-router";
import { editPost, getPosts, savePost } from "../../utils/server";
import { IBlogPost } from "../../components/BlogCard/BlogCard";
const WriteAnArticle = () => {
const { id } = useParams<{ id: string }>();
const history = useHistory();
const [title, setTitle] = useState("");
const [body, setBody] = useState("");
useEffect(() => {
if (id) {
const post = getPosts().find((post: IBlogPost) => post.id === id);
post && setTitle(post.title);
post && setBody(post.body);
}
}, [id]);useParams from the url of the page. In the code block above, we initializing a history variable from useHistory with which we will navigate the user to the home page after editing or adding new posts. We also have state to hold our post title and body from inputs. submitHandler function to enable the user to submit a post or save the edits performed.const submitHandler = (e: { preventDefault: () => void }) => {
e.preventDefault();
const post = getPosts().find((post: IBlogPost) => post.id === id);
if (!id) {
const post = {
title,
body,
date: new Date(),
id: new Date().getTime().toString(),
};
savePost(post);
} else if (id && post) {
const updatedPost = {
...post,
title,
body,
};
editPost(updatedPost);
}
history.push("/");
};savePost helper function, using the title and body from the form and the id and date as the current timestamp of that moment. else we update the post title, body.return (
<div className="w-3/5 mx-auto mt-12 mb-28">
<h3 className="text-3xl text-center capitalize mb-10 tracking-widest">
Write a post for your blog from here
</h3>
<form onSubmit={submitHandler} className="w-10/12 mx-auto">
<input
className="w-full px-4 mb-6 block rounded-md"
type="text"
value={title}
onChange={(e) => setTitle(e.target.value)}
placeholder="Enter article title"
/>
<textarea
className="w-full px-4 pt-4 block rounded-md"
name="post-body"
id="post-body"
value={body}
onChange={(e) => setBody(e.target.value)}
placeholder="Enter article body. you can use markdown syntax!"
/>
<button
title={!body || !title ? "Fill form completely" : "Submit form"}
disabled={!body || !title}
className="block rounded mt-8"
type="submit"
>
Submit Post
</button>
</form>
</div>
);
};
export default WriteAnArticle;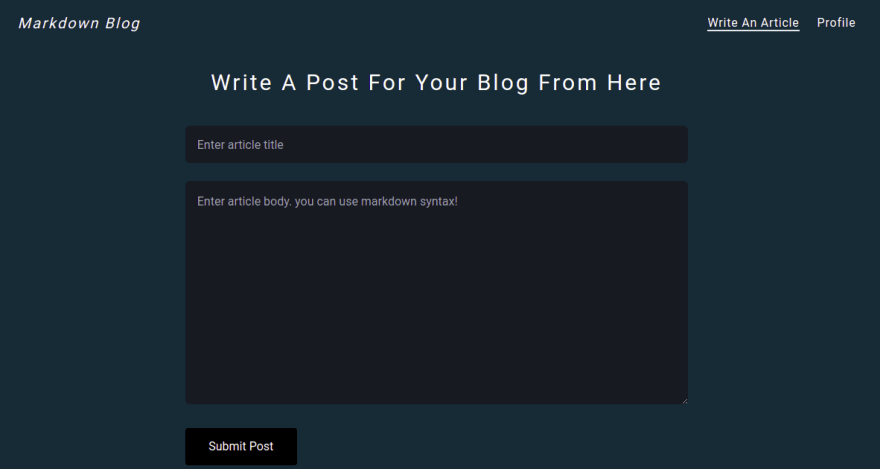
App.tsx file in our src folder and add the code snippet belowimport { BrowserRouter, Switch, Route } from "react-router-dom";
import Navbar from "./components/Navbar/Navbar";
import Post from "./pages/post";
import Homepage from "./pages/home";
import WriteAnArticle from "./pages/write";
import Profile from "./pages/profile";
const App = () => {
return (
<>
<BrowserRouter>
<Navbar />
<Switch>
<Route path="/" exact component={Homepage} />
<Route path="/article/:id" exact component={Post} />
<Route path="/write-article" exact component={WriteAnArticle} />
<Route path="/edit-article/:id" exact component={WriteAnArticle} />
</Switch>
</BrowserRouter>
</>
);
};
export default App;/ will navigate to the homepage/article/:id will navigate to a Post page where we view a post completely. It’s a dynamic route and we will get the id from our url in the Post page./write-article will navigate to write article page/edit-article/:id will take us to edit post page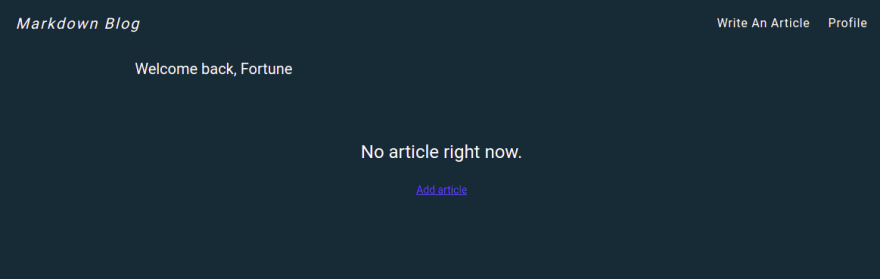
remark-gfm to extend react-markdown features and also how to make markdown styles display correcty in apps using tailwind.68