
40
Adding Typescript to your Existing Rails App
This article was originally written by Ayooluwa Isaiah on the Honeybadger Developer Blog.
TypeScript is a strongly typed superset of JavaScript developed and maintained by Microsoft. Strong typing helps you write cleaner code and detect and fix potential errors much earlier in the development process.
Because TypeScript is a superset of JavaScript, any existing JavaScript program is also a valid TypeScript program. This means TypeScript can interface seamlessly with any existing JavaScript code. It also means migrating from JavaScript to TypeScript can be done incrementally.
Although TypeScript and JavaScript can work well together, there are a number of important factors to consider when planning a migration. This article will give you a firm footing, so you can decide if a migration is the right fit for your project.
The basic thing to keep in mind when migrating from JavaScript to TypeScript is that the latter is written in files with the
.ts extension instead of .js. However, you can allow JavaScript files to be processed through the TypeScript compiler to avoid having to rewrite all your code in TypeScript.Before you go further, make sure your text editor or IDE is configured to work with TypeScript. A key advantage of using TypeScript is that errors can be reported within your editor before compiling the code along with intelligent code completion. Visual Studio Code has built-in support for the TypeScript language, so if you use this editor, you don't need to do anything. Otherwise, it should be easy to find a third-party plugin that will add TypeScript support to your editor.
Once you've set up your editor, the next step is adding the TypeScript compiler to your project. You can do so via
npm:$ npm install typescript --save-devThe command above adds the TypeScript compiler to your project, which can be accessed using the
npx tsc command. You can also install the compiler globally to make the tsc command accessible from anywhere, but a local installation should be preferred so that builds are reproducible across different machines.Once you have TypeScript installed, you need to create a configuration file for your project. TypeScript uses a
tsconfig.json file to manage the options for your project, such as the files to include and the types of checking you want to perform. Here's a minimal configuration that you can start with:{
"compilerOptions": {
"target": "es5",
"outDir": "dist"
"allowJs": true,
},
"include": ["./src/**/*"]
}The most common options to configure in the JSON file are the
compilerOptions and include properties. The latter is used to specify an array of filenames or patterns to include in the program relative to the tsconfig.json file. It supports wildcard characters to form glob patterns, which may or may not include a file extension. If the file extension is omitted (as above), only supported extensions are included: .ts, .tsx, .d.ts by default, with .js and .jsx if compilerOptions.allowJs is set to true.The
compilerOptions property, however, allows you to determine how loose or strict the compiler should be when processing the build. This is where the bulk of your configuration will be. Here's what each option specified above does:target property above allows you to transform newer JavaScript syntax to an older version, such as ECMAScript 5.allowJs causes the TypeScript compiler to accept JavaScript files (including imports). This is a way to incrementally convert to TypeScript by allowing .ts and .tsx files to live alongside existing JavaScript files.outDir causes the build to be outputted to the dist folder.At this point, you are able to run the compiler in watch mode using
npx tsc --watch, and it will compile the source files and emit the output to the dist folder.There are many ways to integrate TypeScript with an existing Webpack configuration. If you use the babel-loader package to transpile JavaScript files, you can add the @babel/preset-typescript preset to generate JavaScript files and the Fork TS Checker Webpack Plugin package to run the TypeScript type checker so that the build fails if there are type errors.
First, install both packages with
npm:$ npm install fork-ts-checker-webpack-plugin @babel/preset-typescript --save-devThen, update your Webpack configuration file to roughly mirror what is shown below:
const path = require("path");
const ForkTsCheckerWebpackPlugin = require("fork-ts-checker-webpack-plugin");

const typescript = {
  test: /\.(ts|js)$/,
  use: [
    {
      loader: "babel-loader",
      options: {
        presets: ["@babel/preset-typescript"],
      },
    },
  ],
};

module.exports = {
  entry: {
    main: "./src/main.ts",
  },

  resolve: {
    extensions: [".ts", ".js"],
  },

  module: {
    rules: [typescript],
  },

  output: {
    path: path.resolve(__dirname, "dist"),
    filename: "[name].bundle.js",
  },

  plugins: [new ForkTsCheckerWebpackPlugin()],
};
At this point, Webpack will take care of transpiling and type checking the files and will cause the build to fail if there are any errors.

The following instructions assume that you already have a Rails 6 project using Webpacker 5.1 or later. The first thing you need to do is add TypeScript support to your project using the following command:
$ bundle exec rails webpacker:install:typescriptThis ensures that your TypeScript code is transpiled using Babel (through the
@babel/preset-typescript package). You need to install the Fork TS Checker Webpack Plugin package manually if you want to enable type checking as part of the Webpack build process.$ yarn add --dev fork-ts-checker-webpack-pluginThen, update your
config/webpack/development.js file as shown below:const ForkTsCheckerWebpackPlugin = require("fork-ts-checker-webpack-plugin");
const path = require("path");
environment.plugins.append(
"ForkTsCheckerWebpackPlugin",
new ForkTsCheckerWebpackPlugin({
typescript: {
configFile: path.resolve(__dirname, "../../tsconfig.json"),
},
async: false,
})
);There are essentially two main ways to transition an existing project to TypeScript. The first approach involves rewriting the entire project in TypeScript. This is not as hard as it sounds since it only involves changing the file extension to
.ts or .tsx and fixing any type errors that the compiler emits. The main problem with this method is that you're likely to get hundreds or even thousands of errors (depending on the size of the project and strictness of your TypeScript configuration), and you'll have to put the development of new features on hold until you complete the migration, which may take an inordinate amount of time.A second more practical approach is to support a mix of JavaScript and TypeScript files in the codebase and incrementally switch files to TypeScript. Thanks to the flexibility of the TypeScript compiler (through the
allowJs option), this process should be a breeze. All you need to do is add TypeScript to your build process and set up a basic configuration, such as the one presented earlier in this article. Afterwards, you need to ensure that any new features are implemented in TypeScript while existing code is moved over in an incremental manner.Once you've defined your dependency graph through the
include or files property in your tsconfig.json file, the compiler will start type checking any TypeScript files in your codebase. You can also enable type checking for JavaScript files through the checkJs compiler option. This allows you to add type annotations to your JavaScript files using JSDoc so you can start to get a feel using types in your application but without fully committing to TypeScript.When you're ready to commit, you'll need to rename the
.js or .jsx file to .ts or .tsx, respectively, and start using TypeScript syntax to define the types instead of JSDoc. For example, let's say that you have an add.js file with the following code:// add.js
function add(x, y) {
return x + y;
}
export default add;At this point, everything is implicitly typed as
any. This means that TypeScript won't perform any type checking for these values. You can opt into type checking the plain JavaScript file using JSDoc comments as shown below:// add.js
/**
* @param {number} x
* @param {number} y
* @returns {number}
*/
function add(x, y) {
return x + y;
}
export default add;The TypeScript compiler will now report errors if
add is used incorrectly, such as when a string is passed as an argument instead of a number.
At this point, you're probably ready to move the file to TypeScript. Just change the file extension to
.ts and translate the JSDoc comments to the TypeScript syntax.// add.ts
function add(x: number, y: number): number {
return x + y;
}
export default add;With this strategy in place, you're able to gradually migrate to TypeScript without much friction. The main caveat with this approach is that is possible for a large amount of code to remain untyped because of the lack of incentive to do so.
Migrating to TypeScript in the manner described in the previous section works great for your application code, but it's not uncommon to depend on some third-party libraries that may require some additional configuration so that the benefits of working with TypeScript are retained.
Libraries written in TypeScript should work out of the box with no fiddling required. When using a compatible editor, you'll be able to see everything the library exposes, as well as the types of function parameters and return values. The compiler will ensure that you're using the right types and will fail the build if you don't.

However, for packages written in JavaScript (the majority), TypeScript cannot automatically determine what the types are, so it implicitly assigns the
any type to the entire library. This is problematic because you don't get any type safety with the any type, so even if you use a method that does not exist, the compiler wont complain.import * as lodash from "lodash";
// lodash.sneeze() is not a function
lodash.sneeze();If you have the noImplicitAny compiler flag turned on (recommended), the build will fail with an error similar to the one shown below. It essentially means that TypeScript does not know what types are valid for the Lodash library.

There are two main ways to solve this problem, as you can see from the error message above. Let's talk about the declaration files method first. It involves creating a
.d.ts file in which you describe the type definitions for another file or package. For example, you can create a main.d.ts file in your source folder with the following contents:declare module "lodash" {
function sneeze(): string;
}This file states that the lodash module exposes a
sneeze function that returns a string. If you run the build again, it compiles because TypeScript trusts that the type definitions in the declaration file is correct, and it has no way of checking if they are actually accurate. Of course, the code will throw a runtime error since the sneeze method does not exist.If you try to use some other method from the library, the build will fail again until its type definition is added to the declaration file. This is one of the ways to add types to third-party libraries that lack them, making it possible for the compiler to provide stronger guarantees about the code.
The second way to add types to plain JavaScript packages is through the DefinitelyTyped package, which is a community-sourced repository of type definition files. If you're trying to use a popular JavaScript library in your project, there is a good chance the type definitions for the library have already been contributed to the repository. This means you can easily bring them into your project through
npm under the @types scope. For example, the types for the lodash package can be added through the following command:$ npm install --save @types/lodashLike any other npm package, type declaration packages are installed in the node_modules folder. Within it, you will find a
@types folder which contains all typings. After running the command above, you will find a lodash folder inside @types which contains several files with the type information for all the lodash methods. The typescript compiler understands this convention so it will recognize the types automatically without your intervention.
At this point, you can remove the module definition in
main.d.ts and build the project once again. As you can see from the image above, it correctly reports that sneeze does not exist. If we use a correct method like ceil with the correct arguments, it compiles just fine. Also, you'll get that sweet autocompletion goodness with type annotations in your editor.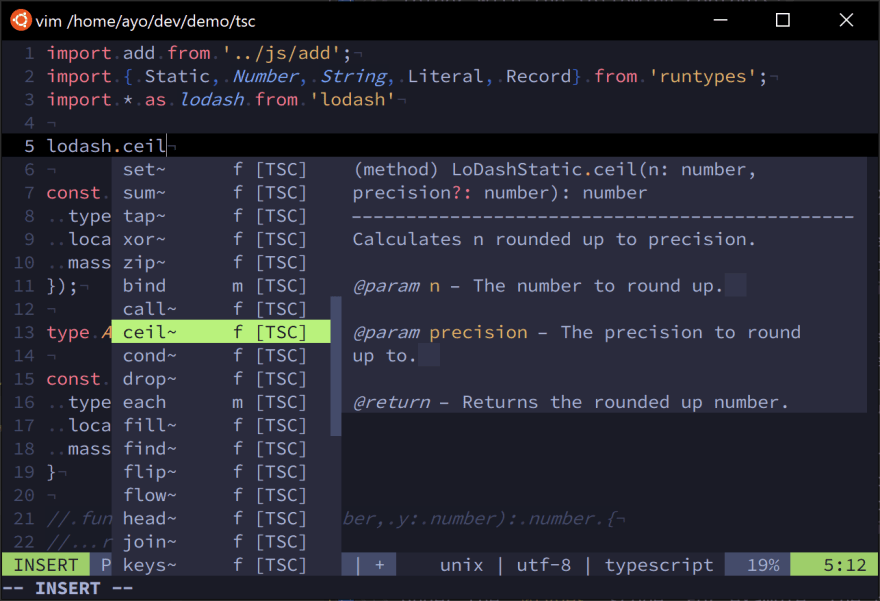
Note that type definitions in the DefinitelyTyped packaged are community-sourced and are not provided by the library authors in most cases. This means that from time to time, you might encounter missing or incorrect definitions. Let's talk about what to do if this situation arises.
The TypeScript complier allows the merging of two or more types into one definition provided they have the same name. This merged definition retains the features of both of the original declarations. Here's an example that should make this concept easier to understand.
interface Person {
  name: string;
}

interface Person {
  name: boolean;
  age: number;
}

const jack: Person = {
  name: "Jack",
  age: 20,
};

console.log(jack);
Here, both
Person declarations are merged into one definition, so the jack object contains the all the properties from both interfaces. One thing to note here is that subsequent property declarations of the same name must have the same type.interface Person {
name: string;
}
interface Person {
name: string; // works fine
age: number;
}
interface Person {
name: boolean; // throws an error
age: number;
}This might not look very useful on its own, but it will come in handy if you want to extend a type that is not defined by you. For example, let's say the
sneeze method really exists in lodash but is currently missing in the @types/lodash package. You can add it through declaration merging in a .d.ts file:// main.d.ts
import * as _ from "lodash";
declare module "lodash" {
interface LoDashStatic {
sneeze(): string;
}
}To extend a module, you need to import it and use
declare module to get inside the module. If you look at the @types/lodash package, you'll notice that all the methods are defined on the LoDashStatic interface. To add a new method, all you need to do declare the interface again in the lodash module and add the type definition for the function. At this point, if you try to use the sneeze method in your code, it will compile along with all the other methods that exist on the original LoDashStatic interface.This way, you can quickly fix a missing type error without waiting for the package to be updated. Once the relevant
@types package is updated and published, you can remove the custom definition in the .d.ts file and update the package through npm, and everything else should keep working.Using JavaScript and TypeScript together in the same codebase may take some getting used to, but the knowledge of type definitions and declaration merging should make things a lot easier. As soon as you've converted your entire codebase to TypeScript, you should ramp up the strictness of the compiler for greater safety. Also, check out libraries such as runtypes and io-ts for runtime validation of your static types.
Thanks for reading, and happy coding!
Honeybadger has your back when it counts. We're the only error tracker that combines exception monitoring, uptime monitoring, and cron monitoring into a single, simple to use platform.
Our mission: to tame production and make you a better, more productive developer. Learn more
40