
62
Creating a Smart Mega Menu with Vue.js
As your website grows and its hierarchy of pages becomes more complex, you may realize that simple horizontal or vertical menus are not optimal for effective user navigation. Similarly, there is the need for a larger space if you wish to improve the user experience by introducing visual cues such as icons and images. A mega menu is an example of a design pattern that could fulfill such demands and helps increase the conversion rate.
Research conducted by the well-known Nielsen Norman Group confirms the effectiveness of the mega menu design pattern. Their analysis of case studies on various high-traffic websites attributed these characteristics to an effective mega menu implementation:
Mega menus are suitable for large viewports like tablets and desktops, but a few adjustments could make this design responsive for mobile users as well.
The technical implementation of a basic mega menu is relatively easy and can be done just with CSS. However, I will be using Vue.js as the base for this example so we can add more features and make the menu user-friendly.
Let’s create a simple mega menu with a vertical menu on the left for the main categories and a grid layout on the right to display sub-categories along with icons.
Creating a mockup is a great way to kick off a new project. It lets you have the freedom to unleash your creativity without having to worry about technical details — remember, the devil is in the details.
Here is a Figma mockup to illustrate what we’re creating:

We can now proceed with the actual implementation of the mega menu by creating a new Vue.js project. You can use Vue CLI to create a new project on your computer, but for simplicity’s sake, I’m opting for an online development environment called CodeSandbox. It comes with a Vue.js template that you could fork to jump-start your project.
Copy the SVG icons you’d like to use to the
assets folder. If you used an icon library in Figma, you can simply click on each icon and export it to an SVG file.
We will be creating two Vue components:
NavBar for the top navigation bar and MegaMenu which is the actual mega menu implementation.The navigation bar’s
template section consists of three main divs containing the logo, main menu items, and primary icons. These divs are wrapped in a parent container that uses a flex display with a justify-content of space-between to evenly spread out the three sections. To simplify our code, we can take advantage of Vue.js’s v-for directive to automatically render the menu items. The :hover CSS selector is used to highlight the item that the user is interacting with.We need a way to know exactly which menu item is being hovered. This is required for showing the mega menu for a particular item only or to show different mega menus for different items. We can listen to the
mouseover event by binding it to a component method called mouseEvent. The mouseEvent method is triggered by elements of classes menu-container and item. That is because we need to know when a menu item is being hovered and when the mouse has moved elsewhere on the navigation bar.We also need to create and import the
MegaMenu component. The v-if directive is bound to a reactive data variable named showMegaMenu which is activated when the user hovers the Products menu item.Note: Please refer to the GitHub repository for the complete code which includes the
style section with the CSS.<template>
<div>
<div class="menu-container" @mouseover="mouseEvent($event, 'wrapper')">
<div class="logo">
<a href="https://tomaraei.com">
<img src="../assets/logo.svg" />
</a>
</div>
<div class="items">
<a
v-for="item in menuItems"
@mouseover="mouseEvent($event, 'item', item.key)"
:key="item.key"
class="item"
>
{{ item.label }}
</a>
</div>
<div class="icons">
<div class="icon">
<img src="../assets/magnifier.svg" />
</div>
<div class="icon">
<img src="../assets/users.svg" />
</div>
<div class="icon menu">
<img src="../assets/menu.svg" />
</div>
</div>
</div>
<MegaMenu v-if="showMegaMenu" />
<div class="viewport-warning">
<div class="message">
This example was made for viewport sizes 920px and above :)
</div>
</div>
</div>
</template>In the
script section below you can find the implementation of the mouseEvent method. Note that we are supplying a source argument to this method to help us differentiate whether the call is originating from the parent wrapper or an actual menu item. This is necessary to prevent a phenomenon known as event bubbling, in which two events are triggered when a mouse event is set for two elements in a parent-child structure. Calling the stopPropagation method prevents cascading of further events.The
NavBar component is responsible for showing and hiding the MegaMenu component. This is easy to handle and it is taken care of by the mouseEvent method to toggle the showMegaMenu data variable. However, we still need to know when the user has moved the mouse outside the mega menu to hide it as well. To achieve this, we need a way to send a signal from one component to another. This is where the idea of an event bus comes into the picture. Vue has a special feature for emitting custom events. The only prerequisite for that is a common Vue instance that both components can refer to. Create a JavaScript file named eventBus.js and import it in the script section of both components.// eventBus.js
import Vue from "vue";
const eventBus = new Vue();
export default eventBus;For a component to receive events, it must explicitly listen to a particular event name. This can be done by calling the
$on and $off custom event methods in the mounted and beforeDestroy lifecycle hooks respectively. In our example, a hide-mega-menu event will set the showMegaMenu to false when triggered.<script>
import MegaMenu from "./MegaMenu";
import eventBus from "../eventBus";
export default {
name: "NavBar",
components: {
MegaMenu,
},
data() {
return {
menuItems: [
{ key: "products", label: "Products" },
{ key: "solutions", label: "Solutions" },
{ key: "pricing", label: "Pricing" },
{ key: "case-studies", label: "Case Studies" },
{ key: "blog", label: "Blog" },
{ key: "contact", label: "Contact" },
],
showMegaMenu: false,
};
},
methods: {
mouseEvent(event, source, key = "") {
if (source === "item") {
event.stopPropagation();
}
this.showMegaMenu = key === "products";
},
},
mounted() {
eventBus.$on("hide-mega-menu", () => {
this.showMegaMenu = false;
});
},
beforeDestroy() {
eventBus.$off("hide-mega-menu");
},
};
</script>We have now laid the foundation for this project. Hovering the Products menu item should toggle the mega menu component. The
template section of the MegaMenu component is made up of two side-by-side divs representing a vertical list of main categories on the left and a square grid of sub-categories with images on the right. We’re using a grid display to achieve a ratio of 1 to 3 for these two divs. There is a handy online tool for generating CSS grids that comes with an intuitive interface and visualization to quickly configure your desired layout.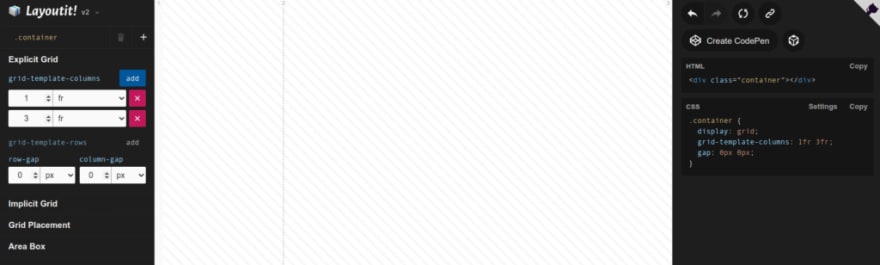
The main and sub-category items are generated using the
v-if directive for simplicity, but in a real-life project this would be connected to an API to retrieve the actual product categories. If you’re going that route, I recommend making your API calls using Vue’s state management pattern known as Vuex.Similar to the navigation bar component, we are also using the
mouseover event to identify the active main category. In this case, however, we’re using Vue’s dynamic class binding (:class) to toggle an active class on the main category item. This couldn’t be accomplished using CSS’s :hover selector, as we wouldn’t be able to keep the main category highlighted after the user has moved the mouse to select a sub-category. Sub-categories themselves are still using the :hover CSS selector.<template>
<div @mouseleave="hideMegaMenu()" class="megamenu-wrapper">
<div class="main-categories">
<div
v-for="index in 8"
:key="index"
@mouseover="activeMainCategory = index"
:class="['main-category', isActive(index) ? 'active' : '']"
>
<div class="icon"><img src="../assets/main-category.svg" /></div>
<div class="label">Main category {{ index }}</div>
</div>
</div>
<div class="sub-categories">
<div v-for="index in 15" :key="index" class="sub-category">
<div class="icon"><img src="../assets/sub-category.svg" /></div>
<div class="label">
Sub-category {{ activeMainCategory }}/{{ index }}
</div>
</div>
</div>
</div>
</template>The
script section is rather simple. It imports the eventBus and emits the hide-mega-menu event whenever the mouse leaves the mega menu, so that the NavBarcomponent could hide it. The active main category is determined by storing its index number in a data variable called activeMainCategory.<script>
import eventBus from "../eventBus";
export default {
name: "MegaMenu",
data() {
return {
activeMainCategory: 1,
};
},
methods: {
hideMegaMenu() {
eventBus.$emit("hide-mega-menu");
},
isActive(key) {
return this.activeMainCategory === key;
},
},
};
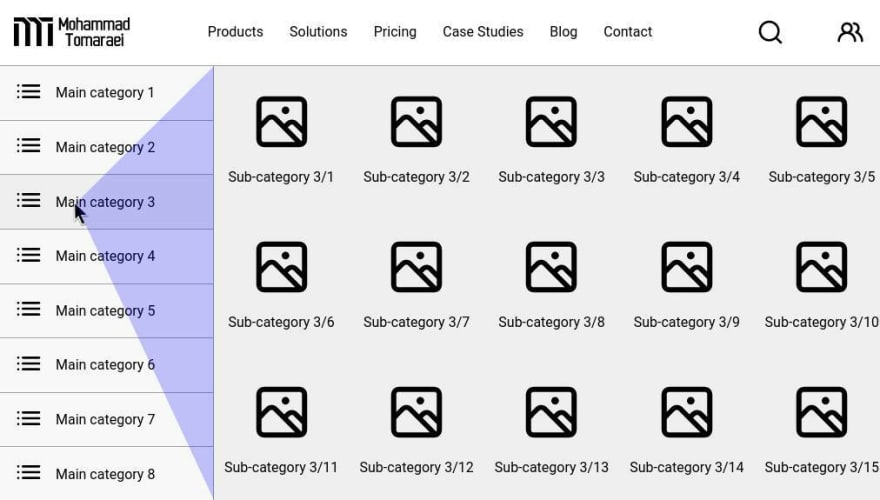
</script>We now have a functioning mega menu that should work just fine.
Here’s a preview of how it looks like:
A pleasant user experience (UX) requires the developers to pay attention to little details. These tiny improvements can collectively make a design smarter. One such example is when the user hovers on a main category and then navigates to the right to choose a sub-category. Depending on where the cursor is, the user may accidentally select another main category, which could be quite annoying. This is what I mean:

Even though it seems like a minor thing, there have been many articles written on this exact issue! For instance, Ben Kamens published a blog post analyzing how Amazon avoided this problem by using trigonometry. An imaginary triangle is constructed with its vertices placed at the cursor’s location and the upper and lower boundaries of the border between main categories and sub-categories. The idea is to avoid selecting another main category as long as the cursor is within this triangle. Smashing Magazine also has a detailed post on this subject that’s worth reading.
We’re going to do something similar, but a bit fancier using angles. Do you recall those days in high school or college thinking when will you ever use an arctangent for a meaningful purpose? Now is the time 🙂
The algorithm stores the last known x and y coordinates of the mouse relative to the page. By comparing those coordinates to the new location of the cursor, we can construct a virtual line and calculate the angle it makes with the positive x-axis. This is precisely what the
atan2 function does, albeit in radians. We can then compare this angle to a constant value to determine whether the cursor is moving vertically or horizontally, thus preventing unwanted category selections.The figure below is a visual explanation of this idea:

Now, let’s implement this algorithm in the
MegaMenu component. First, we need to listen to mousemove events in order to get the latest position of the cursor. Create a new method named mouseDirection and bind it to the mousemove event in the mounted and beforeDestroy lifecycle hooks.<script>
import eventBus from "../eventBus";
export default {
name: "MegaMenu",
data() {
return {
activeMainCategory: 1,
};
},
methods: {
hideMegaMenu() {
eventBus.$emit("hide-mega-menu");
},
isActive(key) {
return this.activeMainCategory === key;
},
mouseDirection(e) {
console.log(e.pageX, e.pageY);
},
},
mounted() {
window.addEventListener("mousemove", this.mouseDirection);
},
beforeDestroy() {
window.removeEventListener("mousemove", this.mouseDirection);
},
};
</script>You should now see the cursor’s x and y coordinates in the console:

Create the following data variables:
lastX and lastY to hold the last known cursor coordinates, as well as direction to indicate whether the mouse is travelling vertically or horizontally. We also need to create a method named changeMainCategory which only changes activeMainCategory when direction is vertical. This method will replace the previous binding of mouseover for each main category.Add the formula for calculating angle
theta to the mouseDirection method and set direction to vertical if theta is larger than 75 degrees. Otherwise, it should be horizontal. Update values of lastX and lastY at the end of the method.<script>
import eventBus from "../eventBus";
export default {
name: "MegaMenu",
data() {
return {
activeMainCategory: 1,
lastX: 0,
lastY: 0,
direction: "",
};
},
methods: {
hideMegaMenu() {
eventBus.$emit("hide-mega-menu");
},
isActive(key) {
return this.activeMainCategory === key;
},
mouseDirection(e) {
let theta = Math.abs(
(180 * Math.atan2(e.pageY - this.lastY, e.pageX - this.lastX)) / Math.PI
);
this.direction = theta > 75 ? "vertical" : "horizontal";
this.lastX = e.pageX;
this.lastY = e.pageY;
},
changeMainCategory(index) {
console.log(this.direction);
if (this.direction === "vertical") {
this.activeMainCategory = index;
}
},
},
mounted() {
window.addEventListener("mousemove", this.mouseDirection);
},
beforeDestroy() {
window.removeEventListener("mousemove", this.mouseDirection);
},
};
</script>Now it’s much easier to navigate toward sub-categories:

Although everything works as expected, there’s one last improvement to make. The
mousemove event is very sensitive and captures every little cursor movement. Moreover, it is unlikely for the user to move in a perfect vertical direction,. Therefore, calculating angle theta too often would result in some inaccuracies.If you look carefully, you could see the mouse jumping over some main categories, as indicated by the console:

This is a good opportunity to learn about the concepts of throttling and debouncing. Throttling is done by preventing the execution of an action if it happens faster than a given period of time. Debouncing is a similar idea, but it delays the execution of an action rather than preventing it. A common use case of debouncing is to delay sending autocomplete API requests when the user types something in a search box.
In our case, we need to slow down the calculation of angle
theta, so the solution is to throttle the mouseDirection method. Create a new data variable named throttle and set its default value to false. Add an if-statement to mouseDirection to only proceed if this value is false. Once through, we should set throttle to true and add a setTimeout to disable throttling after a fixed amount of time, such as 50 milliseconds.<script>
import eventBus from "../eventBus";
export default {
name: "MegaMenu",
data() {
return {
activeMainCategory: 1,
lastX: 0,
lastY: 0,
direction: "",
throttle: false,
};
},
methods: {
hideMegaMenu() {
eventBus.$emit("hide-mega-menu");
},
isActive(key) {
return this.activeMainCategory === key;
},
mouseDirection(e) {
if (!this.throttle) {
this.throttle = true;
let theta = Math.abs(
(180 * Math.atan2(e.pageY - this.lastY, e.pageX - this.lastX)) /
Math.PI
);
this.direction = theta > 75 ? "vertical" : "horizontal";
this.lastX = e.pageX;
this.lastY = e.pageY;
setTimeout(() => {
this.throttle = false;
}, 50);
}
},
changeMainCategory(index) {
if (this.direction === "vertical") {
this.activeMainCategory = index;
}
},
},
mounted() {
window.addEventListener("mousemove", this.mouseDirection);
},
beforeDestroy() {
window.removeEventListener("mousemove", this.mouseDirection);
},
};
</script>That’s all! I hope that you learned something new 🙂
GitHub Repository: https://github.com/themreza/mega-menu
62