
51
AWS CodeDeploy CI/CD
TECH STACK: AWS | CodeCommit | CodeArtifact | CodeBuild | CodeDeploy | CodePipeline | GitHub| EC2 | S3 | IAM.
Setting up CI/CD can be a tedious task and takes a lot of time to create a pipeline that runs perfectly, handle every edge case, and compiling it all together. We set up our codebase on platforms like GitHub, GitLab, JIRA, etc., and platforms like Jenkins to set up CI/CD. Breaking up the whole pipeline into multiple platforms is not an easy task to manage.
AWS provides the complete solution for the creation and managing of the complete CICD pipeline in AWS itself. AWS provides CodePipe to create pipelines, CodeComit to manage code base, CodeBuild for building the code, and CodeDeploy for deploying the code into the various environments. Even it supports Jenkins if you want to use that. It supported server or serverless type of deployment. A lot of possibilities and a lot of learning.
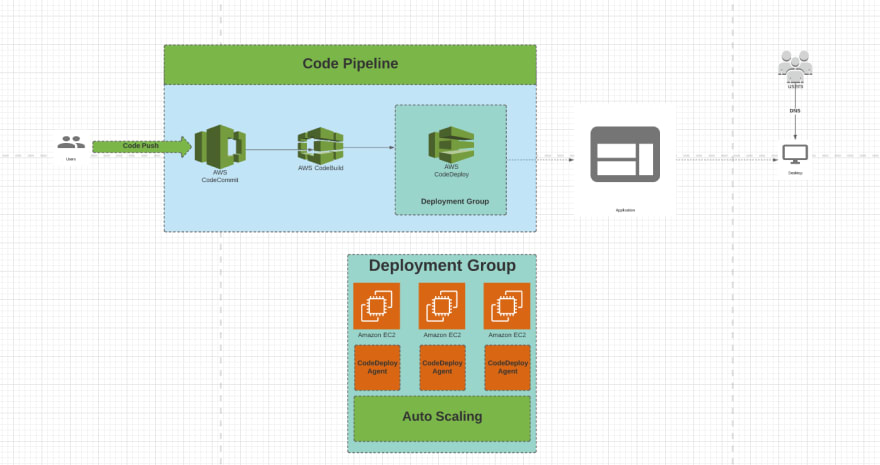
ARCHITECTURE DIAGRAM:
APPROACH
Create a codebase in CodeComit and create a complete CICD pipeline that will read the source code with each push activity, build the application and finally deploy the application. The entire process should be automatic.
Prerequisite:
Have an AWS account with proper access.
And, most important this blog needs your time. Before implementing it, I request you to read it completely.
PS:
For the experiment, I am using a convention of using the name “BLOG-CICD”.
Don’t forget to delete all the resources once you are done with the experiment otherwise, it will incur charges.
Steps required for creating the pipeline
Step 1: Add credentials.
a: Generate credentials.
b: Add permission.
Step 2: Create an EC2 machine for the deployment.
Step 3: Create IAM Role for CodeDeploy.
Step 4: Create Repository.
Step 5: Add application file to Repository.
Step 6: Configure CodeBuild.
Step 7: Configure CodeDeploy.
Step 8: Create CodePipeline.
Step 9: Troubleshooting
Step 10: Open port for the application.
Now, it's time to start hands-on. Happy Clouding!!!
First, we need to create CodeCommit credentials so that users can access the repository and also, need to permit the same.
Generate code commit credentials for the IAM user:
Go to the IAM console.
Click on the user name to whom you want to give permissions.
Click on Security Credentials
Scroll down and go to HTTPS Git credentials for AWS CodeCommit section.
Click on Generate Credentials and it will create code commit credentials for that IAM user.
So, for now, we have created CodeCommit credentials for the IAM user. Next, we need to attach Code commit policy to that user.
Go to the IAM console.
Click on the user for whom you created code commit credentials earlier.
Under the Permissions tab, go to add policy.
Search for AWSCodeCommitPowerUser policy and add it.
As shown in the architecture diagram, we are deploying the application on the EC2 server. So, we need to create an EC2 server for the same.
Go to the EC2 console.
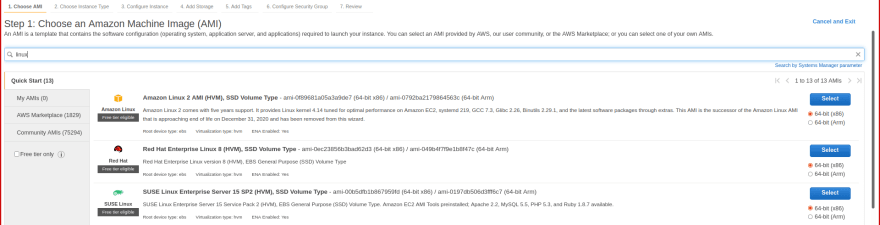
Click on Lunch instance.
Search for Linux as shown in the diagram and click on select.
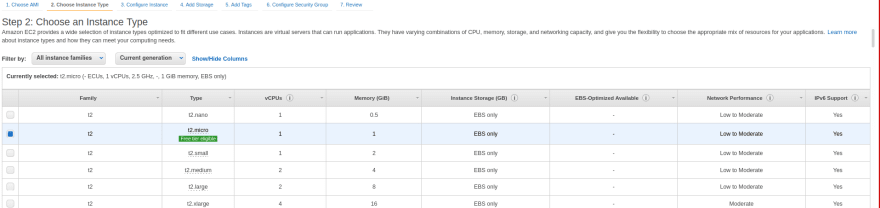
Select instance type here.
Remember: Big instances incur more cost. For this experiment t2.micro is more than sufficient which comes under free tier service.
Click on next
In the next step, we can configure our instance. No need to go into more details here. Keep everything default and click on the next

Keep add Storage as it is and click on the next.

Add Tag, this is a very important step. With the help of this tag, CodeBuild will identify the deployment instance. We will use it later. I have used name tag only to keep it simple as shown in the diagram below and click next.

For now, keep it as it is for making it simple and click on next.

Review the instance details.

Next, create or use the existing key pair for your instance and launch instance.

Server creation is done. happy 😄!
Go to the IAM console.
Click on Role left side.
Click on Create Role.
Select CodeDeploy as AWS service.
Scroll down and select CodeDeploy as your use case.
Click on Next Permissions.

Click on Next: Tags
Click on Next: Review
Give Role name
Click on Create role
From the AWS console go to the CodeCommit service.
Click on Create repository
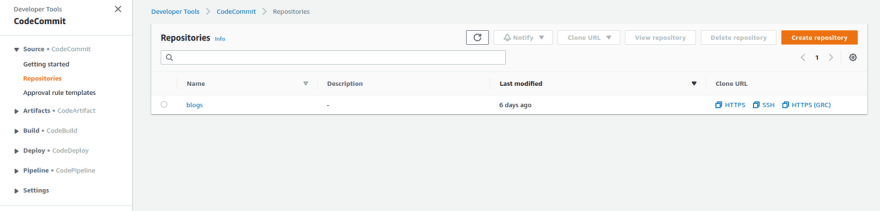
Give Repository name.
Optional: enable Amazon CodeGuru to validate the quality of code.
Copy the repository URL and clone the repository to your local system. Use the credential generated above for cloning.
Add application source code to this repo and push it. you may refer to the application here:
Remember
buildspec.yamlappspec.yamlbuildspec.yamlappspec.yamlConfuse😇
Click on Getting started under Code build.
Click on create a project.
Give a project name.
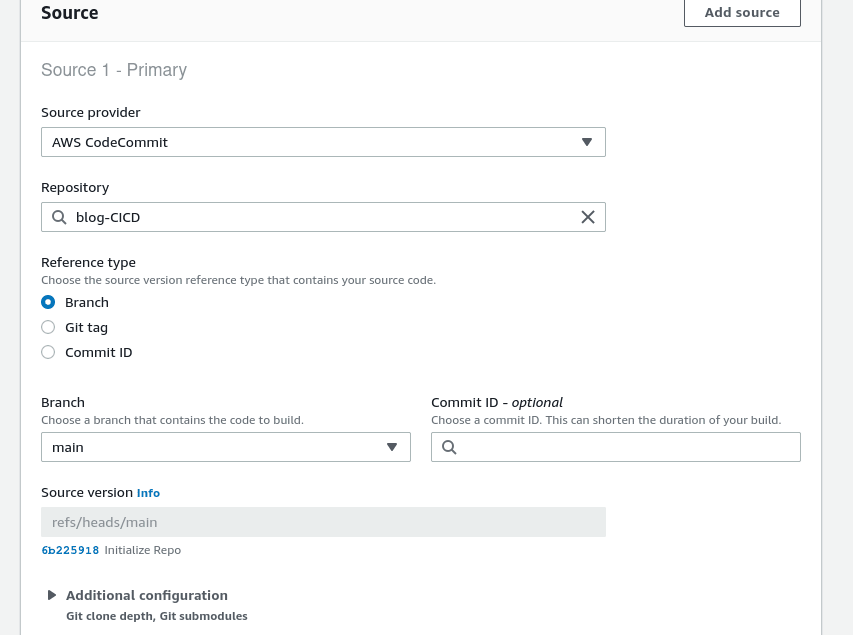
Select Source provider as AWS CodeCommit under the source section.
Select your repository.
Select Reference type as a branch.
Select your branch.
Select Environment image under Environment section
- We can use AWS-managed OS images or custom Docker images.
- For this pipeline, I am using AWS Managed image.
Select your Operating system.
- NOTE: Make sure it is the same as mentioned in appspec.yaml file which we will use in the Code Deploy step.
- Here, I am using
Amazon Linux 2.
Select Runtime as Standard.
Select Image. In my case, I am using aws/codebuild/amazonlinux2-x86_64-standard:3.0
Click on the radio button of New Service Role, it will create a new role for you with the required permissions.

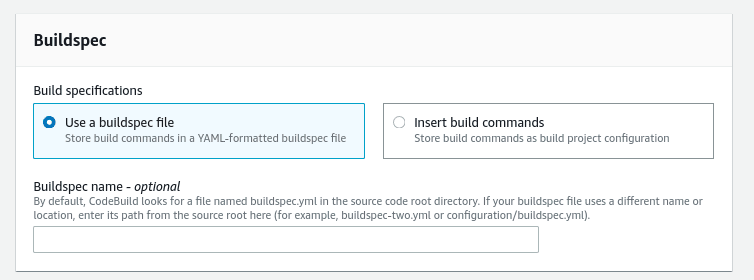
Now, come to the build spec section.
Sample
buildspec.yaml file:# Do not change version. This is the version of aws buildspec, not the version of your buildspec file.
version: 0.2
phases:
pre_build:
commands:
#installs dependencies
- "Commands for Installing Dependencies" ## E.g. npm install / pip install -r requirements.txt / etc.
build:
commands:
- echo Production Build started
- "Build Commands here" ## E.g. npm run build / python setup.py / etc.
post_build:
commands:
- echo Build completed
# Include build files required for your application to run.
artifacts:
files:
- "file names here" ## E.g. dist/*, appspec.yaml (make sure to include this one), build/*, etc.Here’s a sample appspec.yaml file which will be used to set up the deployment environment and start the application :
# This is an appspec.yml template file for use with an EC2/On-Premises deployment in CodeDeploy.

version: 0.0
# Specify "os: linux" if this revision targets Amazon Linux
os: linux

# Place artifacts file inside EC2 instance
files:
  - source: /
    destination: /home/ec2-user/server

permissions:
  - object: /
    pattern: "**"
    owner: ec2-user
    group: ec2-user

hooks:
  # During the BeforeInstall deployment lifecycle event, run the commands
  # in the script specified in "location" which is under destination path.
  BeforeInstall:
    - location: relative_path_inside_your_project_folder/before_install.sh
      timeout: 1000
      runas: root
  # During the AfterInstall deployment lifecycle event, run the commands
  #   in the script specified in "location".
  AfterInstall:
    - location: relative_path_inside_your_project_folder/after_install.sh
      timeout: 1600
      runas: root

  # During the ApplicationStart deployment lifecycle event, run the commands
  #   in the script specified in "location".
  ApplicationStart:
    - location: relative_path_inside_your_project_folder/app_start.sh
      timeout: 300
      runas: root
In this deployment, I am going with the buildspec file. So, for this, I have already saved my buildspec.yaml file in my source code. If you are moving with the insert build commands option, just insert the necessary command here and click on Continue to pipeline.
Leave the Batch configuration and Artifacts section as it is.
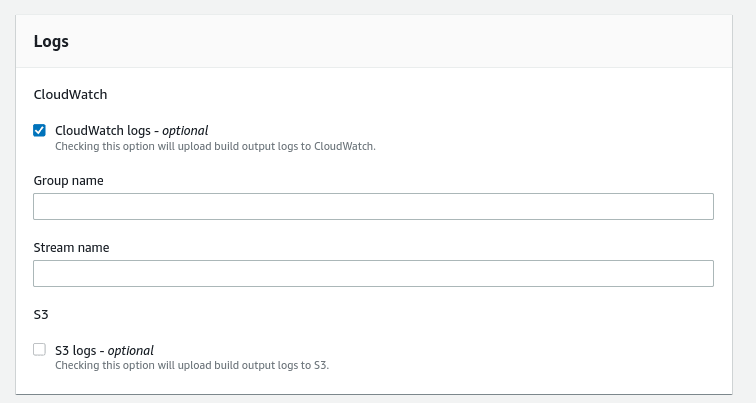
You may enable logs, it will be very helpful in resolving the bugs if something wrong happens. But this is optional.
Click on Getting Started of CodeDeploy.
Click on Create application.
Give application name.
Select Compute platform for your pipeline. I am deploying the application in EC2. So, I am going with EC2/On-premises option. If you want to deploy your application on another platform select accordingly.
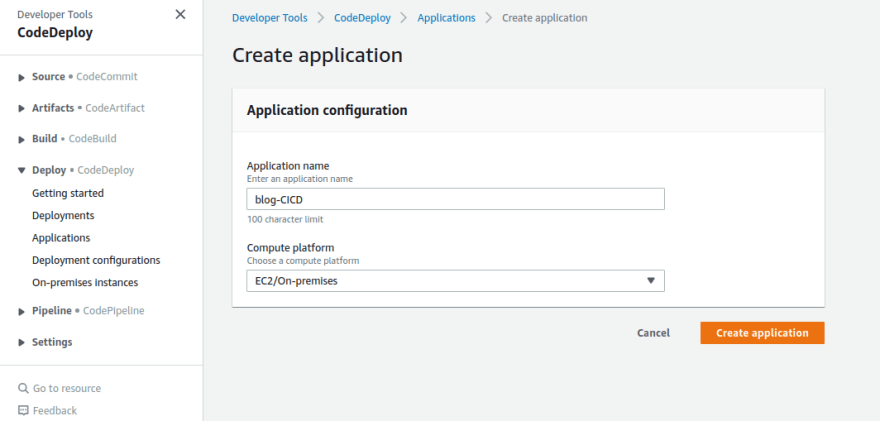
Click on Create application.
Now we need to create a deployment group.
For the deployment group, we will use the EC2 instance created in the earlier step.
Click on the Deployment group.
Give Deployment Name.
Select the service role you created earlier.
Select Deployment type as In-place.
In the environment configuration, select Amazon EC2 instances.
Here, we need to search for the instance/instances based on the tag on which you want to deploy the application. In my case, I am using a name tag for searching. Once you give your tag you can see the number of matched instances.

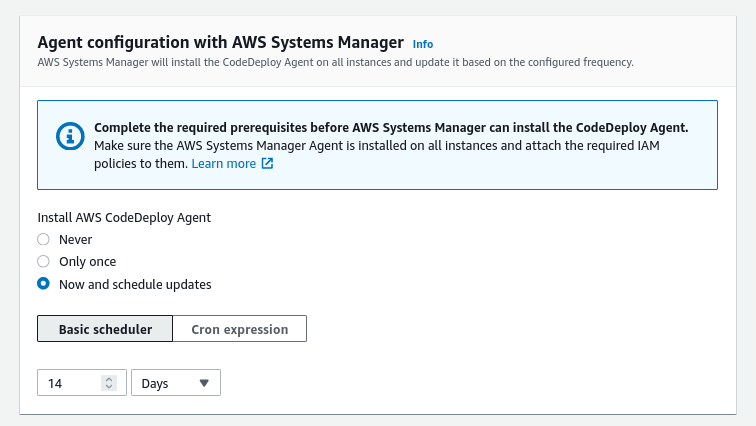
Coming to section Agent configuration with AWS Systems Manager. We need a code deploy agent to be configured in your EC2 machine. Either we can configure it manually. But why should we do it manually? AWS is there to help us. So, under the section Agent configuration with AWS Systems Manage, select Now and schedule updates.
Select the period for the code deploy agent to update. So, after the given period CodeDeploy agent will be automatically updated.
Select CodeDeployDefault.AllAtOnce in the deployment setting.

Skip load balancer for this pipeline.
Finally, click on the Create Deployment Group
Click on Getting Started under CodePipeline.
Click on Create pipeline.
Give pipeline name.
It is better to create a new service role. Select a new service role. AWS will create a role with the required permissions.
Click on next.

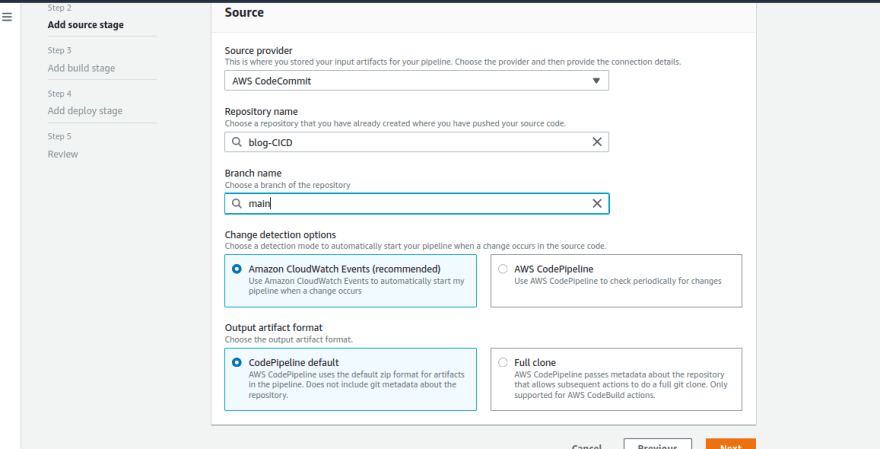
In the next step add source provider as AWS CodeCommit.
Select your Repository name from the drop-down menu.
Select branch name as well from the drop-down menu.
Go with the recommended Amazon Cloudwatch Events as change detection options.
Select CodePipeline default as the output artifact format.
Click on Next.
Choose AWS CodeBuild as a build provider.
Cross-check your region here.
Select your Project created earlier.
Select build type as Single build.
Add environment variable if needed.

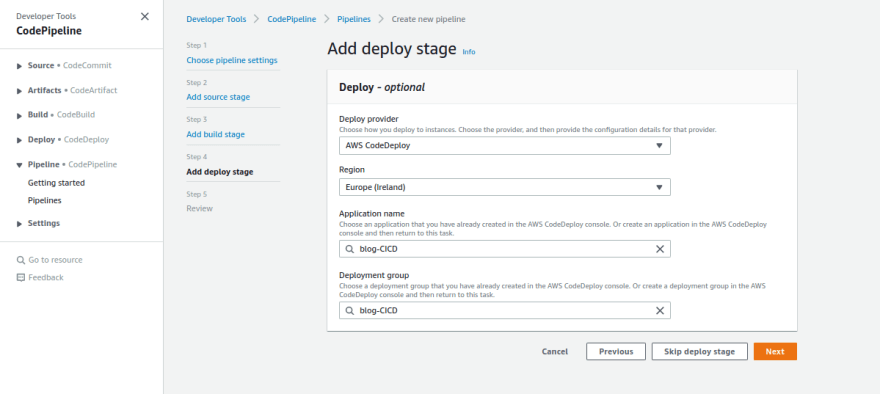
Now come to Add deploy stage.
Select Deploy provider as AWS CodeDeploy.
Verify your region as well.
Select your application from the drop-down menu.
Select the deployment group created earlier.
Click on Next.
Finally, Review your Pipeline and click on Create pipeline.
Go to the pipeline, you can see your pipeline is running. Wait for the job to complete. It will take some time. If your job is completed successfully. Cheers 🎉. You are done.
If you have completed the above steps successfully you are a lucky guy. If your jobs failed. Don’t worry. Try troubleshooting with the following steps.
Troubleshooting 1:
Configure Code deploy agent manually to your EC2 instance. Check the steps below how to do?
Run the below command one by one.
REMEMBER: I am using a Linux machine. If you are using a different OS, please follow this:install code deploy agent
- ssh into your server.
sudo yum updatesudo yum install rubysudo yum install wgetcd /home/ec2-user-
Download code deploy agent with the below command.
wget https://<bucket-name>.s3.<region>-identifier.amazonaws.com/latest/install- MAKE SURE to replace the bucket name and region name as mentioned in the below document as per your region.
- https://docs.aws.amazon.com/codedeploy/latest/userguide/resource-kit.html#resource-kit-bucket-names
-
Run the installation script by the below command
chmod +x ./install
-
Check status of Code deploy agent. You will get status as running.
sudo service codedeploy-agent status
-
If not running, make it running by the below command.
sudo service codedeploy-agent status
Trigger the pipeline again and wait for the job to be complete.
Troubleshooting 2:
ssh into the server and check the logs with the below command and take action properly.
tail -f /var/log/aws/codedeploy-agent/codedeploy-agent.log
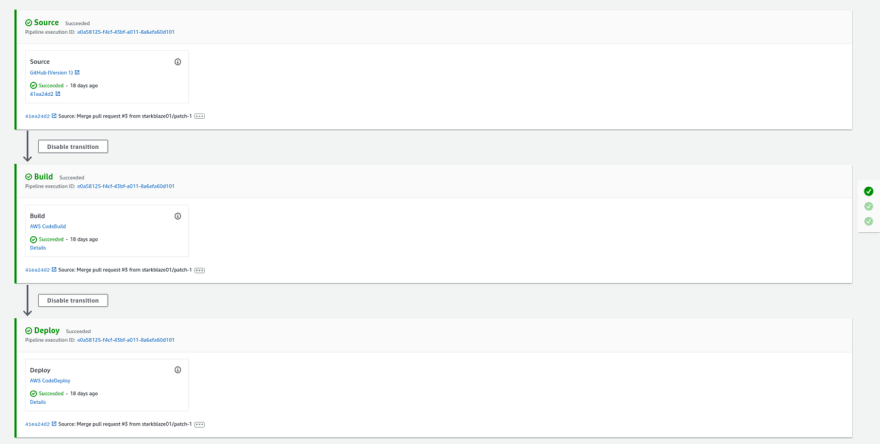
Troubleshooting 3:
Once your pipeline is executed successfully, we will come to see the below screen in your pipeline.
Open the port on which your application is running. For this application, I am using port 3000.
How to open: Check security steps used in EC2 creation in the above section.
Once the port is open, we can now access the application with server DNS. ENJOY 😄
You have successfully set up the complete CI-CD pipeline. Hope you enjoyed the whole journey of creating the pipeline 🎉 !!!!
Reference Title Image: https://exlskills.com/
51