
30
GraphCMS + Nuxt.js - Vote Your Favourite Tech Courses
In this tutorial, you are going to build a voting application for tech courses. The voting application allows people to vote courses from tech so people can find quality courses.
If you like a course and think it's a quality course, you can upvote it. The more upvotes a course has, the higher it appears on the page.
To build the application, you will use:
Without further ado, let's start building the application!
GraphCMS is the first GraphQL native Headless CMS. It aims to eliminate the pain points of traditional content management by leveraging the power of GraphQL.
Let's see how GraphQL aims to do that. Some of the most notable features of GraphCMS are as follows:
These are just a handful of features to convince you of its power. However, you can read more about GraphCMS and its features here.
In a nutshell, you can use GraphCMS as a database or content management system, as can be inferred from the name.
The first step of the tutorial is to create a GraphCMS account, so you can use it.
Go to the GraphCMS website and click on the "Sign up" link. See figure 1 below for reference.

Figure 1
After that, it takes you to the registering page. On sign up page, you can register with the following:
You can use any method that fits your needs. In my case, I registered using my GitHub account.
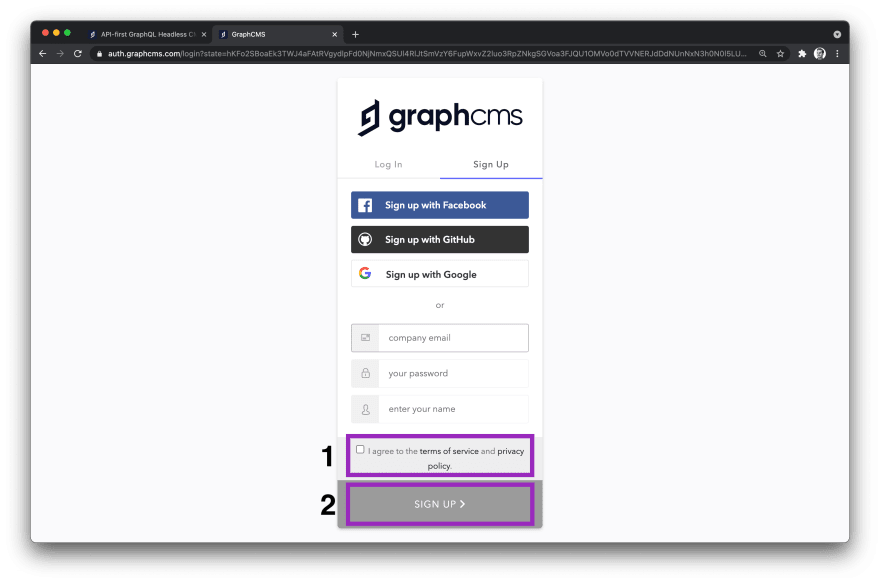
Figure 2
Figure 2 illustrates the signup page. Before choosing your preferred signup method, tick the box that says you agree to their terms and policies. Lastly, click on the "Sign up" button.
After that, you are done. You should see the page from figure 3 below. If you want to take their tour, click on the "Start tour" button. If not, skip straight to overview.

Figure 3
That's how you create a new GraphCMS account. If you click on "Skip to overview" (as shown in figure 3), you are taken to the page where you can create a new project or choose from the existing starter projects.
Thus, the next step is to create and configure the voting application for tech courses.
The project stores courses in tech alongside their authors. Thus, you will have two models:
Also, there will be a many-to-many relationship between the two. For example, a course can have multiple authors, and authors can have multiple courses.
With that out of the way, let's start building the project!
After creating the account, you are taken to a new page where you can create your new project.
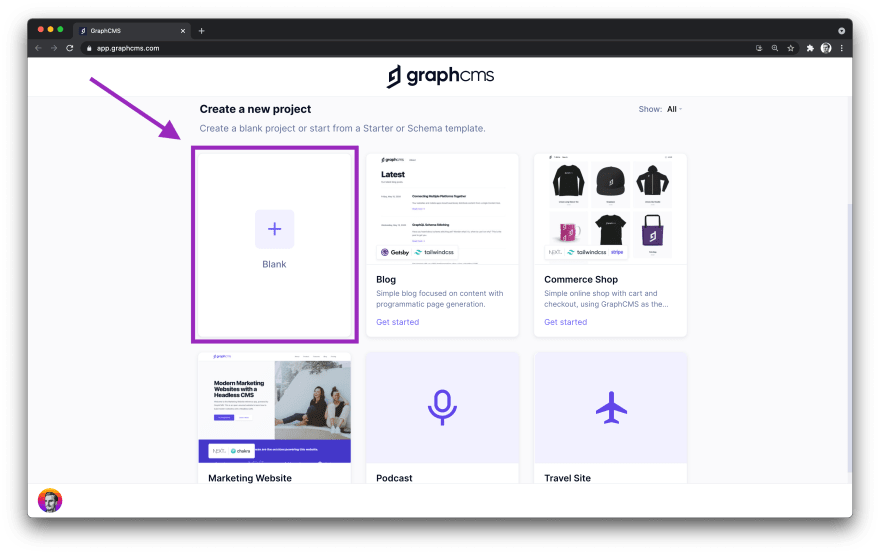
Figure 4
It's important to note that you can choose from their starter projects. However, for this tutorial, you will create a new project.
To create a new project, click on the + button, which says "From Scratch". Figure 4, above, illustrates that.
Clicking on the button takes you to a new page, where you need to:
In figure 5, below, you can see the name and description for this project. Also, you can see that I choose the data center from Europe (Frankfurt).

Figure 5
Once you fill in all the details, click on the "Create Project" button from the bottom of the page. In figure 5, you cannot see it, but you should see it on your page.
After creating the project, you are taken to the pricing page, which you can see in figure 6. You have four options to choose from. For this tutorial, you only need the free version, though. It's more than enough for most side projects.

Figure 6
Choose the "free forever" plan. After selecting the plan, you are taken to a new page where you can invite team members. However, you do not have any team members at the moment, so click on "Invite later", at the bottom of the page.
Now you are done and ready to configure your application! You can see the project dashboard below, in figure 7.
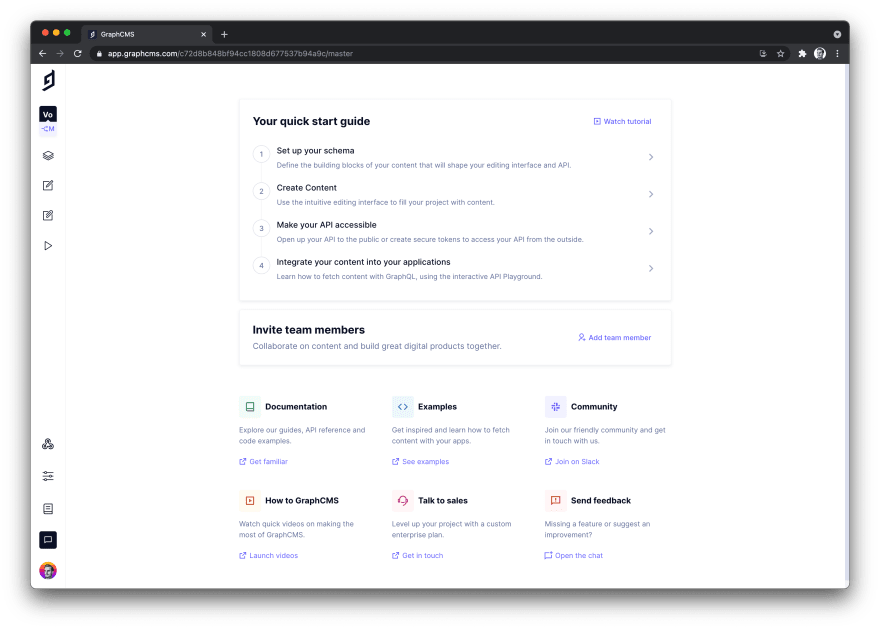
Figure 7
Let's move onto the next step, which is creating the models.
The next step is to create the models. When you create the models, you describe how your data is structured. For instance, you need a schema for courses and one for authors.
From the project dashboard, click on the option saying "Set up your schema". See figure 8 below for reference.

Figure 8
After clicking on the option, you are taken to a new page to create models for your data. For instance, you will create the model for courses.
Click on the button saying "Create Model", as shown in figure 9.

Figure 9
The next step is to create the model. Then, all you need to do is to choose a name and a description for your model.
For this example, the display name for the model is
Course. Once you enter the display name, the API ID and Plural API ID fields update automatically. Thus, you can leave them as they are. Lastly, enter a description of your model.After you entered all the details, click on the button saying "Create Model". In figure 10, you can see an example of setting the
Course model.
Figure 10
After you create the model, you have an empty model for the
Course.As an exercise, create the model for the
Author. Go to the Schema page and then click on the + Add button on the left-hand side. See figure 11 below for reference.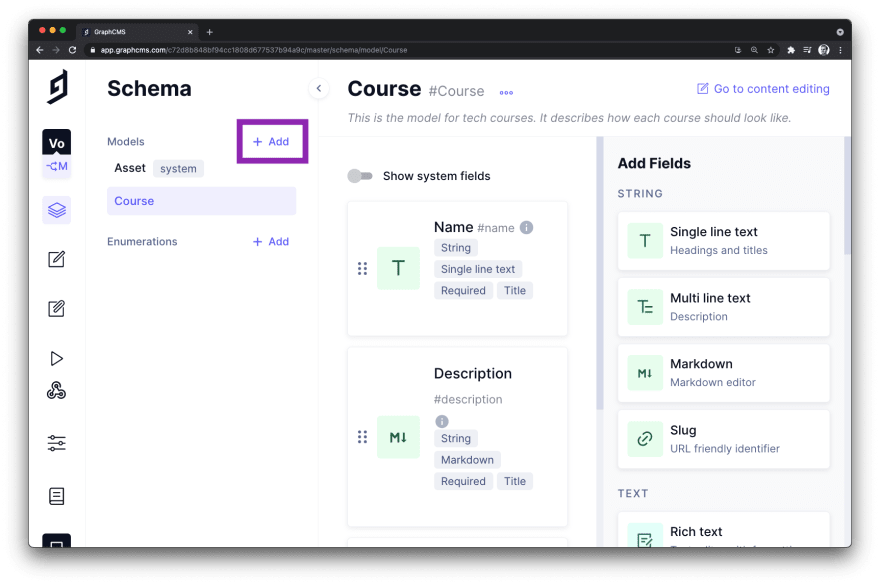
Figure 11
After you click on the "add" button, you can create the
Author model as you created the Course model.Figure 12 below illustrates the settings for the
Author model.
Figure 12
The next step is to configure the models by adding fields.
Once the model is created, you need to add the fields. The fields describe what you store about courses. For instance, you would need a name and a description at the minimum.
Once you create the model, you can access the page dedicated to it. From that page, you can add and remove fields. Figure 13 illustrates that.
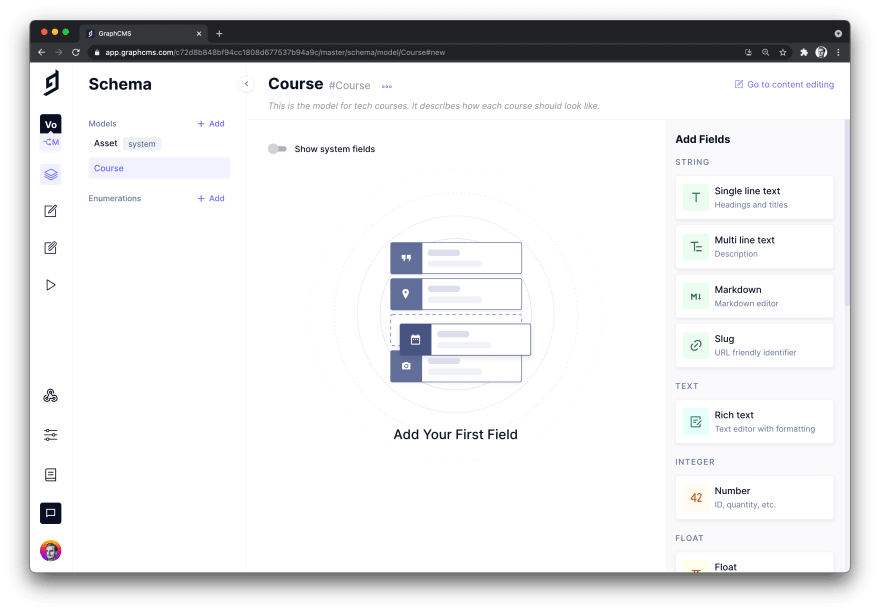
Figure 13
For this tutorial, the
Course model will have the following fields:If you look at figure 13 above, you can see that you can select fields from the right-hand side of the page. You can create fields such as:
And many more.
Let's start by adding the name field. Start by clicking on the "single line text" field. Once you click on that field, a new box will appear, which you can see in figure 14.

Figure 14
You need to specify the name, the API ID, and the description for this field. You can use the same details like the ones in figure 14, or you can use yours.
Also, you might want to display the field's value instead of the ID in relations, so check the field saying Use as title field.
Before moving on, go to the "Validations" tab and make the field required. That means the
name field cannot be empty. See figure 15 for reference.
Figure 15
Once you finish configuring the
name field, click on the "Create" button. After you create the field, you should see it in your dashboard.The next step is to create the description field. Since the description is more complex than the
name field, let's choose the "Markdown" field.Click on the "Markdown" field, and the pop-up from figure 16 should appear. As usual, choose a name, an API ID and a description for your field.

Figure 16
As a validation, let's make the field required and let's also add a character count between 100 and 1000 words. Thus, a course cannot be added to the database if:
See figure 17, which illustrates the validations.
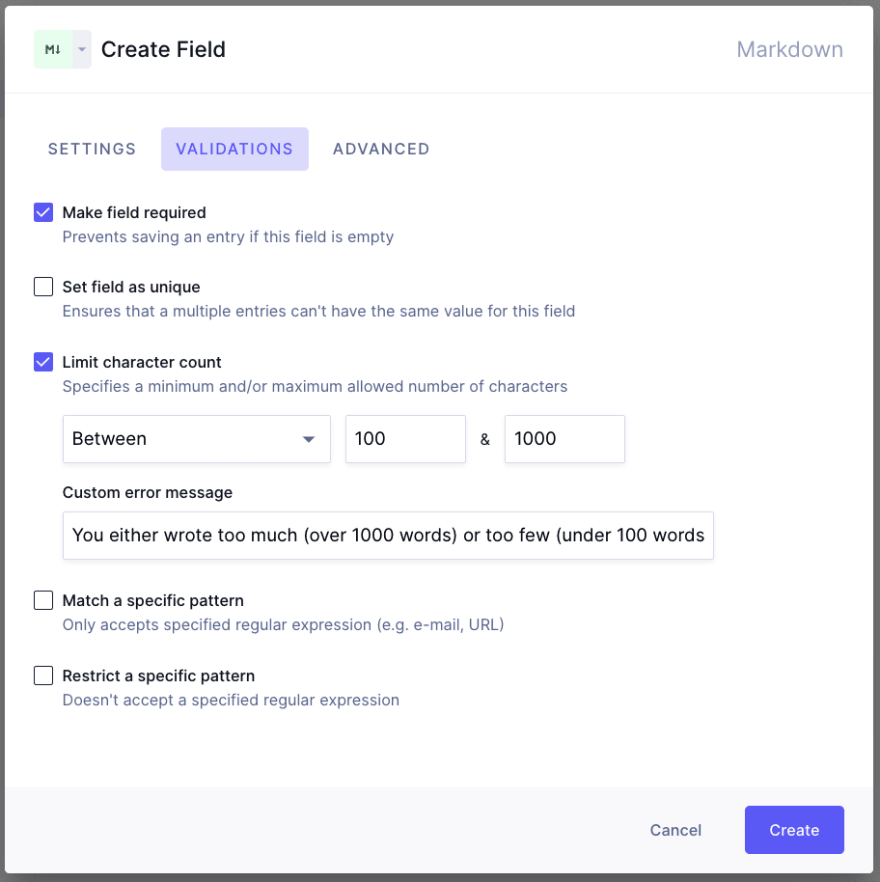
Figure 17
Now click the button to create the field. At this point, you should have two fields, and you should see them in your dashboard.
The
Vote field is of type number. Thus, go to the right-hand side and click on the "Number" field.Figure 18 illustrates the information for this field. However, for this field, you need some validations and also a starting value.
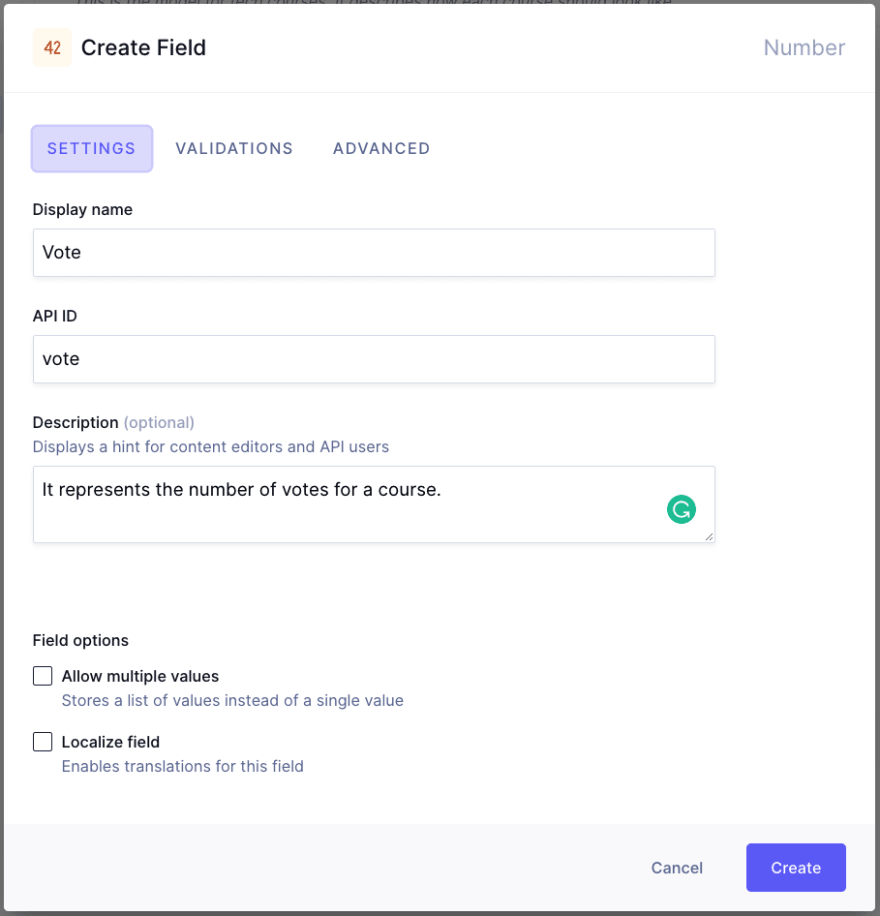
Figure 18
Go to the "Validations" tab and make the field required. You can mark this field as required by following the same steps you followed for other steps. To avoid repetitions, I did not include an image since it's the same thing.
Now go to the "Advanced" tab and check the option saying "Set initial value". Set the initial value to "0" so the votes for all courses start from 0. See figure 19 below for reference.

Figure 19
Create the field, and it should appear in the dashboard.
For the URL field, you can simply use the "Single line text" field. Figure 20 shows the basic configuration for the URL field. It follows the same pattern as the other fields.
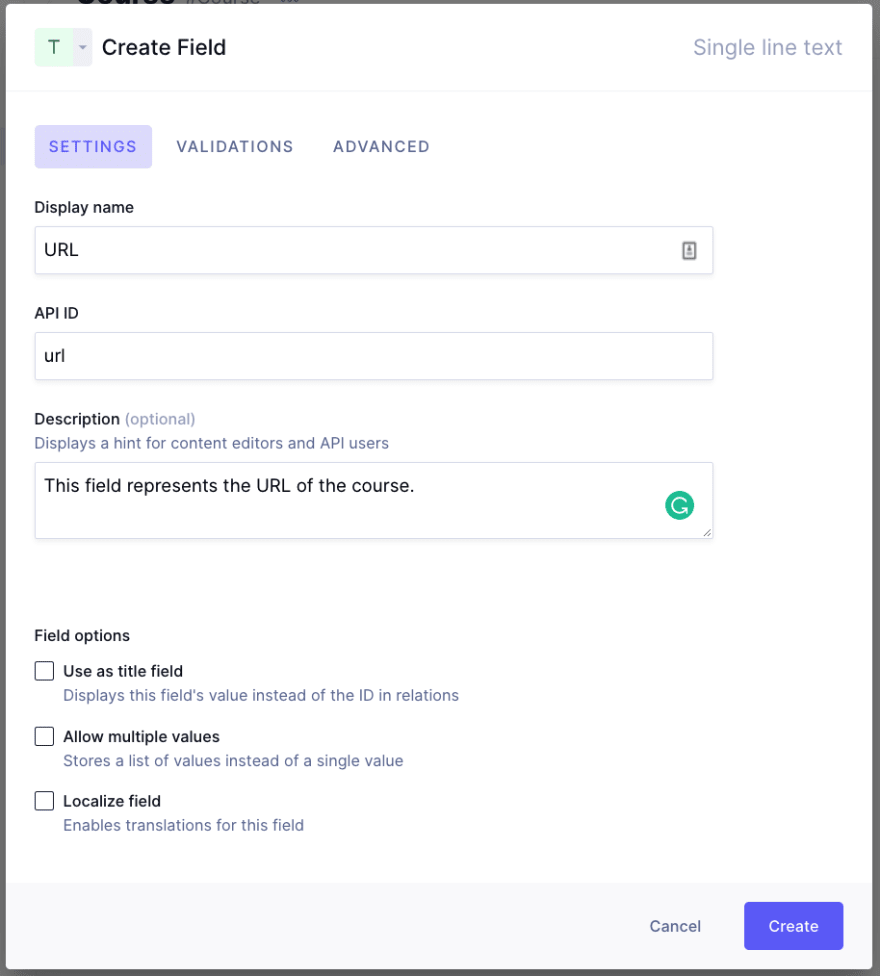
Figure 20
Also, let's make the field required. Then, go to the "Validations" tab and check the option that makes the field required.
Moreover, you want to avoid malicious or invalid URLs. Thus, enable the option saying "Match a specific pattern". With the option active, the application only accepts URLs that match a specific regular expression.
Figure 21, below, illustrates that.

Figure 21
If you go to the dashboard, you should be able to see all the fields you created. Figure 22 illustrates how your dashboard should look.
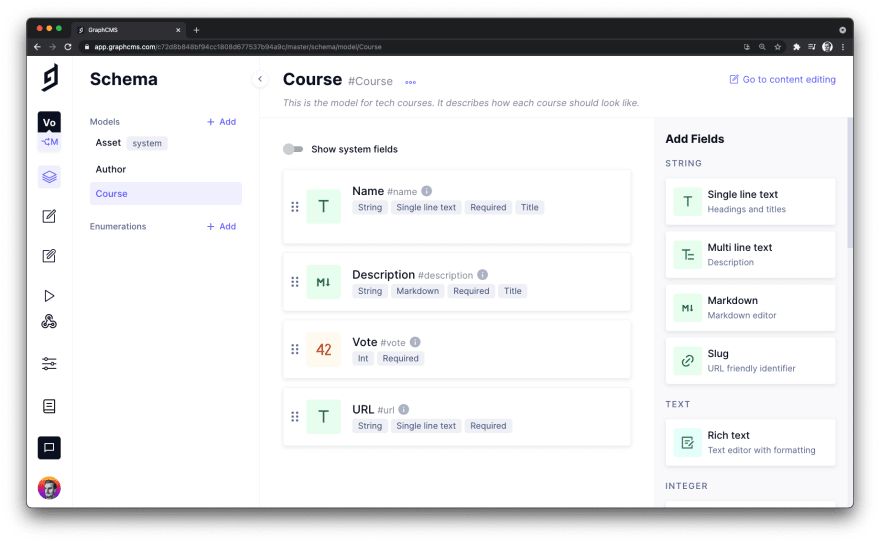
Figure 22
Before configuring the "author" field and creating the relationship, let's configure the
Author model.For the author model, you might be interested in the following fields:
At this point, you should be familiar with field types. Thus, the fields will have the following types:
Single line text for the full nameMulti line text for the short biographySingle line text for the Twitter profileWhen it comes to validation rules for the fields, the following applies to all of them:
From the schema dashboard, select "Single line text" to create the full name. Figure 23 illustrates the details for this field.

Figure 23
In figure 24, below, you can see the validations used for this field and the others.

Figure 24
The next step is to add the biography field. Then, from the right-hand side sidebar, choose the "Multi line text" field. Once you click on it, a new pop-up appears. You can see the details for this field in figure 25.

Figure 25
The biography field has an extra validation rule. You do not want authors to have an empty bio or a 5000 words bio. Thus, you can limit the character count between
100 and 500 words.Figure 26 illustrates how you can limit the character count. You can also see that you can customize the error message. Thus, you can add a descriptive error message that will help rather than confuse the user.

Figure 26
Lastly, you need to set the field for the Twitter profile URL. From the sidebar, select the "Single line text" field and add a display name, API ID, description and validations.
In figure 27, below, you can see the settings for the Twitter profile URL field.

Figure 27
As usual, you make the field required and unique. Thus, people cannot add authors without a Twitter profile or with a duplicate Twitter profile. Moreover, you want to avoid malicious or invalid URLs. Therefore, you can tick the checkbox for the Match a specific pattern feature.
See figure 28 below for reference.

Figure 28
You finished configuring the
Author model as well! If you look at your dashboard, you should see the fields you created. Figure 29, below, illustrates that.
Figure 29
Now that you have both models configured, it's time to create a relationship between them. So that's what you will do in the next step!
Before you can use the application, the last step is to create the many-to-many relationship between the
Course and Author models. To recap, a course can have multiple authors, and authors can have multiple courses.The video below shows how to create the relationship between "course" and "author".
The first step in creating the relationship is to select the
Reference field from any of the models. The Reference field allows you to create different types of relationships between models.Once you click on the field, a new pop-up appears, where you can define the relationship. First of all, you select the model to reference. Then, you have a dropdown box from where you can choose the model.
After that, you can create the relationship in two ways:
Figure 30 illustrates both options.
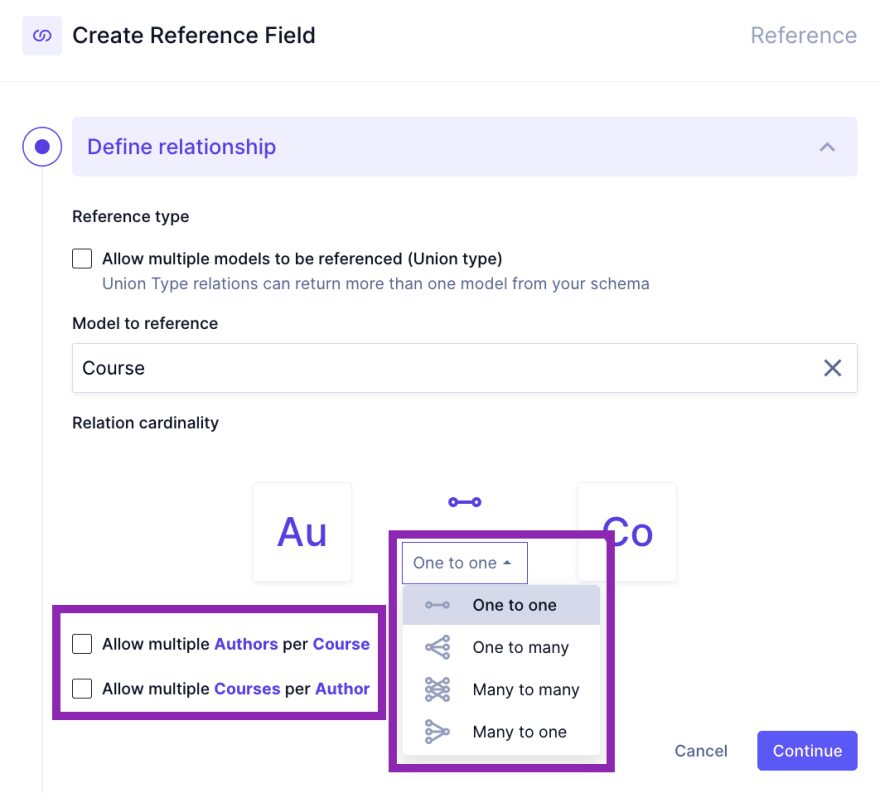
Figure 30
After that, you can configure the
reference and reverse fields. They are pre-configured for you, but you can use custom options if you want. For this tutorial, the pre-configured details are enough.Lastly, press the "Create" button to create the relationship. As you can see in the video above, the relationship is created.
Before you can test and use the application, you need to add content.
With GraphCMS, you can seamlessly add content from the user interface. Alternatively, you can do it programmatically. Thus, you have two options when it comes to adding content.
To create content, click on the "pen" icon, as shown in figure 31. Alternatively, you can click on the second option from the "Your quick start guide" section. See figure 31 for reference.
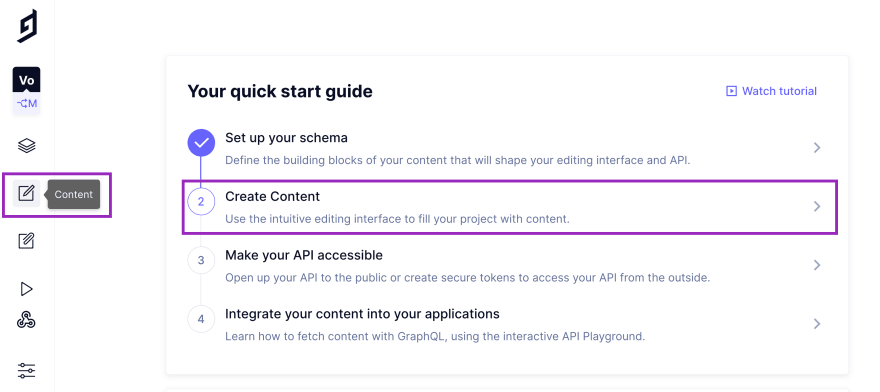
Figure 31
Clicking on any of the two options takes you to a new page where you can add authors and courses.
Figure 32 shows the page where you can add content. On the left-hand side, you can select the type of content you want to add. For instance, if you want to add a new author, select the
Author from the column.Once you decide what type of content you want to add, click on the button saying "+ Create Item".

Figure 32
After that, you can create a new piece of content. In figure 33, you can see an example of creating an author. There are all the fields you added when you configured the model.
Also, at the bottom, you can see that you can add existing courses or you can create and add a new course. Thus, you can link an existing author and a course.
For the time being, save and publish the author because you'll link the author and the course after creating a course.
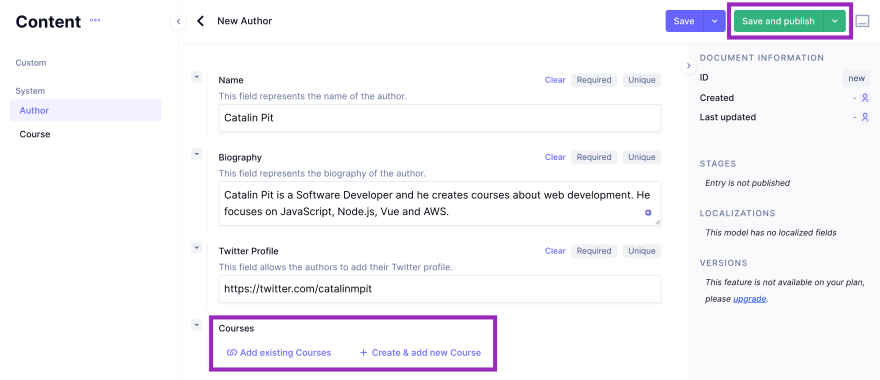
Figure 33
At this point, you should have the first piece of content - an author. Well done! You will follow the same steps to add a course.
On the left-hand side, click on the "Course" option. Then click again on the button saying "+ Create Item". See figure 32 for reference.
When the new page opens, feel free to add your course details, or you can use the same information like the ones from figure 34.
At the bottom, you can see that you can add authors for your courses. Since you created an author in the previous step, let's add an author. Click on Add existing Authors.

Figure 34
Once you click on the button, a new pop-up appears where you can select the authors you want to add. For example, in figure 35, below, you can see the author you created earlier.
Select the author by ticking the box, as highlighted in the image. After that, add the author by clicking on the button "Add selected Author".

Figure 35
After that, you should see the author embedded into your course. Then, finally, you should see something similar to figure 36.
Now click on the green button "Save and publish" to create the relationship. The author and the course are linked now!

Figure 36
Now that you are done with creating and configuring the application, you can play around with it!
GraphCMS has an integrated GraphQL playground. That means you can read and edit existing data or add new data.
Thus, to access the playground, go to the project's dashboard and then click on the "play" icon, as shown in figure 37 below.
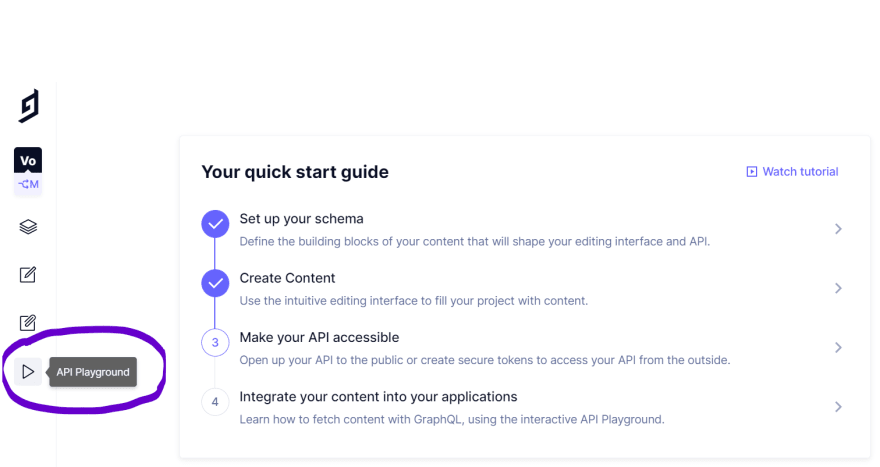
Figure 37
Once you get to the playground, you can either write queries and mutations manually, or you can use the explorer. Using the explorer, you can build queries and mutations interactively.
After you click on the button and the GraphQL playground opens, you can start playing with the data.
Figure 38 shows the playground page.

Figure 38
Let's start writing some GraphQL queries. The first GraphQL query shows all the courses and the authors. You can see all the details about each course and the information on each course author.
See the query below:
query Courses {
  courses {
    name
    description
    publishedAt
    url
    vote
    authors {
      name
      biography
      twitterProfile
    }
  }
}
The following query shows all the authors alongside the courses they created. It retrieves all the details about the authors and their courses.
Copy the following query into the playground:
query Authors {
  authors {
    name
    biography
    twitterProfile
    courses {
      name
      url
      vote
      description
    }
  }
}
The interactive builder makes it seamless to create queries. For example, in the video below, you can see I build the two queries with the GraphCMS explorer.
Moreover, you can use mutations. That means you can add and edit existing data from your application or delete data.
If you scroll at the bottom of the "Explorer" tab, you can see an option saying "Add New Mutation". After you click on that option, you will see all the available mutations in the "Explorer" tab.
For example, you can create a new course with the following mutation:
mutation CourseCreation {
  createCourse(data: {name: "Test Course", description: "Add a longer description", vote: 10, url: "https://google.com"}) {
    id
    name
  }
}
It's important to remember that you added validations for some fields, such as the description. Thus, you need to add a longer description than the one from the example. After that, you can successfully add the new course to the application.
Alternatively, you can remove a course. To delete a course (or an author), you need to pass the course's id (or the author) to the
deleteCourse. The mutation below shows how you can achieve that.mutation CourseDeletion {
deleteCourse(where: {id: "ckqg8wi7s13ko0c56z71xw139"}) {
id
name
}
}To create an author is similar to creating a course, except there are different fields. The mutation below shows how to do it.
mutation AuthorCreation {
  createAuthor(data: {name: "Test Author", biography: "A short biography.", twitterProfile: "{% twitter testauthor"}) %} {
    id
    name
  }
}
Below, in the video, you can see the following mutations:
The "Explorer" option from GraphCMS is super handy, and it makes the process of creating queries and mutations straightforward.
Now that you have seen examples of queries and mutations in this tutorial go and explore others as well. Play around and add new data or modify existing data.
The next step is to set the access to the API so you can use it from your frontend application.
According to the GraphCMS documentation, "queries and mutations by default require a Permanent Auth Token token".
Thus, before you can use the API in your application, you need to set the permissions. Go to the project dashboard and click on any of the two options highlighted in figure 39 below.

Figure 39
After you click on any of the options, a new page opens where you can configure the API access. On the new page, you should see the following information:
If you scroll at the bottom of the page, you will see the Public Content API
and Permanent Auth Tokens. With the Public Content API, you set the permissions for unauthenticated users.
and Permanent Auth Tokens. With the Public Content API, you set the permissions for unauthenticated users.
For unauthenticated users, you probably only want "read" access. That means the unauthenticated users can only read the data.
Thus, from the Public Content API, you can click on the button "Yes, initialize defaults", as highlighted in figure 40.
As shown in figure 40, the default permissions only allow unauthenticated people to read data.

Figure 40
After you click on the button, the default permissions are applied, and you are ready to set the permissions for authenticated users.
According to the GraphCMS documentation, "Permanent Auth Tokens are used for controlling access to querying, mutating content, and comes in the form of Bearer token authentication".
To create a new token for your application, click on the button saying "+ Create token" at the bottom of the page.

Figure 41
Once you click on the "create token" button, a new pop-up appears. From the pop-up, you can create a new token. You will be prompted to enter a name, a description, and the default stage for content delivery. You want users to have access only to the published data, so leave the default option -
Published.Figure 42 illustrates the pop-up where you configure your token.
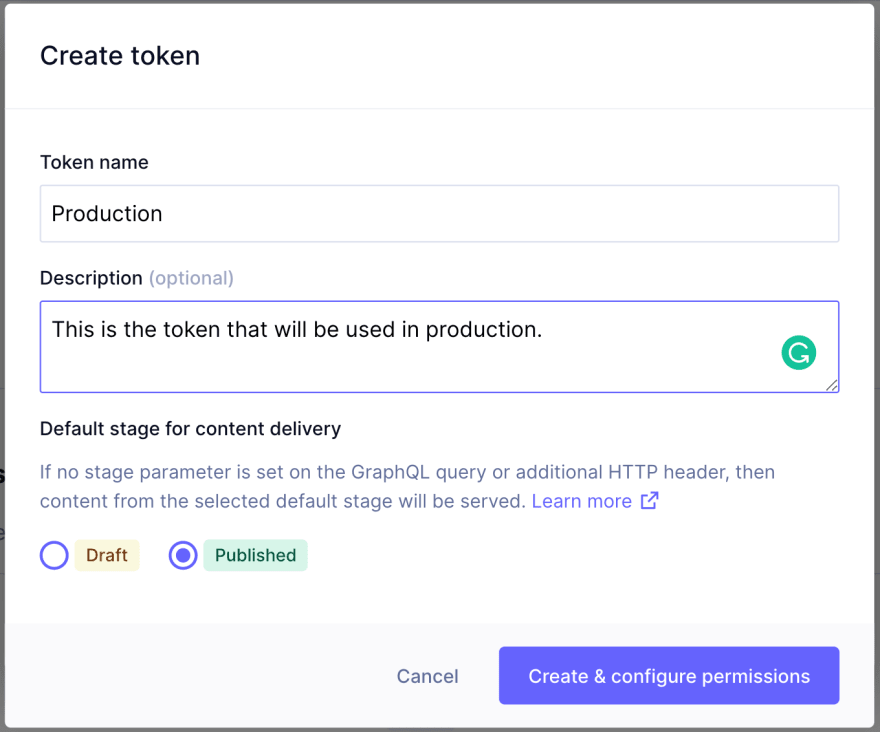
Figure 42
After creating the token, it takes you to the token dashboard to configure the permissions. On the new page, you should see the following information:
At the moment, you are only interested in the content API. The content API permissions specify what can be done with the data.

Figure 43
Let's create some permissions. To create new permissions, click on the button saying "+ Create permission", as shown in figure 43 above.
Once you click on the "create permission" button, a new pop-up appears from where you can configure your models. There are two important steps:
Lastly, you want to be able to read, create, edit and delete data. Thus, tick the appropriate boxes.
Figure 44 illustrates the process of creating the permissions. Mind you that in the figure, no model is selected. Therefore, when you create the permissions, you should do it individually for each model.

Figure 44
After you follow all the steps and create the permissions, you should see them in your dashboard. For example, your dashboard should look like the one from figure 45 below.

Figure 45
Now that you have an endpoint and the permissions set up, you are ready to build the frontend part!
This is the last step before building the frontend, I promise. In this step, you will gather all the information needed, such as:
The first step is to go to the settings as shown in figure 46 below. Click on the sliders.

Figure 46
After you click on the settings, you are taken to another page. From there, click on the
API Access option from the left-hand sidebar, as highlighted in figure 47, below.After that, you should see your endpoints. Then, copy the
Content API highlighted in figure 47, below.
Figure 47
Lastly, scroll at the bottom of the page, and you should see a section called
Permanent Auth Tokens. Once you see it, click on the token to copy it, as shown in figure 48 below.
Figure 48
Now that you have the
endpoint and auth token, you can use the GraphCMS application from outside - for example, from a JavaScript framework such as Nuxt.For the frontend, you will use Nuxt.js, which is a Vue framework. If you want to read more about it or see its benefits, check their official website.
The first step is to create and configure the Nuxt application. Go to your terminal and run the following command:
npx create-nuxt-app voting-appAfter you run the command, you will get a series of questions that allows you to configure your project.
Figure 49 illustrates the settings for this project. You can use the same options or configure the project based on your needs.

Figure 49
Once all the dependencies are installed, you are ready to build the application. But before that, you need to clean it a little bit. Thus, open the directory with the following command:
cd voting-appIf you go to the
components folder, you should see two components:Delete both of them. The next step is to create new components. Create the following components:
CourseCard.vue component to render each course.Figure 50, below, shows how the components folder should look.

Figure 50
Before going further, you need to set up the environmental variables, which store sensitive information such as the:
The first step is to install the required package. Go to the project's root directory and install the package
dotenv as follows:npm i @nuxtjs/dotenvOnce you have the package installed, you need to register it. Go to
nuxt.config.js and add the module to the buildModules array. Your build modules should look as follows:buildModules: [
// https://go.nuxtjs.dev/eslint
'@nuxtjs/eslint-module',
// https://go.nuxtjs.dev/tailwindcss
'@nuxtjs/tailwindcss',
'@nuxtjs/dotenv'
],The next step is to create the
.env file, where you will add your sensitive information. Create the .env file in the root directory of the project. You can do it as follows:touch .envNow open the file and add the following lines:
GRAPHCMS_ENDPOINT=
BEARER=
Of course, you need to add your information. Add your GraphCMS Endpoint URL and the bearer token. Before moving further, you need to add the
.env file to .gitignore so you do not make your sensitive information public.Now, you can access sensitive information such as:
process.env.GRAPHCMS_ENDPOINTprocess.env.BEARERLet's move onto the next step, which is about creating the GraphCMS Nuxt plugin.
Before going further, you need to add the GraphCMS plugin. The GraphCMS client allows you to make requests to your GraphCMS database.
So, first of all, you need to create a new folder called
plugins in the root directory of the project. After that, create a file called graphcms.js inside the plugins folder.Once you create both the directory and the file, open
graphcms.js and add the following code:import { GraphQLClient } from 'graphql-request';
const graphcmsClient = new GraphQLClient(process.env.GRAPHCMS_ENDPOINT, {
headers: {
authorization: `Bearer ${process.env.BEARER}`
}
});
export default(_, inject) => {
inject('graphcms', graphcmsClient);
};The above code creates a new GraphQL Client instance, and it passes your
GraphCMS endpoint and the bearer token. Thus, you can use the graphcms client everywhere in your Nuxt.js application.Now that you have everything set up, the next step is to build each component individually. The application will not work until you build and use all components. Thus, only try to run it afterwards.
The first component is
Hero.vue. This component only has two lines of text. Open it and add the following piece of code:<template>
<div class="flex flex-col items-center text-center mt-10">
<h1 class="text-3xl">Vote <span class="font-bold">your favourite</span> tech courses</h1>
<div class="m-4 text-lg">
<p>Finding the right courses in tech is difficult so we make it easier</p>
</div>
</div>
</template>Figure 51, below, illustrates what you will see when you run the application.

Figure 51
Now go to
pages > index.vue and delete everything that's inside the file. Then, add the following piece of code:<template>
<div class="relative flex flex-col items-top justify-center min-h-screen bg-gray-100 sm:items-center sm:pt-0">
<Hero/>
</div>
</template>In the above code, you use the newly-created component, Hero. The next step is to build the course card component so you can display courses on the page.
The course card displays all the information about courses. It shows the name, the description, and other details. It also allows you to upvote a course.
Let's start by building the template. Everything you see inside the moustache notation -
{{ }} - it's the data coming from the database.<template>
<div class="max-w-4xl mx-auto px-8 sm:px-6 lg:px-8 flex flex-row justify-center">
<div class="mt-8 bg-white overflow-hidden shadow sm:rounded-lg p-6">
<h2 class="text-2xl leading-7 font-semibold">
<NuxtLink :to='id' class="hover:underline">{{ name }}</NuxtLink>
</h2>
<p class="mt-1 font-extralight italic text-gray-600">by {{ authors.toString() }}</p>
<p class="mt-3 text-gray-600 italic">
{{ excerpt }} <br>
</p>
<div class="flex flex-col items-center border-t border-dashed mt-5">
<p class="mt-4 pt-4 text-gray-800 font-bold text-xl tracking-wider">
The course has <code class="bg-gray-100 text-2xl p-1 rounded border">{{ newVote }}</code> votes.
</p>
<p>
<button class="bg-white hover:bg-gray-200 mt-5 mb-2 text-gray-800 font-semibold py-2 px-4 border border-gray-400 rounded shadow" @click="fetchData">Vote +1</button>
</p>
</div>
</div>
</div>
</template>In the second part of the component, you describe the type of the props, a method and a computed property.
The method
fetchData allows users to upvote courses. When the user clicks on the voting button, the fetchData method is called, and it makes a POST request to the database. Then, it increments the number of votes and returns the new value.The endpoint
/upvote/${this.id} is a custom API endpoint created in Nuxt. In the next section, you will see how to do it.Since mutating props is an anti-pattern, we created a new field called
newVote. You assign the value from the vote prop to this new property. Also, the property newVote is updated and displayed on the page when a user votes the course.Lastly, you have a computed property
excerpt that only shows part of the description.<script>
export default {
props: {
id: {
type: String,
required: true
},
name: {
type: String,
required: true
},
description: {
type: String,
required: true
},
url: {
type: String,
required: true
},
vote: {
type: Number,
required: true
},
authors: {
type: Array,
required: true
}
},
data() {
return {
newVote: this.vote
}
},
methods: {
async fetchData() {
const options = {
method: "POST"
};
const upvoted = await fetch(`/upvote/${this.id}`, options).then(res => res.json());
this.newVote = upvoted.votes;
}
},
computed: {
excerpt() {
return this.description.substring(0, 150) + "...";
}
}
}
</script>Figure 52 illustrates how the course card looks. Also, when you click on the course name, it takes you to the course page.

Figure 52
At this point, you have the card for each course. So the question is - how do you loop over the list of courses and render them.
Nuxt.js allows you to create custom API endpoints in your application. For instance, you can create an Express server inside your Nuxt application.
Nuxt.js has a
serverMiddleware property that allows you to use additional custom API routes without needing an external server. If you want to read more about the serverMiddlware property, I recommend the official documentation.Thus, the first step is to create a folder in the project's root directory. Create a new folder called
server-middleware. Then, create a new file, upvoteCourse.js inside the directory.The next step is to open the file
nuxt.config.js and add the following line at the end of the file:serverMiddleware: ['~/server-middleware/upvoteCourse.js']Your file
nuxt.config.js should look as follows:export default {
// Target: https://go.nuxtjs.dev/config-target
target: 'static',
// Global page headers: https://go.nuxtjs.dev/config-head
head: {
title: 'Vote Tech Courses',
htmlAttrs: {
lang: 'en'
},
meta: [
{ charset: 'utf-8' },
{ name: 'viewport', content: 'width=device-width, initial-scale=1' },
{ hid: 'description', name: 'description', content: '' },
{ name: 'format-detection', content: 'telephone=no' }
],
link: [
{ rel: 'icon', type: 'image/x-icon', href: '/favicon.ico' }
]
},
// Plugins to run before rendering page: https://go.nuxtjs.dev/config-plugins
plugins: [
'~/plugins/graphcms.js'
],
// Auto import components: https://go.nuxtjs.dev/config-components
components: true,
// Modules for dev and build (recommended): https://go.nuxtjs.dev/config-modules
buildModules: [
// https://go.nuxtjs.dev/eslint
'@nuxtjs/eslint-module',
// https://go.nuxtjs.dev/tailwindcss
'@nuxtjs/tailwindcss',
],
serverMiddleware: ['~/server-middleware/upvoteCourse.js']
}Now, you are ready to build the custom API endpoint for voting courses. Open the file
upvoteCourse.js and import the following packages:const express = require('express');
const { GraphQLClient } = require('graphql-request');First of all, you need
express to create the API endpoint. Secondly, you need graphql-request to make GraphQL requests to the GraphCMS server.After that, you need to:
json() middlewareAdd the following lines after importing the above packages:
const app = express();

app.use(express.json());
There is one more step before building the API endpoint. You need to create a new GraphQL Client instance. The GraphQL instance requires your GraphCMS Content API URL and the bearer token.
Add the following code:
const client = new GraphQLClient(
    process.env.GRAPHCMS_ENDPOINT,
    {
        headers: {
            authorization: `Bearer ${process.env.BEARER}`,
        }
    }
);
At this point, this is how your file
upvoteCourse.js should look like:const express = require('express');
const { GraphQLClient } = require('graphql-request');
const app = express();
app.use(express.json());
const client = new GraphQLClient(
process.env.GRAPHCMS_ENDPOINT,
{
headers: {
authorization: `Bearer ${process.env.BEARER}`,
}
}
);Now it's time to build the API endpoint. Let's start with the function header.
app.post('/upvote/:slug', async (req, res) => {

}
You need to make asynchronous requests to the
/upvote/:slug endpoint. Thus, you need to use the POST method. Since the
:slug is a dynamic value, you need to retrieve it from the URL. You can get the slug from the URL as follows:app.post('/upvote/:slug', async (req, res) => {
const { slug } = req.params;
}You access the
params property on the request object.After that, you will do three actions in the method:
slug, which is the course IDThus, you need one GraphQL query and two mutations. You retrieve the course from the database with a query. However, to upvote and publish a course, you need a mutation.
In the code snippet below, you can see the query and the two mutations:
app.post('/upvote/:slug', async (req, res) => {
    const { slug } = req.params;

    const getCourse =
    `
        query getCourse($slug: ID!) {
            course(where: { id: $slug }) {
                id
                vote
                name
            }
        }
    `;

    const upvoteCourse =
    `
        mutation voteCourse($slug: ID!, $existingVotes: Int) {
            updateCourse(where: { id: $slug }, data: { vote: $existingVotes }) {
                id
                name
                vote
            }
        }
    `;

    const publishCourse =
    `
        mutation publishCourse($slug: ID!) {
            publishCourse(where: { id: $slug }) {
                id
                name
                vote
            }
        }
    `;
});
You will use the query and mutations when you make the requests to the GraphCMS database.
Lastly, you use the GraphQL client to make the requests. The following request retrieves the course from the database:
const { course } = await client.request(getCourse, { slug });Once the course is returned from the database, increment the number of votes and store it in a new variable.
const existingVotes = course.vote + 1;After that, you upvote the course by making a request to the database and passing the
slug and existingVotes, which is the new incremented number.const voteCourse = await client.request(upvoteCourse, { slug, existingVotes });When you perform a mutation on the existing data, it goes to the
DRAFT stage. That means the updated data is not visible on the frontend unless you publish it.Thus, you make another request to the server to publish the data. You pass the slug, so the database knows what course to update.
const publishedCourse = await client.request(publishCourse, { slug });Lastly, after all the operations are successful, you send a JSON response containing:
res.json({ message: 'Course upvoted successfully!', votes: publishedCourse.publishCourse.vote });This is how the complete code for
upvoteCourse.js should be:const express = require('express');
const { GraphQLClient } = require('graphql-request');
const app = express();
app.use(express.json());
const client = new GraphQLClient(
process.env.GRAPHCMS_ENDPOINT,
{
headers: {
authorization: `Bearer ${process.env.BEARER}`,
}
}
);
app.post('/upvote/:slug', async (req, res) => {
const { slug } = req.params;
const getCourse =
`
query getCourse($slug: ID!) {
course(where: { id: $slug }) {
id
vote
name
}
}
`;
const upvoteCourse =
`
mutation voteCourse($slug: ID!, $existingVotes: Int) {
updateCourse(where: { id: $slug }, data: { vote: $existingVotes }) {
id
name
vote
}
}
`;
const publishCourse =
`
mutation publishCourse($slug: ID!) {
publishCourse(where: { id: $slug }) {
id
name
vote
}
}
`;
const { course } = await client.request(getCourse, { slug });
const existingVotes = course.vote + 1;
const voteCourse = await client.request(upvoteCourse, { slug, existingVotes });
const publishedCourse = await client.request(publishCourse, { slug });
res.json({ message: 'Course upvoted successfully!', votes: publishedCourse.publishCourse.vote });
});
module.exports = appNow, you can use the custom API endpoint to upvote courses.
The
CourseList.vue component loops over the array of courses and renders each course individually.In the code below, you call the
CourseCard component for each course, and you pass the required props.<template>
<div>
<ul>
<li v-for="course in courses" :key="course.id">
<CourseCard
:id="course.id"
:name="course.name"
:description="course.description"
:url="course.url"
:vote="course.vote"
:authors="course.authors.map(author => author.name)"
/>
</li>
</ul>
</div>
</template>In the second part of the component, you specify the prop details. You only have a prop for this component -
courses. It's of type array, it's required and by default, it's an empty array.<script>
export default {
props: {
courses: {
type: Array,
default: () => {
return []
},
required: true
}
},
}
</script>Now, you can use the
CourseList component to render courses from the database on the page.The footer component only contains two icons:
Below, you can see the code for the footer (it uses SVGs for the icons):
<template>
    <div class="flex justify-center pt-4 space-x-2 mb-10">
        <a href="https://github.com/" target="_blank"><svg
            class="w-6 h-6 text-gray-600 hover:text-gray-800"
            xmlns="http://www.w3.org/2000/svg"
            xmlns:xlink="http://www.w3.org/1999/xlink"
            aria-hidden="true"
            role="img"
            width="32"
            height="32"
            preserveAspectRatio="xMidYMid meet"
            viewBox="0 0 24 24"
        ><path d="M12 2.247a10 10 0 0 0-3.162 19.487c.5.088.687-.212.687-.475c0-.237-.012-1.025-.012-1.862c-2.513.462-3.163-.613-3.363-1.175a3.636 3.636 0 0 0-1.025-1.413c-.35-.187-.85-.65-.013-.662a2.001 2.001 0 0 1 1.538 1.025a2.137 2.137 0 0 0 2.912.825a2.104 2.104 0 0 1 .638-1.338c-2.225-.25-4.55-1.112-4.55-4.937a3.892 3.892 0 0 1 1.025-2.688a3.594 3.594 0 0 1 .1-2.65s.837-.262 2.75 1.025a9.427 9.427 0 0 1 5 0c1.912-1.3 2.75-1.025 2.75-1.025a3.593 3.593 0 0 1 .1 2.65a3.869 3.869 0 0 1 1.025 2.688c0 3.837-2.338 4.687-4.563 4.937a2.368 2.368 0 0 1 .675 1.85c0 1.338-.012 2.413-.012 2.75c0 .263.187.575.687.475A10.005 10.005 0 0 0 12 2.247z" fill="currentColor" /></svg></a>
        <a href="{% twitter " %} target="_blank"><svg
            class="w-6 h-6 text-gray-600 hover:text-gray-800"
            xmlns="http://www.w3.org/2000/svg"
            xmlns:xlink="http://www.w3.org/1999/xlink"
            aria-hidden="true"
            role="img"
            width="32"
            height="32"
            preserveAspectRatio="xMidYMid meet"
            viewBox="0 0 24 24"
        ><path d="M22.46 6c-.77.35-1.6.58-2.46.69c.88-.53 1.56-1.37 1.88-2.38c-.83.5-1.75.85-2.72 1.05C18.37 4.5 17.26 4 16 4c-2.35 0-4.27 1.92-4.27 4.29c0 .34.04.67.11.98C8.28 9.09 5.11 7.38 3 4.79c-.37.63-.58 1.37-.58 2.15c0 1.49.75 2.81 1.91 3.56c-.71 0-1.37-.2-1.95-.5v.03c0 2.08 1.48 3.82 3.44 4.21a4.22 4.22 0 0 1-1.93.07a4.28 4.28 0 0 0 4 2.98a8.521 8.521 0 0 1-5.33 1.84c-.34 0-.68-.02-1.02-.06C3.44 20.29 5.7 21 8.12 21C16 21 20.33 14.46 20.33 8.79c0-.19 0-.37-.01-.56c.84-.6 1.56-1.36 2.14-2.23z" fill="currentColor" /></svg></a>
    </div>
</template>As usual, let's take the homepage and split it into two parts. The homepage lives in the
pages directory, and it's called index.js.The homepage is made of the following components:
Thus, add them to your template as follows:
<template>
    <div class="relative flex flex-col items-top justify-center min-h-screen bg-gray-100 sm:items-center sm:pt-0">
      <Hero/>
      <CourseList :courses="courses" />
      <Footer/>
    </div>
</template>
If you look at the
CourseList component, you see that the courses prop being passed. The courses prop is an array with objects, each object representing an individual course.You get the
courses array from the database. You can load data from the database asynchronously using the asyncData hook. Also, you make a GraphQL request, so you need a special package.In the code snippet below, you use the
graphql-request package and the asyncData hook to make a request to GraphCMS. You also specify what fields to return. Then, once you have the data from the database, you return it and pass it as a prop to CourseList.<script>
import { gql } from 'graphql-request';
export default {
async asyncData({ $graphcms }) {
const { courses } = await $graphcms.request(
gql`
{
courses(orderBy: vote_DESC) {
id
name
description
url
vote
authors {
name
}
}
}
`
);
return { courses };
}
}
</script>If you run the application, the homepage should display all the courses from the database in descending order. That means the courses with the most votes are shown first. Figure 53, below, illustrates an example with the courses from my database.
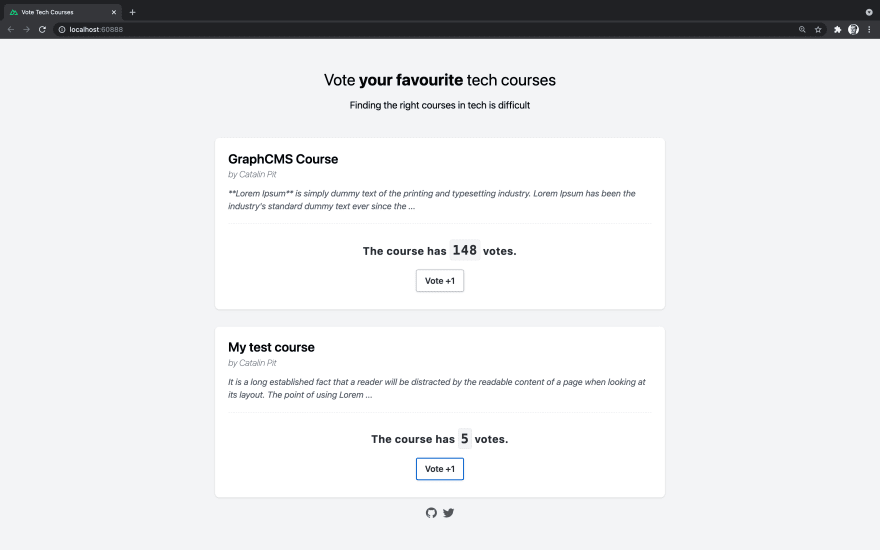
Figure 53
The next step is to create an individual page for each course. On the page, you will see all the course details and details about the author.
The last step of the tutorial is to build the individual page for each course. The individual page shows more information about the course and author or authors.
Before going further, it's important to form an idea of how dynamic pages work in Nuxt. To create a dynamic page in Nuxt, you need to use the underscore (_) in front of the page name.
Thus, create a new page
_slug.vue in the' pages' folder. Since you prefixed it with the underscore, it will be a dynamic page. Then, you can access the value from the params. In this case, you can get the value through params.slug, as you will see in the code below. Now, let's move onto the first step, which is to build the template. Everything you see inside the moustache notation -
{{ }} - it's dynamic data coming from the database.<template>
<div class="relative flex flex-col items-top justify-center min-h-screen bg-gray-100 sm:items-center sm:pt-0">
<div class="max-w-4xl mx-auto px-8 sm:px-6 lg:px-8 flex flex-col justify-center">
<Hero/>
<div class="mt-8 bg-white overflow-hidden shadow sm:rounded-lg p-6">
<h2 class="text-2xl leading-7 font-semibold">
{{ course.name }}
</h2>
<p class="mt-1 font-extralight italic text-gray-600">by {{ course.authors.map(author => author.name).toString() }}</p>
<p class="mt-3 text-gray-600">
{{ course.description }} <br>
<br>
We recommend you take a look at the <a :href="course.url" target="_blank" class="text-green-500 hover:underline">course</a> page.<br>
</p>
<div class="flex flex-col items-center border-t border-dashed mt-5">
<p class="mt-4 pt-4 text-gray-800 font-bold text-xl tracking-wider">
The course has <code class="bg-gray-100 text-2xl p-1 rounded border">{{ course.vote }}</code> votes.
</p>
</div>
</div>
</div>
<div class="max-w-4xl mx-auto px-8 sm:px-6 lg:px-8 flex flex-col justify-center">
<div class="mt-8 bg-white overflow-hidden shadow sm:rounded-lg p-6">
<h2 class="text-2xl leading-7 font-semibold mb-3">
{{ course.authors.map(author => author.name).toString() }}
</h2>
<a :href="course.authors.map(author => author.twitterProfile).toString()" class="mt-1 font-extralight italic text-gray-600"><code class="bg-gray-100 p-2 rounded border">@catalinmpit</code> Twitter</a>
<div class="flex flex-col items-center border-t border-dashed mt-5">
<p class="mt-4 pt-4 text-gray-800 tracking-wider">
{{ course.authors.map(author => author.biography).toString() }}
</p>
</div>
</div>
</div>
</div>
</template>In the second part, you use the
graphql-request to make a GraphQL request to the GraphCMS database. You also pass the slug to the request, which represents the ID of the course.Using the ID, the GraphCMS database knows which course to retrieve and send back. Also, you retrieve information about the course authors.
Once the course is retrieved, it returns it so you can render it on the page.
<script>
import { gql } from 'graphql-request';

export default {
  async asyncData({ $graphcms, params }) {
    const { slug } = params;
    const query =
      gql`
        query getCourse($slug: ID!) {
          course(where: { id: $slug }) {
            id
            name
            description
            url
            vote
            authors {
              name
              biography
              twitterProfile
            }
          }
        }
      `
    ;

    const course = await $graphcms.request(query, { slug });
    return course;
  }
}
</script>
Figure 54 illustrates how the individual course page looks. You can see all the details about the course and the authors.

Figure 54
And you are done!
Well done for building the application! Now you can store tech courses and allow people to vote them.
The application is not perfect, and there are improvements that you could make. Some of them are as follows:
And more.
You can see the live application here. In addition, the GitHub repository is available at this link.
Article originally published on catalins.tech.
30