42
Managing remote servers with SSH and SFTP connections: a step-by-step guide
Among the benefits to using SSH to manage remote machines, we can list:
Many people, specially for Windows, tend to recommend a GUI client called PuTTY to set SSH connections. As long as you are on Windows 10, OpenSSH is already native on you computer, so do not bother installing PuTTY.
By the end of this article you will have learned how to:
servers
Windows/Linux devices to access these servers
servers, so they will become less vulnerable to brute-force attacksservers
servers
We will use Digital Ocean for this part. Creating a
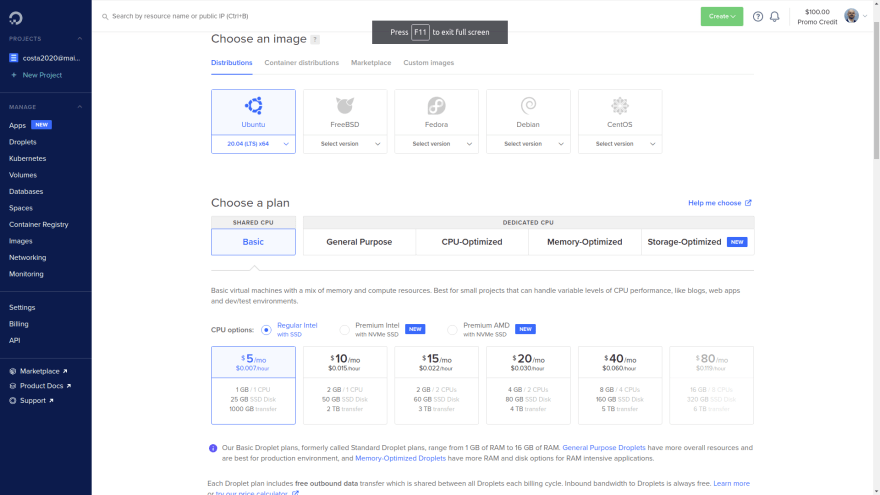
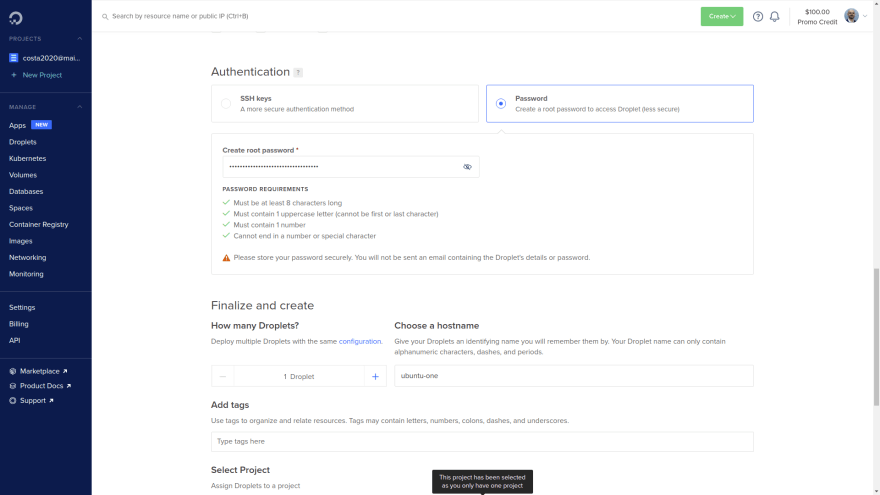
server is very straightforward. Look for a create droplet option there. Here we have some settings suggestions for the new server to be created:Now hit the "create droplet" button
Some reference screenshots:


Once the server is created, you will have access to its IP address. Mine was
142.93.169.195, and yours will be a different one.Check that the machine is "real" by verifying its IP address on this website:
http://ifconfig.co/?ip=142.93.169.195 (use your IP, not this one)Where:
root: user142.93.169.195: server IPYou will be prompted for a message regarding ECDSA key fingerprint. Type "yes".
Once you say yes to this, notice that in $HOME/.ssh folder there will be a known_hosts file. This file "remembers" the servers that the current client device has previously connected to. Every time you connect to a new server, its fingerprint will be saved here (and you will be notified of that). This is a mechanism to verify that the server you are connecting to is actually the one you think it is.
You will be prompted for the password (the one you set when the
server was created). Paste it here.And there it is. If your terminal changed to
root@ubuntu-one, you are connected to the remote server!This is optional, but recommended, as you problably will install additional softwares on this
server. Run on the server:apt update
apt upgradeSSH is the authentication method that we will use as an alternative to using passwords when accessing remote
servers. The SSH key is a 2-part key. Here's how they differ:server that you will connect to.client computer and access the servers the key is intended for! ⚠️
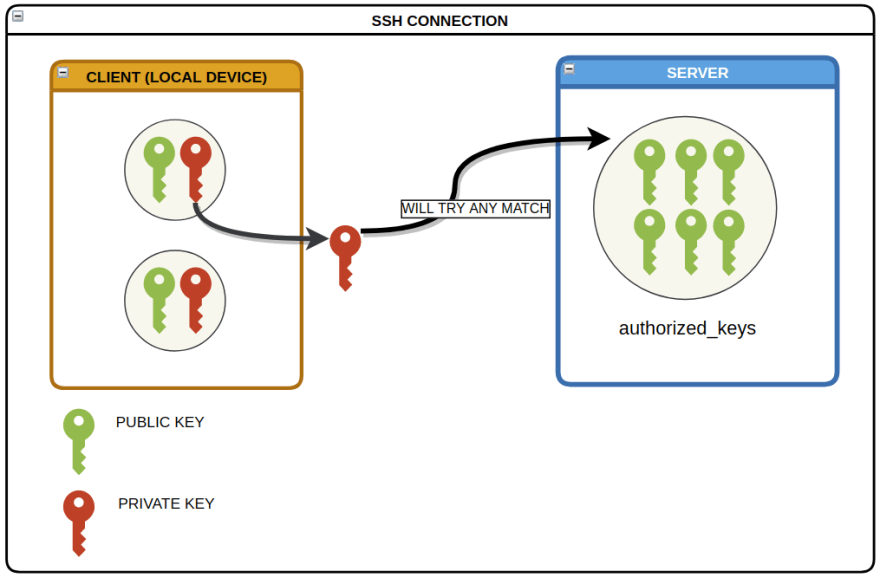
You can have multiple SSH keys stored on your device. Once you have one, send the
public part to the server. There, it will be stored in a dedicated place. To establish a connection, you will select a private key and the server will check for a match with their pre-existing public keys.
To make it easier, download and run one of the following scripts. They use the
ed25519 algorithm to create the keys, since it provides a more sophisticated encryption and generates a smaller key as well.When creating a SSH key, you will be prompted for an optional passphrase that will be requested when you try to use it. It is highly recommended that you set a passphrase, because if your private key gets leaked and it has no passphrase, someone else can actually it on their client computer and very likely will be able to access the servers that the key has access to. 😱
Tipically, the SSH keys are stored under the
$HOME/.ssh directory (the . means that .ssh is a hidden folder), but you can have them elsewhere. I created a SSH key named costa, so here I can expect to see the 2-part key in 2 files: costa (private, with no extension)costa.pub (public)See its contents with:
cat costa.pubOr using a text editor, and you wil get something like this:
ssh-ed25519 AAAAC3NzaC1lZDI1NTE5AAAAIN7ioJG5Axxcksw47AujdY/Lke8ZJoWRPSDsV6pc/reK costaLog in to the
server, then:cd /root/.sshThere you will find the
authorized_keys file, which is where the public keys must be inserted into. Paste the public key here manually by opening the file using a text editor:nano authorized_keysOr directly using the
>> command: echo <your_public_key_content> >> authorized_keysIf you use this second option, make sure you use >> (append) and not > (overwrite) ⚠️
Think of the
authorized_keys file as a vault that holds all the public keys from all devices authorized to SSH connect into this server using a SSH key.Now that the
First, if you are on the
Back on the
public is on the server, we should be all set for accessing the server with the SSH key! First, if you are on the
server, exit from it using the exit command.Back on the
client, access the server with the following command. This time you will not be prompted for the password.ssh -i <private_key_file> <user>@<ip>Notice that you don't actually need to provide the private key path using -i, as the keys stored under /.ssh are picked automatically. But as you begin to add more keys, chances are that at some point you will start to get errors for unmatching keys. To avoid this kind of problem, I suggest that you always specify the key.
Back on the
client, let us create a sample file in the current directory you are in:touch hello.txtNow let us send it to the
server:scp -i <private_key> hello.txt [email protected]:Where:
:: the directory where hello.txt will be saved on the server. In this case, the main/root folder.Go back to the
server and verify that hello.txt is there.This procedure is a little counter-intuitive, because you need to be on the client side. It is as if you are fetching a file previously stored on the server.
Being on
client, I would like to have hello.txt (the one already saved on the server) sent to the client. First, delete hello.txt we just created on the client:rm hello.txtNow fetch
hello.txt:scp -i <private_key> [email protected]:hello.txt .Where:
:: indicates the file path on the server. (at the end): the path I want the file to be saved on the client. Notice the space before the .. Now, make sure you can see hello.txt on the client.The following script will create a new user, grant it
sudo permissions and grab a copy of the root user's authorized_keys file. Keep in mind that each user has its own authorized_keys file. ⚠️From the
client, send create-user.sh to the main folder on the server:scp create-user.sh [email protected]:Back on the
server, you will see that create-user.sh is there. Run it to create a new user:. create-user.shNotice that your terminal changed to
<new_user>@ubuntu-one. Now check the contents of the authorized_keys of the <new_user>:cat /home/<new_user>/.ssh/authorized_keysYou will see here the same
public key that you added to the root user. That means that now you can SSH connect to this server as <new_user>, instead of root, by using the same private key. Now you can replace
root with <new_user> when connecting to the server.This is not required, but notice that if you try to connect to the
server without a SSH key, you will still be prompted for the password. We will disable that so the server will be protected against brute-force attacks using passwords. On the server, run:sudo nano /etc/ssh/sshd_configNotice that in order to change this file, you need sudo permissions, hence the sudo command.
This file contains settings regarding SSH. In its contents, look for
Now you need to restart the SSH service for the changes to take effect: ⚠️
PasswordAuthentication. It is problably set to yes, so change it to no. Also, make sure it is not commented as well (#). Save the changes and close this file.Now you need to restart the SSH service for the changes to take effect: ⚠️
systemctl restart sshdFrom this moment on, you will no longer be prompted for the password when trying to SSH connect to the
server!😎The settings in the /etc/ssh/sshd_config file apply to all the users, as the /etc folder in Linux has a global scope.
This is not required either, but keep in mind that there are many security concerns about remote connecting to a server as the
root user. This user is like a God mode on Linux machines, so a lot of damage can be done by this user on the server! ⚠️To disable
root access, go back to:sudo nano /etc/ssh/sshd_configSet
PermitRootLogin to no. Now restart the SSH Daemon service again: systemctl restart sshdNow go ahead and try to access the
server as the root user. You are not supposed to be able to log in.This file makes it a lot easier to SSH connect to remote
servers without needing to type their IP address and user. It is very helpful, especially if you plan to connect to multiple servers.On the
client, use the following template to create a file named config, and place it in your /.ssh folder:In case you are wondering about the Port, 22 is the default port for SSH connections. It can be changed on the /etc/ssh/sshd_config file on the server. Also, the settings under Host * are broadcasted to all theHosts
Once this file is set, the SSH connections can be made as such:
ssh <custom_name>In short, now you can replace the user + IP address + private key + port with a simple custom alias. Very convenient, right? 😎

We will use
Apache as a HTTP server. Install it on the server:sudo apt install apache2 -yOn the
client, go to your browser and visit the IP address of the server. You will see a page similar to this one:
The next step is finding this page on the
Back on the
server and replace it with our custom website content. Back on the
server, go to this directory:cd /var/www/htmlYou will find a
index.html file here. If you inspect its contents, you will notice that this is the file you are seeing on the page above.We will use my personal portfolio as an example for our custom website.
Back on the
Back on the
client, download it here as a .zip file, and send it to the server (main folder):scp portfolio-master.zip <custom_name>:Back on the
server and , having the portfolio-master.zip file there, move this file to the /var/www/html/ directory:sudo mv portfolio-master.zip /var/www/html/Go there:
cd /var/www/html/Install
unzip to unzip this file:sudo apt install unzipNow you can unzip it:
unzip portfolio-master.zipYou may also delete the preexisting
index.html file, as we will use a different one:rm index.htmlAfter the unzipping, we get a
/portfolio-master folder. We do not need the folder, only its contents. So we will move them into the current folder (/var/www/html/): sudo mv portfolio-master/* .Where:
*: all the files in /portfolio-master folder.: the current directoryNow you are expected to see a bunch of files in
On the
/var/www/html/, including a brand new index.html file.On the
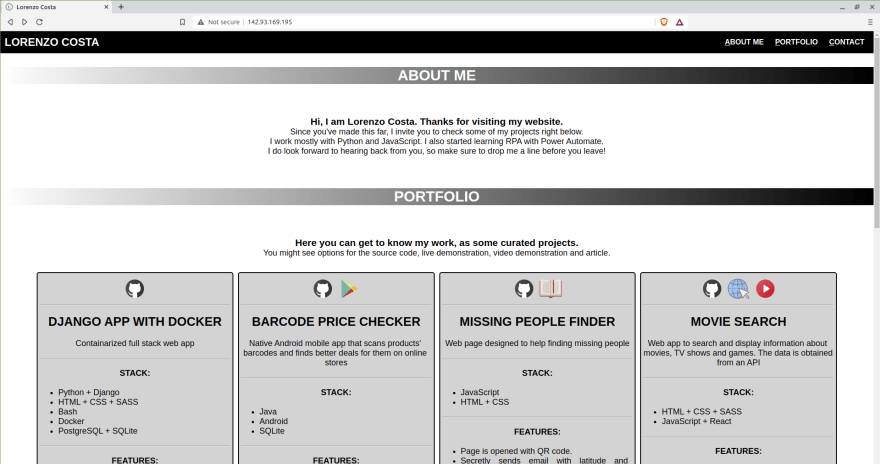
client side, visit the IP address again on the browser and you will see my portfolio page!
You may now safely delete the
/portfolio-master folder andportfolio-master.zip file, as we do not need them anymore:sudo rm -r portfolio-master/
sudo rm portfolio-master.zipWe learned that
scp can be used to transfer files back and forth from client to server. However, this approach has some limitations:remote and local machines, prior to issuing the command.In short, it is the FTP (File Transfer Protocol) with SSH-batteries included. Which means you can use the same credentials you are already using for SSH. Among the benefits to using SFTP:
server directories.At this point I assume you are using the
config file to manage your SSH connections, so in order to connect using SFTP from the local:sftp <custom_connection_name>Your shell is supposed to have changed to
Some of the main possibilities with SFTP:
sftp>. ⚠️ Some of the main possibilities with SFTP:
get <filename>put <filename>If a download fails or is interrupted, you can resume it:
reget <filename>If a upload fails or is interrupted, you can resume it:
reput <filename>Using a single command:
echo 'put <local_file_path_to_upload>'| sftp -i <key> <user>@<ip>
echo 'get <remote_file_path_to_download>'| sftp -i <key> <user>@<ip>Handy to use before sending large files to the
server.dfPersonally I find this one very handy.
lls!
#when you are done, exitFor more commands, type
help.As you grant more people SSH access to your server, chances are at some point you will want to know which keys have been used to log in, and when, an so on. On Linux,
journactlctl works as an auditing tool for that. In our scenario, let's say I want to know about SSH connections for today on my server.journalctl -u ssh -S todayYou wil find some entries similar to this one:
Oct 06 02:46:03 ubuntu sshd[2403]: Accepted publickey for costa from 192.168.18.1 port 54006 ssh2: ED25519 SHA256:KcZdwz9jSWutRXORHXH995E2ThQn9zci1yaeSaaPKxc
Oct 06 02:46:03 ubuntu sshd[2403]: Accepted publickey for costa from 192.168.18.1 port 54006 ssh2: ED25519 SHA256:KcZdwz9jSWutRXORHXH995E2ThQn9zci1yaeSaaPKxc
At first glance, you might think this is a reference to a public SSH stored in your
authorized_keys. Actually, it is the hash code for the public key. Now, to inspect the hash codes for the keys in authorized_keys:ssh-keygen -l -f .ssh/authorized_keysNow you can look for a match with the
journalctl entries. In our case: SHA256:KcZdwz9jSWutRXORHXH995E2ThQn9zci1yaeSaaPKxc You can inspect the hash code for a SSH key with ssh-keygen -l -f <public_or_private_key_file>. You will notice that both public and private key share the same hash!
That's it, people.
42
