
37
Creating custom form controls using ControlValueAccessor in Angular
How to create custom form controls in Angular using ControlValueAccessor? We can create custom form components and connect them to either template-driven forms or reactive forms.
So when I say custom form controls, I am talking about those elements that are not your typical controls like input fields, radio buttons, or checkboxes. For example, a star rating component or a knob. These are not available out of the box.
We can also make sections in a form as child components which can be then used as custom form controls. In this way, larger forms can be broken down into manageable pieces.
For all the default form controls like input field, radio button, checkbox, select dropdown, etc, custom control value accessors are already written and shipped with Angular. Eg: CheckboxControlValueAccessor
We will be talking more about
ControlValueAccessor it and how to use it to create really cool form.When we hear the term form, we would be thinking of few input text fields and maybe some checkboxes and stuff. But when it comes to really complex forms where we have a lot of custom buttons, lists, and selections, the whole form will become very complex. And managing such a complex form would be a problem.
When there are a lot of custom form elements or when the form starts to get big, it's probably a good idea to break it into smaller sections. Placing everything in a single template would make it really messy.
We can break down the form into multiple components and then connect it with the main form.
So If you have a custom element that you would like to connect to your form, you have to make use of ControlValueAccessor to make the element compatible with Angular Forms API. Doing so will enable the element to be connected using
ngModel (Template Driven Forms) or formControl (Reactive Forms).Let's take a look at how do we create a custom form control.
When I started with Angular, I was not aware that something like this existed. I remember when I wrote child components for forms and used
@Input() and @Output() to receive and send form values to the parent form component. I used to listen to the changes in the child component and then emit the values to the parent.In the parent, the values will be taken and used to patch the form. This was until I came across the magical ControlValueAccessor. No more inputs and outputs, everything just works.
Step 1 is to implement the interface in the custom component. The interface would ask us to add few methods in our class.
interface ControlValueAccessor {
  writeValue(obj: any): void
  registerOnChange(fn: any): void
  registerOnTouched(fn: any): void
  setDisabledState(isDisabled: boolean)?: void
}
Let us see what each of the methods is doing. Once we are clear on how things are, we can dive into the implementation.
writeValue() - this function is called by the Forms API to update the value of the element. When ngModel or formControl value changes, this function gets called and the latest value is passed in as the argument to the function. We can use the latest value and make changes in the component. (ref)registerOnChange() - we get access to a function in the argument that can be saved to a local variable. Then this function can be called when there are any changes in the value of our custom form control. (ref)registerOnTouched() - we get access to another function that can be used to update the state of the form to touched. So when the user interacts with our custom form element, we can call the saved function to let Angular know that the element has been interacted with. (ref)setDisabledState() - this function will be called by the forms API when the disabled state is changed. We can get the current state and update the state of the custom form control. (ref)Once we implement these functions, the next step is to provide the
NG_VALUE_ACCESSOR token in the component's providers array like so:const COUNTRY_CONTROL_VALUE_ACCESSOR: Provider = {
provide: NG_VALUE_ACCESSOR,
useExisting: forwardRef(() => CustomFormControlComponent),
multi: true,
};
@Component({
selector: 'app-country-selector',
template: ``,
providers: [COUNTRY_CONTROL_VALUE_ACCESSOR], // <-- provided here
})
export class CustomFormControlComponent implements ControlValueAccessor {}Note: Here I created a provider constant and then passed it into the
providers. Also you can see the use of forwardRef (ref) here. It is needed because we are referring to the CountrySelectorComponent class which is not defined before its reference.So now that we know what each of these functions does, we can start implementing our custom form element.
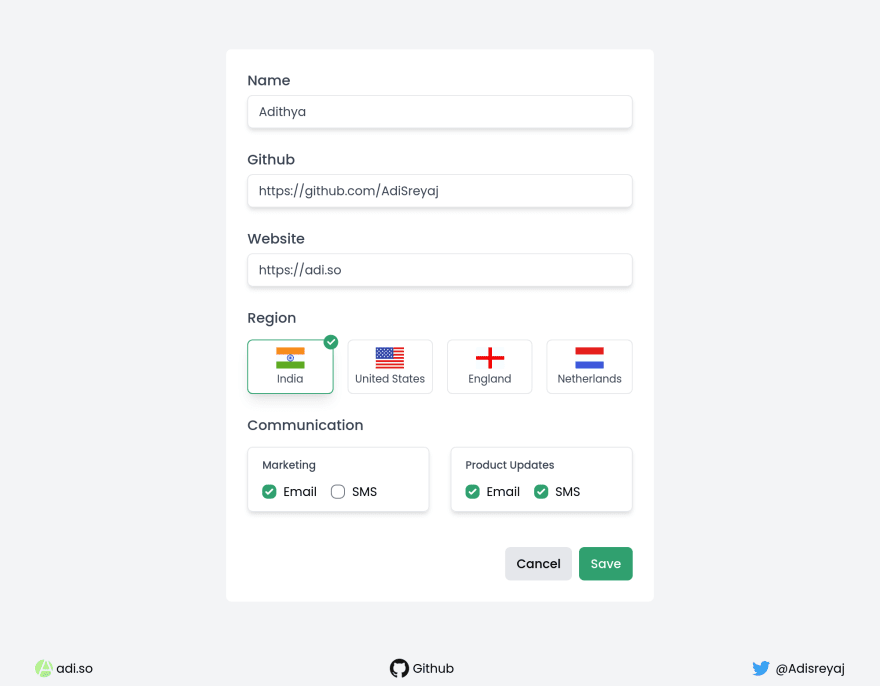
We are going to take a look at the base form that we are gonna work with. We just have some basic input fields and 2 custom form elements.
{
    name: 'Adithya',
    github: 'https://github.com/AdiSreyaj',
    website: 'https://adi.so',
    server: 'IN',
    communications: [{
          label: 'Marketing',
          modes: [{
              name: 'Email',
              enabled: true,
            },
            {
              name: 'SMS',
              enabled: false,
            }],
        },
        {
          label: 'Product Updates',
          modes: [{
              name: 'Email',
              enabled: true,
            },
            {
              name: 'SMS',
              enabled: true,
            }],
        },
      ]
  }
This is how we need the data to be. Here the
server and the communications fields are going to be connected to a custom form control. We are using Reactive Forms in the example.Here is how our form will look like:
const form = this.fb.group({
    name: [''],
    github: [''],
    website: [''],
    server: [''],
    communications: [[]]
  });
and in the template
<form [formGroup]="form">
    <div class="form-group">
      <label for="name">Name</label>
      <input type="text" id="name" formControlName="name">
    </div>
    <div class="form-group">
      <label for="github">Github</label>
      <input type="url" id="github" formControlName="github">
    </div>
    <div class="form-group">
      <label for="website">Website</label>
      <input type="url" id="website" formControlName="website">
    </div>
    <div class="form-group">
      <label>Region</label>
      <app-country-selector formControlName="server"></app-country-selector>
    </div>
    <div class="form-group">
      <label>Communication</label>
      <app-communication-preference formControlName="communications"></app-communication-preference>
    </div>
  </form>
Notice in the above template we are directly using
formControlName on the app-country-selector and app-communication-preference components. This will be only possible if those components are implementing the ControlValueAccessor interface. This is how you make a component behave like a form control.We are going to see how to implement a cool country selector component as a custom form control that can be directly connected to a form. In this example, I'll be using Reactive Forms.
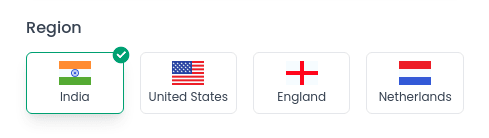
The component is pretty straightforward, we will give the user to select one country from a given list. The behavior is similar to a radio button. The only difference here is that we are using our own custom component to implement this design.
As always, I start by creating a new module and component for our country selector form control.
Here is how we implement the ControlValueAccessor for our country selector component.
const COUNTRY_CONTROL_VALUE_ACCESSOR: Provider = {
  provide: NG_VALUE_ACCESSOR,
  useExisting: forwardRef(() => CountrySelectorComponent),
  multi: true,
};
We provide it in the providers array inside the
@Component decorator.@Component({
selector: 'app-country-selector',
template: `
<div>
<ng-container *ngFor="let country of countries">
<button [disabled]="disabled" (click)="selectCountry(country.code)"
[class.selected]="!disabled && selected === country.code">
<ng-container *ngIf="!disabled && selected === country.code">
<!-- Checkmark Icon -->
</ng-container>
<img [src]="...flag src" [alt]="country.name" />
<p>{{ country?.name }}</p>
</button>
</ng-container>
</div>
`,
providers: [COUNTRY_CONTROL_VALUE_ACCESSOR],
})
export class CountrySelectorComponent implements ControlValueAccessor {
countries = [
{ code: 'IN', name: 'India' },
{ code: 'US', name: 'United States' },
{ code: 'GB-ENG', name: 'England' },
{ code: 'NL', name: 'Netherlands' },
];
selected!: string;
disabled = false;
private onTouched!: Function;
private onChanged!: Function;
selectCountry(code: string) {
this.onTouched(); // <-- mark as touched
this.selected = code;
this.onChanged(code); // <-- call function to let know of a change
}
writeValue(value: string): void {
this.selected = value ?? 'IN';
}
registerOnChange(fn: any): void {
this.onChanged = fn; // <-- save the function
}
registerOnTouched(fn: any): void {
this.onTouched = fn; // <-- save the function
}
setDisabledState(isDisabled: boolean) {
    this.disabled = isDisabled;
  }
}If the user has given an initial value to
server in the form, we will get the initial value in the writeValue() method. We get the value and assign it to our local variable selected which manages the state.When the user clicks on a different country, we mark the field as
touched and then assign the value to the selected variable. The main part is we also call the onChanged method and pass the newly selected country code. This will set the new value as the form control's value.By using the argument from
setDisabledState() method we can implement the disabled state for our component. So If we trigger disable from the form using:this.form.get('server').disable();Doing the above will trigger a call to
setDisabledState() method where the state isDisabled is passed, which is then assigned to a local variable disabled. Now we can use this local variable to add a class or disable the button.setDisabledState(isDisabled: boolean) {
this.disabled = isDisabled;
}That is all! We have successfully created a custom form control. Check the GitHub repo for full code.
Now let's see how to implement the second custom form control in our form, which allows user to select their communication preferences.

This is also a very simple component that has a bunch of checkboxes. We could have added this in the same parent component where the form is initialized. But by creating a separate component, we are making it more maintainable.
const COM_PREFERENCE_CONTROL_VALUE_ACCESSOR: Provider = {
  provide: NG_VALUE_ACCESSOR,
  useExisting: forwardRef(() => CommunicationPreferenceComponent),
  multi: true,
};

@Component({
  selector: 'app-communication-preference',
  template: `<div>
    <ul>
      <ng-container *ngFor="let item of options; index as i">
        <li>
          <p>{{ item?.label }}</p>
          <div>
            <ng-container *ngFor="let mode of item.modes; index as j">
              <div>
                <input
                  type="checkbox"
                  [id]="item.label + mode.name"
                  [(ngModel)]="mode.enabled"
                  (ngModelChange)="handleChange(i, j, $event)" />
                <label [for]="item.label + mode.name">{{ mode.name }}</label>
              </div>
            </ng-container>
          </div>
        </li>
      </ng-container>
    </ul>
  </div>`,
  providers: [COM_PREFERENCE_CONTROL_VALUE_ACCESSOR],
})
export class CommunicationPreferenceComponent implements ControlValueAccessor {
  options: CommunicationPreference[] = [];
  private onTouched!: Function;
  private onChanged!: Function;
  handleChange(itemIndex: number, modeIndex: number, change: any) {
    this.onTouched();
    this.options[itemIndex].modes[modeIndex].enabled = change;
    this.onChanged(this.options);
  }

  writeValue(value: any): void {
    this.options = value;
  }
  registerOnChange(fn: any): void {
    this.onChanged = fn;
  }
  registerOnTouched(fn: any): void {
    this.onTouched = fn;
  }
}
Again it's the same thing we are doing, we have an
When the user makes any change, we update the local state and call the
options variable that manages the local state of the component. When there is any value-change triggered by the form, we get the new value in the writeValue method, we update the local state with the changed value.When the user makes any change, we update the local state and call the
onChanged method and pass the updated state which updates the form as well.Find the complete code for the component in the repo.
Angular makes it really easy to implement custom form control using
ControlValueAccessor. By implementing few methods, we can directly hook our component to a Reactive or Template Driven form with ease.We can write all sorts of crazy form elements and use them without writing logic to handle communication between parent and child. Let the forms API do the magic for us.
We can also use this approach to break sections of the form into their own individual component. This way if the form is big/complex, we can break then down into smaller components that can be easily managed.
Do add your thoughts in the comments section.
Stay Safe ❤️
Stay Safe ❤️
37