20
loading...


{} denote object-form while Data encapsulated in "square brackets" [] denote array-form.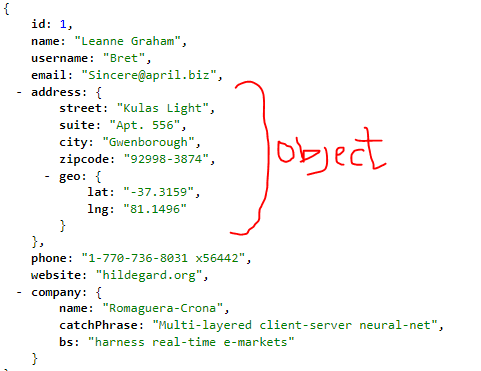
NB : As you can see JSON objects can be nested into one another, the same goes for JSON arraysRepresentational State Transfer which is a software architectural style. A REST API an API that follows the REST design principles. Unlike some other API models, REST APIs are flexible, user-friendly and easy to work with across multiple programming languages and it has non-strict design principles which is why it's easy to work with.You can read on REST design principles here.GitHub_API in Qt Creator(the IDE for Qt framework) which inherits the QMainWindow base class and add the network module in our project file because we will be working with networks in this project.


NB : The goal of this article is to show how to work with REST APIs in Qt which already assumes you have basic knowledge on how Qt worksQNetworkAccessManager - allows our application to send and receive network repliesQNetworkRequest - contains a request to be sent to a QNetworkAccessManager objectQNetworkReply - embodies a replywhich is gotten when a request is carried out by QNetworkAccessManager

netManager - will manage our network requests and repliesnetReply - will handle most of the replies we get from the APIrepoReply - will handle the replies we get concerning repositories from GitHubdataBuffer - will contain the data we receive from the APIimg - will contain the an image (profile pic)We want this program to collect a 'GitHub Username' from the user and then it will request information on the GitHub user(if it exists) through the GitHub API, the API will return the information in form of JSON and the program will make use of that data to display some information through the GUI
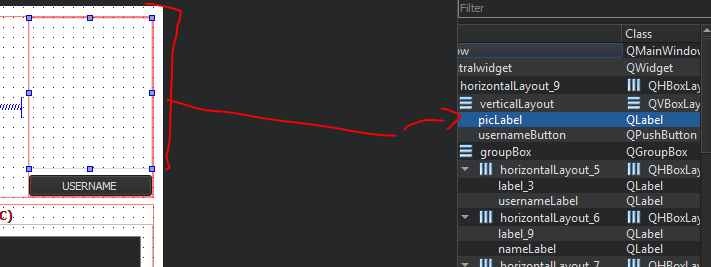
USERNAME Button, it should bring up a simple dialog window in which the user would input the username of the GitHub Account
ok button, we first store that username into a variable then we call the clearValues() function which resets all the information displayed i.e It resets the program to its default state which is when no information is being displayed.

QNetworkRequest variables (req, repoReq) which we will use to request for information on the user and the repositories of the user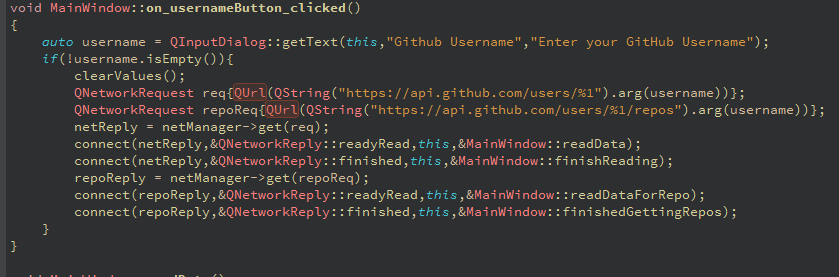
api.github.com/users/YOUR_USERNAME and you'll see that it will return information on the GitHub username you put in place of YOUR_USERNAME in form of a JSON document. In my case: 
api.github.com/users/%1 as the URL for req and api.github.com/users/%1/repos for repoReq.NB : %1 is a placeholder text, it will be replaced by what is passed into the arg method, In this case it will be replaced with the username variable..It's similar to how C's printf() function worksget method for the QNetworkAccesManager object and pass in req as the argument. It basically gets the content of what the reqrequests (which in this case is the information of the user in JSON format) and returns it in form of a QNetworkReply object.
netReply variable and then we connect its signals(readyRead and finished) to our custom slots readData and finishedReadingreadyRead signal is emitted when there is data to be read from the netReply objectfinished signal is emitted when the netReply object has finished processing the data it got from the requestreadData and finishedReading is called when the readyRead and finished signal for the netReply object is emitted//READ DATA CUSTOM SLOT
void MainWindow::readData()
{
dataBuffer.append(netReply->readAll());
}
//FINISHED READING CUSTOM SLOT
void MainWindow::finishReading()
{
if(netReply->error() != QNetworkReply::NoError){
qDebug() << "Error : " << netReply->errorString();
QMessageBox::warning(this,"Error",QString("Request[Error] : %1").arg(netReply->errorString()));
}else{
//CONVERT THE DATA FROM A JSON DOC TO A JSON OBJECT
QJsonObject userJsonInfo = QJsonDocument::fromJson(dataBuffer).object();
//SET USERNAME
QString login = userJsonInfo.value("login").toString();
ui->usernameLabel->setText(login);
// SET DISPLAY NAME
QString name = userJsonInfo.value("name").toString();
ui->nameLabel->setText(name);
//SET BIO
auto bio = userJsonInfo.value("bio").toString();
ui->bioEdit->setText(bio);
//SET FOLLOWER AND FOLLOWING COUNT
auto follower = userJsonInfo.value("followers").toInt();
auto following = userJsonInfo.value("following").toInt();
ui->followerBox->setValue(follower);
ui->followingBox->setValue(following);
//SET ACCOUNT TYPE
QString type = userJsonInfo.value("type").toString();
ui->typeLabel->setText(type);
//SET PICTURE
auto picLink = userJsonInfo.value("avatar_url").toString();
QNetworkRequest link{QUrl(picLink)};
netReply = netManager->get(link);
connect(netReply,&QNetworkReply::finished,this,&MainWindow::setUserImage);
dataBuffer.clear();
}
}
void MainWindow::setUserImage()
{
img->loadFromData(netReply->readAll());
QPixmap temp = img->scaled(ui->picLabel->size());
ui->picLabel->setPixmap(temp);
}QByteArray object)NB : A QByteArray is used to store raw bytesfinishedReading - first checks to see if an error occurred during the request, if there was an error it will display a simple dialog window notifying the user of the error. If there was no error it does the following steps :
dataBuffer to a JSON Document and then convert that document to a JSON object named userJsonInfo, we can do this because remember when i said JSON objects are denoted using curly-braces {}, If you go to the site on your browser you will see that all the data is in fact enclosed in a curly brace which means that we can convert that document straight-away into a JSON object.value method on the userJsonInfo variable which expects a "key", it will return the value associated with the key (it will return a QJsonValue object which we convert to a string by calling it's toString() method), We pass in the "login" key and we expect that it would return the username value associated with it. Then we pass the value in to the usernameLabel Label object which is in our GUI.finished signal to a custom slot setUserImage then we clear our buffer because we dont need to store any more data.setUserImage - gets the image from the buffer then it scales it down to the size of the picLabel object so it can fit in it and then sets the picLabel object to show the image by calling setPixmap()
NB : The dataBuffer object gets cleared after the setUserImage function is completed
repoReply object which will contain the JSON document that has information on the repositories of the GitHub Account.void MainWindow::readDataForRepo()
{
dataBuffer.append(repoReply->readAll());
}
void MainWindow::finishedGettingRepos()
{
if(repoReply->error() != QNetworkReply::NoError){
qDebug() << "Error Getting List of Repo: " << netReply->errorString();
QMessageBox::warning(this,"Error",QString("Request[Error] : %1").arg(netReply->errorString()));
}else{
QJsonArray repoInfo = QJsonDocument::fromJson(dataBuffer).array();
ui->repoBox->setValue(repoInfo.size());
for(int i{0}; i < ui->repoBox->value(); ++i){
auto repo = repoInfo.at(i).toObject();
QString repoName = repo.value("name").toString();
ui->repoList->addItem(repoName);
}
}
}
readDataForRepo - appends the data(JSON document) into the dataBufferfinishedGettingRepos - first checks if there was an error with the request and displays the error to the user, if there was no error it creates a JSON document out of the data stored in our dataBuffer and then it converts it into an array because the information in the document is enclosed in square braces which means it's a json array. Then it sets the value of the repoBox GUI element to the size of the array(the size of the array would be the number of public repos that user has)
loop(that is constricted to the length of the array) to go through each item(repo) in the array and get its name and then add it to our list widget which is another of our GUI component
NB : A QListWidget is used to display items in a .........list form
PS : Here is theREPO which contains this entire program in case you want to view the entire source code20