
36
Continuous Deployment in Angular
Angular is one of the most popular front-end frameworks. Continuous Deployment (CD) is one of the most important developments in software engineering in the last decade. It’s a natural and yet radical evolution of Continuous Integration (CI). While its predecessor stated that developers should merge their work to the main line often, CD goes one step further and says that each of those merges—when they succeed—should be automatically deployed to the production environment.
In today’s post, I’ll walk you through how to set up CD for an Angular app in a basic yet functional way, leveraging only free resources. I’ll also show you how to add a new feature to your app behind a feature flag, so you can change its behavior and track its performance without multiple deployments.
Before we get into the practical parts of the post, let’s cover some basics by explaining what CI and CD are and what you gain by adopting them.
Continuous integration means that developers integrate their work very often, at least once a day, but typically more. By doing that, they enjoy the benefits of shorter feedback cycles, finding defects earlier, and improving the overall quality of the product.
Continuous deployment is going one step further by also automating the deployment. That means that every time a merge to the main branch happens successfully—that is, the code builds and all tests and other automatic checks pass—the product is delivered to production.
For brevity’s sake, we won’t walk you through setting up an Angular application. What we’ll do instead is to point you to a GitHub repo where you can download or clone a bare-bones yet functional CRUD application. So go to this repository and clone or download the application.
As soon as you’ve got a folder with the application, open up a terminal, and navigate into the app directory. If you’ve cloned the repository using Git, remove the connection to the original repository by running this:
git remote remove originThe step above isn’t necessary if you obtained the application by downloading its contents as a zip. Now, while still in the app’s folder, serve the app by running the following command:
ng serveGo to http://localhost:4200, and you’ll see the app working:
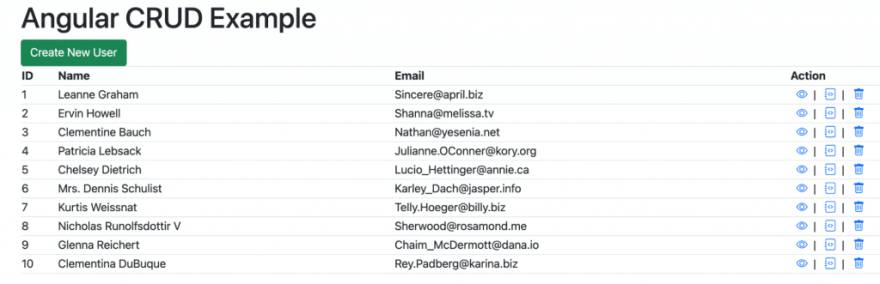
The app is a simple CRUD application that consumes a test Rest API (https://jsonplaceholder.typicode.com/).
You’re now ready to start implementing CI/CD for your app. So let’s do it.
As we’ve promised, you’ll only need free resources to follow this tutorial. And the first resource you’ll leverage is Firebase Hosting, a free hosting service offered by Google.
So begin by going to Firebase Hosting, and start a new project. For the next step, you’ll install the Firebase CLI globally using npm:
npm install -g firebase-toolsAs soon as the installation is finished, you’ll have to log in to Firebase by running the following command:
firebase loginA new tab on your browser will take you to a page where you’ll have to authorize the Firebase CLI to access your Google account. After you grant access to the Firebase CLI, you can close the browser window and get back to your terminal.
Now you’re ready to initialize Firebase for the project. At the root of the project’s directory, run this:
firebase initYou’ll then be asked a bunch of questions. Down-arrow to
Hosting: Configure and deploy Firebase Hosting sites, touch the space bar, and hit enter. Down-arrow to Create a new project and hit enter. Give it a unique name (mps-split-ang-crud shown below). Set dist/<your local app name> for the public directory question.Note: this is the name you gave your angular project. In my case, it’s called:
my-crud-app. Enter n for the question after that. See the images below for the settings described here.

With that, you’re ready to do your first deploy to Firebase. First, you’ll have to perform a production build using Angular:
ng build --configuration productionAfter the build is complete, you’ll have a dist folder containing the resulting artifacts. The contents of that folder are what you send when you deploy your application. That’s why you had to answer dist when Firebase asked you what you wanted to use as your public directory.
So, to deploy the contents of your public directory, you just have to run an easy command:
firebase deployIf you see something like the following image, your deploy was a success:
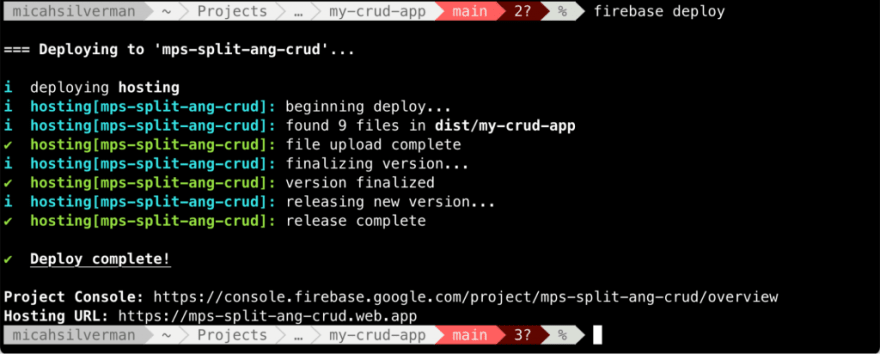
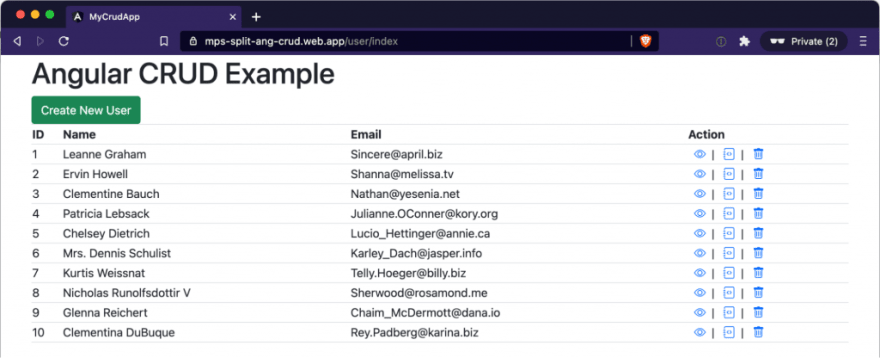
You can now point to the URL Firebase shows you to see your app online.
What’s the next step? Automation.
Set Up Travis CI
As you’ve seen, it’s very easy to deploy your app using the Firebase CLI. However, running the firebase deploy command every time you want to deploy your app is no good. Let’s automate that using Travis CI.
Start by going to https://travis-ci.com/and signing up using your GitHub account. Then you’ll be able to see your GitHub repos.
The next step is heading to https://repo.new and starting a new repository on GitHub. Then come back to the terminal, add your GitHub repo as a remote, and push to it:
git remote add origin https://github.com/<your-user-name>/<your-repo-name>.git
git push -u origin master
You’re now one step closer to having your project configured with Travis CI. The next step is to create the file that will store Travis CI’s configuration. So, at the root level of your repository, create a file called .travis.yml with the following content:
language: node_js
node_js:
  - "12.14"
branches:
  only:
    - master
before_script:
  - npm install -g @angular/cli
script:
  - npm install
  - npm run build
deploy:
  skip_cleanup: true
  provider: firebase
  token:
    secure: ""
NOTE: For good reasons, the default branch of new projects on GitHub is main. However, I struggled to get the project to deploy to Firebase properly when the branch was named anything other than master. If you know how to deploy to Firebase on a different branch, please let us know!
As you’ve noticed, there’s a piece of information missing: the token. That’s because the token is a secret piece of data, which means you can’t just put it in there as plain text. Instead, you have to encrypt it.
First, you have to generate the Firebase token, which you do by running the following command:
firebase login:ciAfter running the command, you’ll see a message saying, “Success! Use this token to log in on a CI server:”, followed by the generated token.
Install the Travis CLI using the instructions found here.
NOTE : Travis is switching all endpoints from travis-ci.org to travis-ci.com. There is still a free tier. The Travis CLI still defaults to using the .org address, so the commands below are oriented toward ensuring that the CLI works with the .com address.
The next step is to encrypt that token, using the Travis CLI:
travis encrypt --add deploy.token <YOUR-FIREBASE-TOKEN> --comYou could encrypt the token and then paste the resulting value to the
.travis.yml file, but the command above does everything in a single step.It’s now safe to commit, so that’s what you’ll do: commit your
.travis.yml file and push it to your remote repo. That will trigger a build whose status you can follow on travis-ci.org. After the build succeeds, a deploy will be triggered. You can follow the deploy by going to Firebase.You’ve successfully configured the continuous build and deployment of an Angular app using Firebase Hosting and Travis CI. As a bonus, let’s now see how you can add a feature flag to this app.
But first things first: what is a feature flag, and why should you care?
Feature flags—also called feature toggles and feature flippers, among several other names—are mechanisms that allow you to disable and enable features without having to change the code and redeploy the application. Such capability is incredibly powerful and has many use cases. For instance, you can use flags to roll out a new feature just for a small subset of users, mitigating its risk. Similarly, you can use flags to perform A/B testing, dividing your user base into two groups and serving each one a different version of a feature to gauge user interest and reaction.
However, feature flagging has a much deeper impact than that. It is, more than anything, an enabler of a sound CI/CD process. The adoption of feature flagging gives developers the freedom to ship code that contains unfinished features. They can then merge their code to the main repository as often as possible to enjoy the benefits of shorter feedback cycles. That is a scenario that’s closer to real continuous integration and not merely configuring some tools—which are also valuable and necessary, mind you.
We’ll now quickly show you how to add a feature flag to your app. You’ll simulate the deployment of an unfinished feature. You’ll see that by keeping the feature off, there’s no risk of a user ever accessing such a feature.
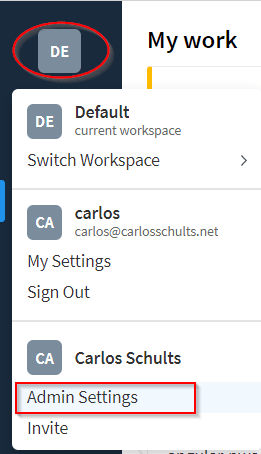
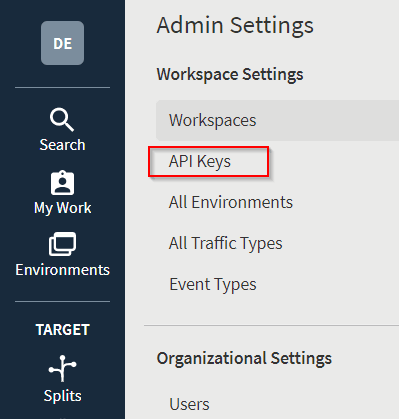
Start by signing up for a Split forever-free account. Once you’re done, it’s time to obtain your API key. Log in to your account, click on the Workspace button on the top left corner—the one labeled DE— and then click on Admin Settings:
On the new page, click on API Keys:
On the next screen, locate the key for the JavaScript SDK and the staging environment:

Click on Copy, and save the key somewhere safe.
For the next step, you’ll need to install Split’s JavaScript SDK, so you can query Split to check whether your feature flag is active. Go back to the terminal, make sure you’re inside the project’s folder, and run this:
npm install --save @splitsoftware/splitio-browserjsCommit the changes added to your package.json file. You’re now ready for the next step.
To implement the feature flag, you’ll need to make some changes to the code. The first change is to create a new file that will act as a façade to the Split solution.
Run:
ng generate service splitio to create a new service in the angular app.Paste the following code in
src/app/splitio.service.ts:import { Injectable } from '@angular/core';
import { SplitFactory } from '@splitsoftware/splitio-browserjs';
import { fromEvent, Subscription } from 'rxjs';
@Injectable()
export class SplitIoService {
splitio: SplitIO.ISDK;
splitClient: SplitIO.IClient;
isReady = false;
treatments: SplitIO.Treatments;
subscription: Subscription;
features: string[] = [
'include_phone'
];
isTreatmentOn(treatmentName: string) : boolean {
let treatment = this.splitClient.getTreatment(treatmentName);
let result = null;
if (treatment == 'on') {
result = true;
} else if (treatment == 'off') {
result = false;
} else {
result = false;
}
console.log(`Value of: ${treatmentName} is ${treatment}`);
return result;
}
initSdk(): void {
this.splitio = SplitFactory({
core: {
authorizationKey: '<your api key>',
key: 'customer-key'
}
});
this.splitClient = this.splitio.client();
this.verifyReady();
}
private verifyReady(): void {
const isReadyEvent = fromEvent(this.splitClient, this.splitClient.Event.SDK_READY);
this.subscription = isReadyEvent.subscribe({
next() {
this.isReady = true;
console.log('Sdk ready: ', this.isReady);
},
error(err) {
console.log('Sdk error: ', err);
this.isReady = false;
}
});
}
getTreatments(): void {
this.treatments = this.splitClient.getTreatments(this.features);
}
}Let’s break down the
SplitIoService you just created.initSdk gets the Split client set up. It uses your SDK client key. It calls verifyReady
verifyReady uses the jsx event system and Split’s SDK_READY event to indicate that the SplitIoService is ready for actionisTreatmentOn takes a string parameter, which is the name of a treatment, and it returns a boolean based on whether the treatment is on or off
There’s only one small change left to the code. You’ll go to the
src/app/user/create/create.component.html file and add the following code to it:<div *ngIf="splitService.isTreatmentOn('INCLUDE_PHONE')" class="form-group">
<label for="phone">Phone:</label>
<input formControlName="phone" id="phone" type="text" class="form-control">
</div>The
*ngIf calls the isTreatmentOn function from the SplitIoService, which determines whether the phone field will be rendered or not.You’re done with the changes to the code. Now let’s move to the next step, which will take you again to Split’s site.
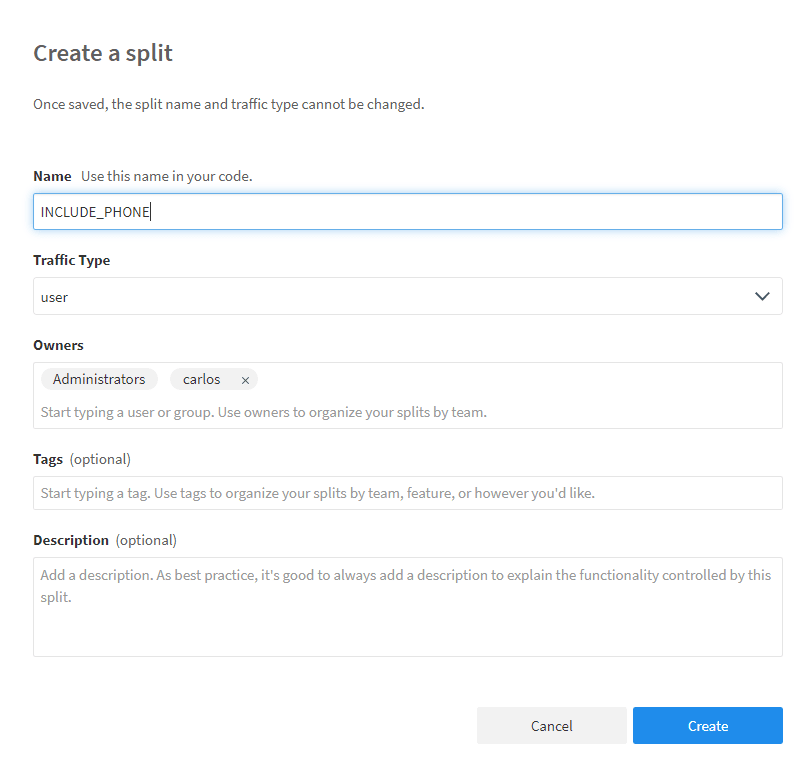
Go back to your Split account. Click on Splits and then on Create Split.
You’ll be asked for a name for your split. The name has to match what you’ve used in your code, so go with “INCLUDE_PHONE”:
After that, there are only three more steps left:
Now, you can go back to the app, create a new user, and confirm you don’t see the phone field. Then go back to Split, and activate the treatment (switch it from Off to On):

If you go back to the app and navigate to create a new user, you’ll see that the new field is displayed.
Today’s post offered a guide on how to get started with CI/CD in Angular. We’ve walked you through how to set up deployment to Firebase Hosting and then automate that process using Travis CI. As a bonus, we’ve shown you there’s a powerful technique you can apply to change your app’s behavior in production without having to write code and redeploy.
This mechanism is feature flagging. As you’ve read, feature flags bring a lot of benefits to the table. But the biggest one is this: they allow developers to fearlessly and often merge their work to the main line, knowing that final users won’t be able to access unfinished features.
In other words, feature flagging is one of the most effective enablers of CI and CD out there. If you’d like to learn more, I’d encourage you to check out these additional resources:
To stay up to date on feature flagging and modern CI/CD, follow us on Twitter @splitsoftware, and subscribe to our YouTube channel!
36