
44
How to Create a Todo List with React and Sanity
Sanity is often described as a "headless CMS"—a content management system decoupled from its presentation, allowing a developer to create any kind of frontend they desire.
But most "headless CMS" platforms are rather limited in what they can accomplish. They're usually designed to be blogs, e-commerce stores, or marketing pages—try and do something more avant-garde and you may soon find yourself in the weeds.
Not so with Sanity! With its thoughtful developer experience and lightning-fast APIs, Sanity can also compare favorably to "managed databases" such as Firebase and Supabase. Systems like these are designed for more complex, technical applications that require user authentication and dynamically presented data. Sanity can hold its own here!
Don't believe me? Let's build an app.
We'll be coding a user authenticated to-do list app with Next.js, Magic.link, and Sanity on the backend.
I've deployed a demo version if you want to check it out yourself.
I created a simple starter project so we wouldn't lose time writing boilerplate. You can clone it by navigating to your preferred directory and running the following command.
git clone https://github.com/bathrobe/magic-next-sanity-todo-starter.gitThe starter comes with Tailwind CSS for styling and has a basic user authentication flow already implemented, so we won't need to dive into those challenging waters in this post. The auth code is all taken from a very helpful tutorial on Vercel's website, so consult that if you'd like to know the details.
Let's first install our project's dependencies by running
cd magic-next-sanity-todo-starter and then npm install .When that's done, create a
.env.local file at the root of your project. We'll add the keys one by one.Sign up for the free plan at https://dashboard.magic.link/signup. At the time of writing, you're permitted 100 users on the free plan, so it's perfect for our purposes.
Get your public and secret test keys. You'll need an encryption secret too. You can go to this Encryption Key Generator and choose any option above 256 bit.
// .env.local

NEXT_PUBLIC_MAGIC_PUB_KEY=pk_test_12345
MAGIC_SECRET_KEY=sk_test_12345
ENCRYPTION_SECRET=random_encryption_stringIf you have not yet done so, remember to download the Sanity CLI. Open your terminal and enter the following code.
npm install -g @sanity/cliIf you don't already have a studio you'd like to work with, run
sanity init from the command line and create a new one.The command line will ask you for the name of your studio and where you want to store the studio files. In this example I named it "your-studio" and installed it in the same folder where I stored the starter repo.
When it asks you what schema you'd like to start with, choose the option to install a clean schema with no pre-existing data.
Take note of what you named the dataset, as you'll add it to the
.env file later.Now we'll write a todo schema in our
schemas folder.// your-studio/schemas/todo.js
export default {
name: "todo",
title: "Todo",
type: "document",
fields: [
{
name: "text",
title: "Todo Text",
type: "string",
},
{
name: "createdAt",
title: "Created at",
type: "datetime",
},
{
name: "dueDate",
title: "Due date",
type: "datetime",
},
{
name: "isCompleted",
title: "Is completed?",
type: "boolean",
},
{
name: "completedAt",
title: "Completed At",
type: "datetime",
},
{
name: "userEmail",
title: "User Email",
type: "string",
},
],
};Add the schema to your
schema.js file.// your-studio/schemas/schema.js
import createSchema from "part:@sanity/base/schema-creator";
import schemaTypes from "all:part:@sanity/base/schema-type";
//...
import todo from "./todo"
export default createSchema({
name: "default",
types: schemaTypes.concat([
//...
todo
]),
});Run
sanity deploy, choose a unique name for your deployed studio, and soon it should be live.Alert: Technically, you don't need to deploy your studio—simply accessing the document store and using the APIs is enough for these purposes. But assuming you'd
Go to sanity.io/manage and head to Settings > API > Tokens. Add a new token with write permissions and save the key somewhere safe.
Directly above the tokens field, add http://localhost:3000 to your CORS Origins. (If you deploy the app, you'll need to add your live URL to this list as well).
You can find your project ID at the top of this page, right under the title of your studio. Add all your Sanity variables to your
.env.local.// .env.local
NEXT_PUBLIC_MAGIC_PUB_KEY=pk_test_12345
MAGIC_SECRET_KEY=sk_test_12345
ENCRYPTION_SECRET=random_encryption_string_from_earlier
NEXT_PUBLIC_SANITY_ID=your_sanity_id
NEXT_PUBLIC_SANITY_DATASET=your_sanity_dataset
SANITY_WRITE_KEY=your_sanity_write_keyAll right, we're configured and ready to start coding! Run
npm run dev in your project's root and test it out.


Let's start with the submit form that sends our todos to the studio. Later we'll fetch the data and display it on our frontend.
We can look at the finished product to see what we'll be adding.

First we'll use the
useState() hook to store the values of our submit form and todo list.Let's import our hook as well as the
react-date-picker library. Then we'll add our states.// src/pages/todos.js
import { useState } from "react";
//we must import the datepicker's css modules manually
//so it plays nice with Next.
import DatePicker from "react-date-picker/dist/entry.nostyle";
import "react-date-picker/dist/DatePicker.css";
import "react-calendar/dist/Calendar.css";
import useAuth from "../hooks/useAuth";
import Logout from "../components/Logout";
export default function Todos() {
const { user, loading } = useAuth();
//create a state to store todoList array
const [todoList, setTodoList] = useState([]);
//create a state for the text in the todo input form
const [userInput, setUserInput] = useState("");
//create a state for the due date chosen in the datepicker
const [dueDate, setDueDate] = useState("");
//set an error message if either input is missing
const [errMessage, setErrMessage] = useState("");
//...Note the existence of our custom
useAuth() hook at the top. More information about custom hooks (as well as a helpful refresher on all things React hooks!) can be found in this Fireship video.Next we'll define some handlers for our form input and submission button.
// src/pages/todos.js

//... right after the useState hooks

//FOR THE INPUT FORM:
const handleChange = (e) => {
    e.preventDefault();
    setUserInput(e.target.value);
  };

    //FOR THE SUBMIT BUTTON:
  const handleSubmit = async (e) => {
    e.preventDefault();
    //if either part of the form isn't filled out
    //set an error message and exit
    if (userInput.length == 0 || dueDate == "") {
      setErrMessage("Todo text and due date must be filled out.");
    } else {
      //otherwise send the todo to our api
            // (we'll make this next!)
      await fetch("/api/todo", {
        method: "POST",
        body: JSON.stringify({
          text: userInput,
          dueDate: dueDate,
          user: user.email,
        }),
      });
      // await fetchTodos(); //(we'll add this later)
      // Clear all inputs after the todo is sent to Sanity
      setUserInput("");
      setErrMessage("");
      setDueDate("");
    }
  };
handleChange stores our text input in a state. handleSubmit first makes sure both of our fields have been filled out, then posts the todo to our serverless API route and clears out the inputs.You'll notice two things we reference that don't exist yet: the
api/todo route and a fetchTodos() function. Fret not! We'll get to these in the next section. For now, we'll finish rendering our form.Replace
<p>Todo app will go right here!</p> with the form element below.// src/pages/todos.js
{/*...*/}
<form>
{/*we flex the text input and datepicker
so they display inline. */}
<div className="flex justify-center items-center">
<label for="todo" className="invisible">Your Todo</label>
<input
className="w-72 h-12 border p-4 border-blue-100"
type="text"
//our state
value={userInput}
placeholder="Make coffee."
//our function
onChange={handleChange}
/>
<div className="my-8">
<DatePicker
className="p-4"
//makes it so we cannot set due date in past
minDate={new Date()}
//our dueDate state
onChange={setDueDate}
value={dueDate}
/>
</div>
</div>{" "}
<button
className="focus:outline-none focus:ring focus:border-blue-800
px-6 py-2 rounded-xl bg-blue-500 text-blue-50 hover:bg-blue-800
font-semibold"
//our function
onClick={handleSubmit}
>
Submit
</button>
{/*error set in handleSubmit*/}
<p>{errMessage}</p>
</form>
{/*...*/}You should now see a lovely todo input form, with a stylish button lifted almost entirely from Tailwind's helpful docs.
Remember the serverless API route from earlier? Let's build that now.
Create
src/pages/api/todo.js. Since we'll want full CRUD functionality in our app, we'll need PUT and DELETE requests later. To keep our code clean, we'll use the switch syntax for the different request types.// src/pages/api/todo.js
import client from "../../lib/sanity/client";
export default async function handler(req, res) {
switch (req.method) {
case "POST":
//this JSON arrives as a string,
//so we turn it into a JS object with JSON.parse()
const newTodo = await JSON.parse(req.body);
//then use the Sanity client to create a new todo doc
try {
await client
.create({
_type: "todo",
text: newTodo.text,
isCompleted: false,
createdAt: new Date().toISOString(),
dueDate: newTodo.dueDate,
userEmail: newTodo.user,
})
.then((res) => {
console.log(`Todo was created, document ID is ${res._id}`);
});
res
.status(200)
.json({ msg: `Todo was created, document ID is ${res._id}` });
} catch (err) {
console.error(err);
res.status(500).json({ msg: "Error, check console" });
}
break;
}
}With that, we should be able to submit a todo from our app and have it stored in our Sanity studio. Let's try it out.
Run
npm run dev once more and open up your Sanity studio. If all went well, you should see your new todo inside of Sanity. 
Success!

Great job! Now that Sanity is storing our todo values, we can fetch them and display them on our frontend.
We'll define a function that will fetch the latest todos from Sanity and store them in the
todoList state. We want the function to run when the page loads, whenever user data changes, and any time we alter the data (by adding, updating, or deleting todos). To manage this logic, we'll begin by adding a useEffect hook.Head back to
pages/todos.js and importuseEffect, as well as our Sanity client.//src/pages/todos.js
import { useState, useEffect } from "react";
// ...
import client from "../lib/sanity/client";Right below your
useState hooks add the fetchTodos function and tack it onto a useEffect hook.//src/pages/todos.js
//after the useState hooks
const fetchTodos = async () => {
let fetchedTodos;
//make sure the user is loaded
if (!loading) {
//pass userEmail as a query parameter
fetchedTodos = await client.fetch(
`*[_type=="todo" && userEmail==$userEmail] | order(dueDate asc)
{_id, text, createdAt, dueDate, isCompleted, completedAt, userEmail}`,
{
userEmail: user.email,
});
//insert our response in the todoList state
setTodoList(fetchedTodos);
}
};
useEffect(
() => {
//now it will fetch todos on page load...
fetchTodos();
},
//this dependecy array tells React to run the
//hook again whenever the user loads or changes
[loading, user]
);Uncomment
fetchTodos() in the handleSubmit function. Next polyfills the fetch API for all browsers beforehand, so no need to worry about that!// src/pages/todos.js
// in handleSubmit function...
await fetch("/api/todo", {
method: "POST",
body: JSON.stringify({
text: userInput,
dueDate: dueDate,
user: user.email,
}),
});
//***uncomment this line now***
//after submitting, our TodoList will now refresh
await fetchTodos();
setUserInput("");
setErrMessage("");
setDueDate("");
}
};
//...Immediately after
handleSubmit, let's also add a handleDelete function that we can pass to our <Todo/> component. Since we're passing this function straight from the page to <Todo/> (skipping the <TodoList/> component), we should use React's useContext hook. Context allows us to avoid passing props unnecessarily.We'll also pass
fetchTodos() to our context hook, so that we can get fresh data when we toggle a todo's status in its component.// src/pages/todos.js
import { useState, useEffect, createContext } from "react";
//... before the Page component
export const TodoContext = createContext()
export default function Todos() { //...
// then, below the handleSubmit function...
const handleDelete = async (selectedTodo) => {
await fetch("/api/todo", {
method: "DELETE",
body: selectedTodo._id,
});
//todos will refresh after delete, too
await fetchTodos();
};
console.log(todoList)
return (
<TodoContext.Provider value={{handleDelete, fetchTodos}>
{/* all your rendered JSX */}
</TodoContext.Provider>Check your console to make sure we fetched it all correctly. After you've confirmed it works, feel free to delete the console log.

Very good! It's right there waiting for us. Now that we've fetched the data, we need components to feed it to. That's what we'll build next.
First create a components folder in
src. In it, create a new file called TodoList.js. This will be a simple component that mainly exists to keep our todos.js page a little cleaner.// src/components/TodoList.js
import Todo from "./Todo";
export default function TodoList({ todoList, user }) {
return (
<section>
<ul>
{/*if there are todos in the list...*/}
{todoList.length >= 1
? todoList.map((todo, idx) => {
//map only the user's todos
return user.email == todo.userEmail ? (
<Todo key={todo._id} todo={todo} />
) : (
""
);
})
: "Enter a todo item"}
</ul>
</section>
);
}We pass the
todoList state in our page component to <TodoList/>, which maps each item in the array to a <Todo/> component. The ternary operators may look tricky, but they're only saying, "If the todo list has one or more items, go through each item, double-check that they belong to the current user, then render them with our custom Todo component."
The unique ID from Sanity is passed as the
key prop in the Todo because React requires it. React has more information about the key prop in their docs.Now we need to make
Todo.js. In the same folder, create that file. Remember the context we created in todos.js? We can now put it into action.// src/components/Todo.js
import { useState, useContext } from "react";
// import a simple date formatting library
import dayjs from "dayjs";
// import a trashcan icon for our delete button
import { RiDeleteBin5Line } from "react-icons/ri";
import { TodoContext } from "../pages/todos"
export default function Todo({ todo }) {
//with useContext we do not need to pass extra props to <TodoList/>
const { handleDelete, fetchTodos } = useContext(TodoContext)
//setting states for the isCompleted boolean and a date completed
const [isCompleted, setIsCompleted] = useState(todo.isCompleted);
const [completedTime, setCompletedTime] = useState(todo.completedAt);
//function that syncs the completed checkbox with Sanity
const handleToggle = async (e) => {
e.preventDefault();
const result = await fetch("/api/todo", {
method: "PUT",
headers: {
Accept: "application/json",
"Content-Type": "application/json",
},
body: JSON.stringify({
id: todo._id,
//passes isCompleted React state to Sanity
isCompleted: isCompleted,
completedAt: todo.completedAt,
}),
});
const { status, completedAt } = await result.json();
// refresh our data
await fetchTodos();
//pass our Sanity results back into React
setIsCompleted(status);
setCompletedTime(completedAt);
};
return (
<li
className="bg-gray-50 my-6 border shadow-md rounded-xl
p-4 border-gray-200 flex justify-center items-center"
key={todo._id}
>
<input
className="mx-2 cursor-pointer"
type="checkbox"
checked={todo.isCompleted}
onChange={handleToggle}
/>
{/*if todo is done, cross it out and turn it gray*/}
<p
className={`text-lg mx-2 ${
todo.isCompleted ? "line-through text-gray-500" : ""
}`}
>
{todo.text}
</p>
<p className={`text-gray-400 mr-2`}>
{/*if todo is done, show completedTime
if not done, show due date */}
{todo.isCompleted
? `Done ${dayjs(completedTime).format("MMM D, YYYY")}`
: `Due ${dayjs(todo.dueDate).format("MMM D, YYYY")}`}
</p>
<button
className="mx-2"
onClick={(e) => {
e.preventDefault();
handleDelete(todo);
}}
>
<RiDeleteBin5Line />
</button>
</li>
);
}Excellent work! All we need to do is add the components to our page and they should render.
// src/pages/todos.js

// ... at the bottom of the imports
import TodoList from "../components/TodoList"

// ... then directly under the form
                <form> {/*...*/> </form>
                <div className="my-12">
          <h1 className="text-xl font-bold tracking-tight
                    my-8">Your Todos</h1>
          {loading ? (
            "loading..."
          ) : (
            <TodoList
              user={user}
              todoList={todoList}
            />
          )}
        </div>
//...
Now run
npm run dev and you should see your todo items appear. 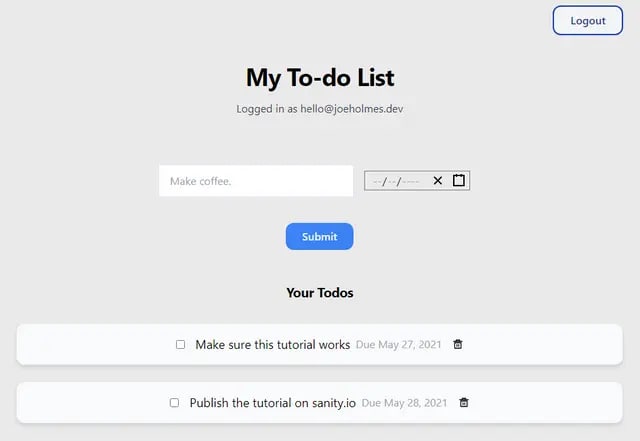
👨🍳 😗
If you try to toggle or delete them you'll throw an error, because we haven't added the PUT and DELETE API routes yet. Let's do those now.
// src/pages/api/todo.js

//...
//after the POST request

case "PUT":
      const result = await client
        .patch(req.body.id)
        .set({
          isCompleted: !req.body.isCompleted,
                    //create new complete date if Todo is marked as done
          completedAt: !!req.body.isCompleted ? "" : new Date().toISOString(),
        })
        .commit();
      res.status(200).json({
        status: result.isCompleted,
        completedAt: result.completedAt,
      });

      break;
case "DELETE":
      await client
        .delete(req.body)
        .then((res) => {
          res.body;
        })
        .then((res) => console.log(`Todo was deleted`));
      res.status(200).json({ msg: "Success" });
      break;
//...
If your dev environment is still running, stop and start it again with ctrl/command C and
npm run dev. You should now be able to mark todos complete and delete them.If all went well, take a look at your Sanity studio. Your content should update in real-time when the frontend input changes and vice versa.

Now you've got the developer experience of a managed database with the friendly, customizable UI of a content manager. Pretty sweet.
I've made the completed repo public if you want to give it a look.
Hopefully this project can serve as a starting point for more ambitious uses of Sanity. There are plenty of ways to improve the app.
user.js document in schemas that allows each person to create their own profile. Then that document could be related to each todo of a given user via a reference field.As always, feel free to say hi on Twitter. Happy coding!
44