
42
Build a To-Do App with Strapi GraphQL Plugin and Flutter
This article will set up a GraphQL endpoint in a Strapi backend along with Flutter, a powerful open-source UI development kit for Android, iOS, Linux, Mac, Windows, Google Fuchsia, and the web to build a Todo app.
The features of Strapi includes:
Open-source
Strapi is 100% open-source. It is hosted on Github https://github.com/strapi/strapi with over 36K stars and a large community for support. Strapi also has a forum where Strapi users can ask questions and get answers and discuss the newest features and releases of Strapi.
Strapi is 100% open-source. It is hosted on Github https://github.com/strapi/strapi with over 36K stars and a large community for support. Strapi also has a forum where Strapi users can ask questions and get answers and discuss the newest features and releases of Strapi.
Customizable
Strapi is highly customizable with feature-rich plugins. Recently they introduced the i18n plugin to allow for multi-language support in your content. The Strapi UI admin is great for building collections and APIs. There is a marketplace where developers can search and install plugins in their Strapi projects.
Strapi is highly customizable with feature-rich plugins. Recently they introduced the i18n plugin to allow for multi-language support in your content. The Strapi UI admin is great for building collections and APIs. There is a marketplace where developers can search and install plugins in their Strapi projects.
Self-hosted
You need no server. Strapi comes bundled with its server. All we have to do is scaffold a Strapi project, run its server, and we are good to go. You don't need to write any server code. Strapi does all that.
You need no server. Strapi comes bundled with its server. All we have to do is scaffold a Strapi project, run its server, and we are good to go. You don't need to write any server code. Strapi does all that.
RESTful or GraphQL
Strapi hosts your Collection in RESTful and GraphQL endpoints, and these endpoints can be consumed by clients (Angular, Flutter, Desktop, cURL, etc.).
Strapi hosts your Collection in RESTful and GraphQL endpoints, and these endpoints can be consumed by clients (Angular, Flutter, Desktop, cURL, etc.).
With Strapi, you don't have to worry about server setup and coding. There will be no need to create models and controllers because Strapi has all that baked in and ready to use. From the Strapi admin UI, we can create our collections and single types. A collection maps to the endpoints:
/YOUR_COLLECTION_s: Creates new content./YOUR_COLLECTION_s: Gets all the contents./YOUR_COLLECTION_s/:ID: Gets a single content based on its ID./YOUR_COLLECTION_s/:ID: Edits a content/YOUR_COLLECTION_s/:ID: Deletes a content.We will be building a todo app in Flutter to demonstrate how we can communicate from a Flutter app to a Strapi backend to store, edit and delete our todo items.
Requirements
To follow this tutorial, you need to have some binaries installed in your machine:
To follow this tutorial, you need to have some binaries installed in your machine:
Yarn: Very fast Node package manager. You can install via NPM: npm i yarn -g.flutter CLI: This command-line tool is used to manage a Flutter project. We can use it to create a Flutter project. Visit https://flutter.dev/docs/get-started/install to install the CLI for your machine.
# Scaffold a Strapi
We will create the main folder where our Strapi project and Flutter project will reside.
mkdir strapi_flutterMove into the folder:
cd strapi_flutter. We begin by creating a Strapi project, run the below command:yarn create strapi-app todo-api --quickstart
# OR
npx create-strapi-app todo-api --quickstartThis command creates a Strapi project in
todo-API with necessary dependencies and start the server by running yarn develop.The page
http://localhost:1337/admin/auth/register/ will be opened in the browser for you to set up your Strapi administrator credentials.
Fill in your details and click on the "LET'S START" button. Strapi will create your account and will load the admin UI. From this page, we create our collections.
We are building a todo app so we will create a Todo model that looks exactly like the one below:
Todo {
    name
    done
}
The model above represents a todo item we will have in our app. The
name is the name or text of a todo, e.g., "Buy groceries from the store." The done is a Boolean field that indicates whether a todo item has been done or not.Now, let's create the collection.
On the admin UI, click on Content-Type Builder, then, click on the
+ Create new collection type button. A modal will pop up; on the popup modal, type "todo" in the Display name input box. The "todo" will be the name of our collection type.
Click on the
"Continue" button and on the following UI that appears on the exact modal. This UI is where we begin to create the fields for the "todo" collection."name." "+ Add another field" button, and on the next display, select "Boolean" and type in "done" on the next display that appears. "Finish" button, the modal will disappear, and we will see the "todo" collection on the page with the fields we just added.Click on the
"Save" button on the top-right. It will save our "todo" collection. We will see that a "Todos" is a content type on the sidebar menu of the dashboard.We will add mock Todo data to our collection.
Click on the "Todos" on the left sidebar; on the page that loads, you will see a table that has no data. Next, click on the
+ Add New Todos button on the top-right of the page. A Create an entry UI will appear. You will see input boxes for all the fields in our Todo model.Add the data below:
- `name` -> Go to groceries store
- `done` -> false
After adding them, click on the
Save button and click on the Publish button that is now active. This button will make our new data live.Go back to our "Todos" pages. You will see the new data listed in the table. Let's add a second data. Click on the
+ Add New Todos and on the next page that appears, add the below data:- `name` -> Go to church
- `done` -> falseClick on
Save and then on Publish. Next, we open access for all users, both unauthenticated and authenticated users.Click on the
Settings item on the sidebar menu, then on the page that loads on the right section, go to the "USERS & PERMISSIONS PLUGIN" section and click on "Roles," and then on Public on the right section.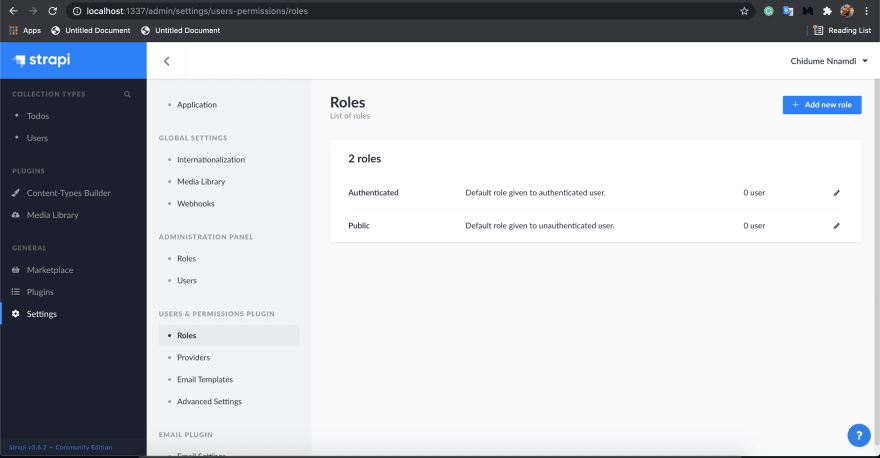
A
Public page is loaded in this section. Next, scroll down to the Permission section and check the Select all box. Next, click on the Save button on the top-right page, and this now makes our endpoints accessible to the Public.
Next, we add GraphQL to our collection.
By default, Strapi provides our endpoints via REST, but here we want the endpoints to be accessed via GraphQL. To do that, we install the GraphQL plugin for Strapi.
We will install it via command-line, so run the below command:
yarn strapi install graphqlStrapi will install the dependency and rebuild the admin UI. Now, go to http://localhost:1337/graphql in your browser, this will load the GraphQL playground:

We can play with our GraphQL from the playground. On the playground, strapi will create GraphQL mutations and queries for the
todos collection that looks like the one below.// Todo's type definition
type Todo {
id: ID!
created_at: DateTime!
updated_at: DateTime!
name: String
done: Boolean
published_at: DateTime
}
type TodoConnection {
values: [Todo]
groupBy: TodoGroupBy
aggregate: TodoAggregator
}
type Query {
// gets a single todo via id
todo(id: ID!, publicationState: PublicationState): Todo
// Gets all todos
todos(
sort: String
limit: Int
start: Int
where: JSON
publicationState: PublicationState
): [Todo]
// This gives us more leverage on what to return in the query. E.g, it provides an aggregator that we can use to get the total count of todos data in the backend.
todosConnection(
sort: String
limit: Int
start: Int
where: JSON
): TodoConnection
}
type Mutation {
// creates a new todo
createTodo(input: createTodoInput): createTodoPayload
// Updates a todo
updateTodo(input: updateTodoInput): updateTodoPayload
// deletes a todo
deleteTodo(input: deleteTodoInput): deleteTodoPayload
}Note: To find all the queries and mutations created for your collections, click on the “SCHEMA” item on the middle right-side of the GraphQL playground. A right-sidebar will appear listing the queries and mutations schema for your collections.

All the queries and mutations will be done via http://localhost:1337/graphql. Let's test our queries and mutations in the GraphQL playground.
Get all todos
To retrieve all the todos in our collection, we run the query:
To retrieve all the todos in our collection, we run the query:
# Write your query or mutation here
query {
  todos {
    name
    done
  }
}
Get a todo
To retrieve a single todo item from our collection we run the query:
To retrieve a single todo item from our collection we run the query:
# Write your query or mutation here
query {
  todo(id: 1) {
    name
    done
  }
}
Create a new todo
To create a new todo we run the below mutation:
To create a new todo we run the below mutation:
# Write your query or mutation here
mutation {
  createTodo(input: { data: { name: "Clean the house", done: false } }) {
    todo {
      name
      done
    }
  }
}
Update a todo
To update to todo item run the below mutation:
To update to todo item run the below mutation:
# Write your query or mutation here
mutation {
  updateTodo(input: { where: { id: 3 }, data: { done: true } }) {
    todo {
      name
      done
    }
  }
}
Delete a todo
To delete a todo run the mutation below:
To delete a todo run the mutation below:
# Write your query or mutation here
mutation {
  deleteTodo(input: { where: { id: 3 } }) {
    todo {
      name
      done
    }
  }
}
Now, we build the Flutter app.
Make sure you have the Flutter and Dart SDK fully installed in your machine. If you are having issues with Flutter, run
flutter doctor to iron them out. After everything has been done, run flutter --version to make sure the Flutter CLI is available globally in your system.So, we set up a Flutter project. Make sure to move out of the
todo-api folder. From the central folder strapi_flutter run the below command:flutter create todo_strapiThe command creates a Flutter project directory called
todo_strapi that contains a simple demo app that uses Material Components.Move into the folder:
cd todo_strapiMake sure your simulator/emulator is running. You can check if your emulator is running and active by running the command:
flutter devices.Now, we start the app, run the command
flutter run.We will see the app launched in our emulator. Now, we go back to the Flutter project. You will see a
main.dart file in the project. That is the main file in Flutter projects, and it is where the app is being bootstrapped from. Everything in Flutter is a widget.Our app will have three widgets:
CreateTodo: This widget is where we will create new todos.TodoList: This widget will get the list of all the todos in our system.ViewTodo: This widget is where we will view our todos, edit and delete them.Our final app will look like this:


So, we will use some dependencies:
graphql_flutter: This is a GraphQL client for Flutter that gives us APIs to run queries and mutations conversationally.intl: This library provides us with DateTime formatting capabilities.Open the
pubspec.yaml file, go to the dependencies section and add graphql_flutter and intl.dependencies:
flutter:
sdk: flutter
intl:
graphql_flutter: ^4.0.0-betaRun
Now create the files:
flutter pub get in your terminal. Flutter will install the dependencies in your project.Now create the files:
mkdir lib/screens
touch lib/screens/ViewTodo.dart lib/screens/CreateTodo.dart lib/GraphQLConfig.dart
We will flesh out the code in them. To connect to a GraphQL server, we will create a
GraphQLClient. This GraphQLClient will contain a link and cache system.According to comments on the
GraphQLClient source code: The link is a Link over which GraphQL documents will be resolved into a [Response]. The cache is the [GraphQLCache] to use for caching results and optimistic updates.We will create a
GraphQLConfiguration class in the GraphQLConfig.dart file, and this class will have a clientToQuery method that will return an instance of GraphQLClient.GraphQLConfig.dart
Open
Open
lib/GraphQLConfig.dart and paste the below code:import "package:flutter/material.dart";
import "package:graphql_flutter/graphql_flutter.dart";
class GraphQLConfiguration {
static HttpLink httpLink = HttpLink(
      'http://10.0.2.2:1337/graphql',
    );
static ValueNotifier<GraphQLClient> client = ValueNotifier(
GraphQLClient(
cache: GraphQLCache(),
link: httpLink,
),
);
static ValueNotifier<GraphQLClient> clientToQuery() {
return client;
}
}The code
static HttpLink httpLink = HttpLink(
'http://10.0.2.2:1337/graphql',
);The code above sets the link where the
The answer is that we are running the Flutter app on an emulator.
GraphQLClient will resolve documents. See that the link is http://10.0.2.2:1337/graphql, but why is that? Our Strapi backend runs on http://localhost:1337/graphql, not on http://10.0.2.2:1337/graphql.The answer is that we are running the Flutter app on an emulator.
Emulator proxies HTTP requests made inside it. The proxy URL is
10.0.2.2, and this URL will forward the HTTP request made to the URL to localhost. So that's the reason we don't use the localhost URL.Since our Strapi backend runs on
The
We create an instance of
localhost:1337, then we have to make an HTTP request to 10.0.2.2:1337. The emulator will proxy it to localhost:1337.The
cache: GraphQLCache() makes the GraphQLClient use its internal cache.We create an instance of
GraphQLClient and stores it in the client. This is returned in the clientToQuery static method.main.dart
Open the
Open the
lib/main.dart and paste the below code:import 'package:flutter/material.dart';
import 'dart:math';
import 'package:graphql_flutter/graphql_flutter.dart';
import 'package:intl/intl.dart';
import 'GraphQLConfig.dart';
import 'screens/CreateTodo.dart';
import 'screens/ViewTodo.dart';
void main() {
WidgetsFlutterBinding.ensureInitialized();
runApp(MyApp());
}
class MyApp extends StatelessWidget {
const MyApp({Key key}) : super(key: key);
@override
Widget build(BuildContext context) {
return GraphQLProvider(
client: GraphQLConfiguration.clientToQuery(),
child: MaterialApp(
theme: ThemeData(
primarySwatch: Colors.blue,
),
home: TodoList(),
));
}
}We imported the packages that we will be needing.
The
main function is the entry point of Flutter apps. This entry point is where the execution starts. Next, the runApp starts rendering the widgets in our app. See that we passed it MyApp widget. This widget is the first widget to render its UI in our app.Each widget overrides the
build method from either StatelessWidget or StatefulWidget to return widgets that will render the UI of our app.A
A
StatelessWidget manages no local state. It is just like a functional component in Reactjs without useState.A
StatefulWidget manages a local state. It is like a functional component in Reactjs with the useState hook.The
MyApp extends the StatelesWidget because it will be managing no state. In its build method, we have a context argument that is of the BuildContext instance. BuildContext is a handle to the location of a widget in the widget tree.The
GraphQLClient has Mutation and Query widgets. These widgets give us options from where we can make queries and mutations to our GraphQL server. Before making these queries and mutations, we must wrap the Query and Mutation widgets in the GraphQLProvider widget.That's why in the
build method of the MyApp, we wrapped the MaterialApp widget in GraphQLProvider. As a result, the TodoList widget can now access the Query and Mutation widgets.TodoList
This widget makes a query to fetch all the todos in our Strapi backend, which happens when the widgets load. Then, it will render the todos in a list. Each todo list will have an
This widget makes a query to fetch all the todos in our Strapi backend, which happens when the widgets load. Then, it will render the todos in a list. Each todo list will have an
onTap event registered on them so that when pressed, a ViewTodo widget screen is opened to view the pressed todo item.Also, in this widget, we will have a
FloatingActionButton that, when clicked it will open the CreateTodo widget screen for us to add new todos. This TodoList will be a stateful widget. Paste the below code below the MyApp widget in main.dart....
class TodoList extends StatefulWidget {
TodoList({Key key}) : super(key: key);
@override
_TodoListState createState() => _TodoListState();
}
class _TodoListState extends State<TodoList> {
String readTodos = """
query {
todos(sort:"created_at:desc") {
id
name
done
created_at
}
}
""";
var colors = [
Colors.amber,
Colors.green,
Colors.purple,
Colors.orange,
Colors.red,
Colors.yellow
];
Random random = new Random();
var todos = [];
randomColors() {
int randomNumber = random.nextInt(colors.length);
return colors[randomNumber];
}
onChanged(b) {
return true;
}
@override
Widget build(BuildContext context) {
return Query(
options: QueryOptions(
document: gql(readTodos),
pollInterval: Duration(seconds: 0),
),
builder: (QueryResult result,
{VoidCallback refetch, FetchMore fetchMore}) {
if (result.hasException) {
return Text(result.exception.toString());
}
if (result.isLoading) {
return Text('Loading');
}
todos = result.data["todos"];
return Scaffold(
body: Column(children: [
Container(
alignment: Alignment.centerLeft,
padding: const EdgeInsets.fromLTRB(8, 50, 0, 9),
color: Colors.blue,
child: Text(
"Todo",
style: TextStyle(
fontSize: 45,
fontWeight: FontWeight.bold,
color: Colors.white),
)),
Expanded(
child: ListView.builder(
itemCount: todos.length,
shrinkWrap: true,
itemBuilder: (context, index) {
return GestureDetector(
onTap: () {
Navigator.push(
context,
MaterialPageRoute(
builder: (context) => ViewTodo(
id: todos\[index\]["id"],
refresh: () {
refetch();
},
),
),
);
},
child: Container(
margin: const EdgeInsets.fromLTRB(10, 0, 10, 10),
padding: const EdgeInsets.fromLTRB(10, 0, 10, 10),
decoration: BoxDecoration(
borderRadius: BorderRadius.all(Radius.circular(7)),
color: randomColors(),
),
child: Row(
children: [
Expanded(
child: Column(
crossAxisAlignment: CrossAxisAlignment.start,
children: [
Padding(
padding:
const EdgeInsets.fromLTRB(0, 6, 0, 6),
child: Text(
todos\[index\]["name"]
.toString() /*"Go to the grocery store"*/,
style: TextStyle(
fontSize: 25,
fontWeight: FontWeight.bold)),
),
Text(DateFormat("yMMMEd")
.format(DateTime.parse(todos[index]
["created_at"]
.toString()))
.toString()),
],
),
),
Checkbox(
value: todos\[index\]["done"],
onChanged: onChanged)
],
),
));
},
))
]),
floatingActionButton: FloatingActionButton(
onPressed: () {
Navigator.push(
context,
MaterialPageRoute(
builder: (context) => CreateTodo(refresh: () {
refetch();
}),
),
);
},
tooltip: 'Add new todo',
child: Icon(Icons.add),
),
);
});
}
}The
TodoList uses the createState method to create its mutatable State at the _TodoListState, and this _TodoListState renders the UI widget for the TodoList.Widgets that extends the
State class are:- The logic and internal state for a [StatefulWidget].
- The State is information that (1) can be read synchronously when the widget is built and (2) might change during the widget's lifetime. It is the responsibility of the widget implementer to ensure that the [State] is promptly notified when such state changes, using [State.setState].Inside the
_TodoListState widget, we start by defining the query to read the todos in the readTodos String variable. We have an array of colors, and we used this to color the background of our todos list widget randomly.The
todos variables will hold the todos list fetched from our backend. The randomColors is the method that will randomly return a color for each todo widget.Inside the build method, see that the
Query widget wraps the whole widget tree. This is done to reference the returned todos and a vital function refetch we can use to refresh our todos list when a change occurs.This
Query widget uses the document method in its options object to query for the todos list. It does this by calling the gql method with the readTodos variable. The result of this query is returned in the builder function's result argument.Inside the function, we retrieve the result and assign it to the
todos variable:todos = result.data["todos"];Then we return our UI starting from the
Scaffold(...) widget. We use the todos variable to render each result there in the ListView.builder, which builds the result in a list with the custom UI we set.The
GestureDetector widget is set on each Todo list to put an onTap event on them.child: ListView.builder(
itemCount: todos.length,
shrinkWrap: true,
itemBuilder: (context, index) {
return GestureDetector(
onTap: () {
Navigator.push(
context,
MaterialPageRoute(
builder: (context) => ViewTodo(
id: todos\[index\]["id"],
refresh: () {
refetch();
},
),
),
);
},
...See that when a Todo item in the list is pressed or tapped, the
ViewTodo widget screen is launched. We passed to it the id of the Todo and a refresh function. This refresh function calls the refetch function returned by the Query widget. This is done to refresh the TodoList view from the ViewTodo widget when a change to the Todo is made.The
FloatingActionButton:...
floatingActionButton: FloatingActionButton(
onPressed: () {
Navigator.push(
context,
MaterialPageRoute(
builder: (context) => CreateTodo(refresh: () {
refetch();
}),
),
);
},
tooltip: 'Add new todo',
child: Icon(Icons.add),
),
...It launches the
CreateTodo widget when it is clicked. Let's look at the ViewTodo widget.ViewTodo
We will perform three actions on a Todo in this widget. We will query a todo using the id passed to this widget, we will update a Todo, and we will delete the Todo.
We will perform three actions on a Todo in this widget. We will query a todo using the id passed to this widget, we will update a Todo, and we will delete the Todo.
Paste the below code in
lib/screens/ViewTodo.dart:import 'package:flutter/material.dart';
import 'package:graphql_flutter/graphql_flutter.dart';
import '../GraphQLConfig.dart';
String readTodo = """
query(\$id: ID!) {
todo(id: \$id) {
name
done
}
}
""";
String updateTodo = """
mutation(\$id: ID!, \$done: Boolean, \$name: String) {
updateTodo(input: { where: { id: \$id }, data: { done: \$done, name: \$name } }) {
todo {
name
done
}
}
}
""";
String deleteTodo = """
mutation(\$id: ID!) {
deleteTodo(input: { where: { id: \$id } }) {
todo {
name
done
}
}
}
""";
class ViewTodo extends StatefulWidget {
final id;
final refresh;
ViewTodo({Key key, @required this.id, this.refresh}) : super(key: key);
@override
ViewTodoState createState() => ViewTodoState(id: id, refresh: this.refresh);
}
class ViewTodoState extends State<ViewTodo> {
final id;
final refresh;
ViewTodoState({Key key, @required this.id, this.refresh});
var editMode = false;
var myController;
bool done;
@override
Widget build(BuildContext context) {
return GraphQLProvider(
client: GraphQLConfiguration.clientToQuery(),
child: Query(
options: QueryOptions(
document: gql(readTodo),
variables: {'id': id},
pollInterval: Duration(seconds: 0),
),
builder: (QueryResult result,
{VoidCallback refetch, FetchMore fetchMore}) {
if (result.hasException) {
return Text(result.exception.toString());
}
if (result.isLoading) {
return Text('Loading');
}
// it can be either Map or List
var todo = result.data["todo"];
done = todo["done"];
myController =
TextEditingController(text: todo["name"].toString());
return Scaffold(
appBar: AppBar(
elevation: 0,
automaticallyImplyLeading: false,
backgroundColor: Colors.blue,
flexibleSpace: SafeArea(
child: Container(
padding: EdgeInsets.only(
right: 16, top: 4, bottom: 4, left: 0),
child: Row(children: <Widget>[
IconButton(
onPressed: () {
Navigator.pop(context);
},
icon: Icon(
Icons.arrow_back,
color: Colors.white,
),
),
SizedBox(
width: 20,
),
Text(
"View Todo",
style: TextStyle(
fontSize: 25,
fontWeight: FontWeight.bold,
color: Colors.white),
),
])))),
body: Container(
padding: const EdgeInsets.all(12),
margin: const EdgeInsets.all(8),
decoration: BoxDecoration(
borderRadius: BorderRadius.circular(9),
),
width: double.infinity,
child: editMode
? Column(
children: [
Container(
width: double.infinity,
padding: const EdgeInsets.fromLTRB(0, 0, 0, 4),
child: Text("Todo:",
textAlign: TextAlign.left,
style: TextStyle(
color: Colors.black,
fontSize: 20,
))),
TextField(
controller: myController,
decoration: InputDecoration(
border: OutlineInputBorder(),
hintText: 'Add todo'),
),
Row(
crossAxisAlignment: CrossAxisAlignment.center,
children: [
Container(
padding:
const EdgeInsets.fromLTRB(0, 0, 0, 4),
child: Text("Done:",
textAlign: TextAlign.left,
style: TextStyle(
color: Colors.black,
fontSize: 20,
))),
StatefulBuilder(builder:
(BuildContext context,
StateSetter setState) {
return new Checkbox(
value: done,
onChanged: (bool value) {
print("done:" + done.toString());
setState(() {
done = value;
});
},
);
}),
])
],
)
: Column(
children: [
Container(
width: double.infinity,
padding: const EdgeInsets.fromLTRB(0, 0, 0, 4),
child: Text("Todo:",
textAlign: TextAlign.left,
style: TextStyle(
color: Colors.black,
fontSize: 20,
)),
),
Container(
width: double.infinity,
padding: const EdgeInsets.fromLTRB(0, 0, 0, 4),
child: Text(todo["name"].toString(),
textAlign: TextAlign.left,
style: TextStyle(
color: Colors.black,
fontSize: 30,
fontWeight: FontWeight.bold))),
Container(
width: double.infinity,
padding: const EdgeInsets.fromLTRB(0, 10, 0, 4),
child: Text("Done:",
textAlign: TextAlign.left,
style: TextStyle(
color: Colors.black,
fontSize: 20,
)),
),
Container(
width: double.infinity,
padding: const EdgeInsets.fromLTRB(0, 0, 0, 4),
child: Text(todo["done"].toString(),
textAlign: TextAlign.left,
style: TextStyle(
color: Colors.black,
fontSize: 30,
fontWeight: FontWeight.bold)),
)
],
),
),
floatingActionButton: !editMode
? Mutation(
options: MutationOptions(
document: gql(deleteTodo),
update: (GraphQLDataProxy cache, QueryResult result) {
return cache;
},
onCompleted: (dynamic resultData) {
print(resultData);
refresh();
ScaffoldMessenger.of(context)
.showSnackBar(SnackBar(content: Text('Done.')));
Navigator.pop(context);
},
),
builder: (
RunMutation runMutation,
QueryResult result,
) {
return Container(
child: Column(
crossAxisAlignment: CrossAxisAlignment.end,
mainAxisAlignment: MainAxisAlignment.end,
children: [
Padding(
padding: EdgeInsets.fromLTRB(0, 0, 0, 5),
child: FloatingActionButton(
mini: true,
heroTag: null,
child: Icon(Icons.delete),
onPressed: () {
runMutation({'id': id});
ScaffoldMessenger.of(context)
.showSnackBar(SnackBar(
content:
Text('Deleting todo...')));
},
)),
FloatingActionButton(
onPressed: () {
setState(() {
editMode = true;
});
},
tooltip: 'Edit todo',
child: Icon(Icons.edit),
)
]));
})
: Mutation(
options: MutationOptions(
document: gql(updateTodo),
update: (GraphQLDataProxy cache, QueryResult result) {
return cache;
},
onCompleted: (dynamic resultData) {
print(resultData);
refresh();
refetch();
ScaffoldMessenger.of(context)
.showSnackBar(SnackBar(content: Text('Done.')));
},
),
builder: (
RunMutation runMutation,
QueryResult result,
) {
return Container(
child: Column(
crossAxisAlignment: CrossAxisAlignment.end,
mainAxisAlignment: MainAxisAlignment.end,
children: [
Padding(
padding: EdgeInsets.fromLTRB(0, 0, 0, 5),
child: FloatingActionButton(
mini: true,
heroTag: null,
child: Icon(Icons.cancel),
onPressed: () {
setState(() {
editMode = false;
});
},
)),
FloatingActionButton(
heroTag: null,
child: Icon(Icons.save),
onPressed: () {
ScaffoldMessenger.of(context).showSnackBar(
SnackBar(
content: Text('Updating todo...')));
runMutation({
'id': id,
'name': myController.text,
'done': done
});
setState(() {
editMode = false;
});
},
)
]));
}),
);
}));
}
}We have three string variables set
readTodo, updateTodo, and deleteTodo. The readTodo is a query string to return a todo by its id. The updateTodo is a mutation to update a todo using its id with new done and name values. The deleteTodo is also a mutation that deletes a todo.See that the
ViewTodo is a stateful widget and manages its State in the ViewTodoState widget. Every variable inside the ViewTodoState widget is a state variable that can be updated during the widget's lifetime.The constructor is set to accept the Todo's is and a refresh function. In the
We did this to toggle text fields we can use to edit this widget without the need for another widget screen.
ViewTodoState widget, see that we have an editMode boolean variable. This variable sets the edit mode of the widget.We did this to toggle text fields we can use to edit this widget without the need for another widget screen.
The
myController is a text controller for a text field when editing the Todo in an edit mode. We use it to get the value typed in a TextField.The
bool done; is used to hold the done field of the todo.In the
build method, we enclosed the whole widget in the tree with the Query widget. It calls the readTodo on start-up and renders the name and done fields of the Todo in the UI.We used a ternary operator to check when the
Also, we are using the
editMode is active and render text field and the checkbox to edit the Todo. If there is no edit mode, the todo details are rendered on Text widgets.Also, we are using the
editMode to render FloatingActionButtons based on the current model.If there is an edit mode, the
save and cancel FloatingActionButtons will show. The save FloatingActionButton will save the edited Todo. It will collect the name value from TextField and collect the done value from the State of the CheckBox. Then, it will call the runMutation with the values.See that in the
onCompleted function of the Mutation object enclosing the edit section of the save and cancel FloatingActionButton. We call the
refresh method to refresh the list of todos in the TodoList and the refetch method from the Query widget to refresh this ViewTodo widget because the current Todo has been modified....
onCompleted: (dynamic resultData) {
print(resultData);
refresh();
refetch();
ScaffoldMessenger.of(context)
.showSnackBar(SnackBar(content: Text('Done.')));
},
...If there is no edit mode, the
edit and delete FBs are shown. The edit FB, when clicked, sets the editMode State to true. The delete FB, when clicked, sends the deleteTodo to delete the current Todo. See that in the
onCompleted function of the Mutation widget that enclosed it, we called the refetch method and popped the ViewTodo widget off the screen because it was deleted and no longer available....
onCompleted: (dynamic resultData) {
print(resultData);
refresh();
ScaffoldMessenger.of(context)
.showSnackBar(SnackBar(content: Text('Done.')));
Navigator.pop(context);
},
...Let's code the
CreateTodo screen.CreateTodo
This method is where we create new todos. This screen will have a TextField where we can type in the name of the Todo to create. It will have a
This method is where we create new todos. This screen will have a TextField where we can type in the name of the Todo to create. It will have a
MaterialButton that will run a mutation when clicked.Paste the below code to
lib/screens/CreateTodo.dart:import 'package:flutter/material.dart';
import 'package:graphql_flutter/graphql_flutter.dart';
import './../GraphQLConfig.dart';
String addTodo = """
mutation(\$name: String, \$done: Boolean) {
createTodo(input: { data: { name: \$name, done: \$done } }) {
todo {
name
done
}
}
}
""";
class CreateTodo extends StatelessWidget {
final myController = TextEditingController();
final refresh;
CreateTodo({Key key, this.refresh}) : super(key: key);
@override
Widget build(BuildContext context) {
return GraphQLProvider(
client: GraphQLConfiguration.clientToQuery(),
child: Mutation(
options: MutationOptions(
document:
gql(addTodo),
update: (GraphQLDataProxy cache, QueryResult result) {
return cache;
},
onCompleted: (dynamic resultData) {
refresh();
ScaffoldMessenger.of(context)
.showSnackBar(SnackBar(content: Text('New todo added.')));
Navigator.pop(context);
},
),
builder: (
RunMutation runMutation,
QueryResult result,
) {
return Scaffold(
appBar: AppBar(
title: Text("Create Todo"),
),
body: Column(children: [
Container(
alignment: Alignment.centerLeft,
padding: const EdgeInsets.fromLTRB(10, 50, 10, 9),
child: TextField(
controller: myController,
decoration: InputDecoration(
border: OutlineInputBorder(),
hintText: 'Add todo'),
)),
Row(children: [
Expanded(
child: Padding(
padding: const EdgeInsets.all(10),
child: MaterialButton(
onPressed: () {
runMutation({
'name': myController.text,
'done': false
});
ScaffoldMessenger.of(context).showSnackBar(
SnackBar(
content: Text('Adding new todo...')));
},
color: Colors.blue,
padding: const EdgeInsets.all(17),
child: Text(
"Add",
style: TextStyle(
fontWeight: FontWeight.bold,
color: Colors.white,
fontSize: 20),
),
)))
])
]));
}));
}
}See that we have a
createTodo mutation set. This mutation string will create a new todo in our Strapi.The
CreateTodo is a stateless widget, and it manages no state. The constructor accepts the refresh function passed to it and stores in it the refresh variable.The
We wrap its widget tree in
myController is a TextEditingController used to manipulate TextFields.We wrap its widget tree in
GraphQLProvider and Mutation widgets. The document function will run the gql(createTodo) function call when the runMutation argument in its builder function is called.In the UI, a TextField is rendered. This is where the new todo name is typed. The
myController is set to the TextField. This will enable us to use the myController to get the value of the TextField.The
The
MaterialButton has an onPressed event registered to it. Its handler will be called when the button is pressed. This will retrieve the value in the TextField using the myController. It will call the runMutation function passing in the value in the TextField. This will run the createTodo mutation thereby creating a new todo in our Strapi backend.The
onCompleted function will be called when the mutation completes:The
MaterialButton has an onPressed event registered to it. Its handler will be called when the button is pressed. This will retrieve the value in the TextField using the myController. It will call the runMutation function passing in the value in the TextField. This will run the
createTodo mutation, thereby creating a new todo in our Strapi backend.The
onCompleted function will be called when the mutation completes:...
onCompleted: (dynamic resultData) {
refresh();
ScaffoldMessenger.of(context)
.showSnackBar(SnackBar(content: Text('New todo added.')));
Navigator.pop(context);
},
...The
refresh function passed to the CreateTodo widget from the TodoList widget is called, so the todos list in the TodoList widget is updated to display our newly added todo item.Add todo

View todo

Edit todo

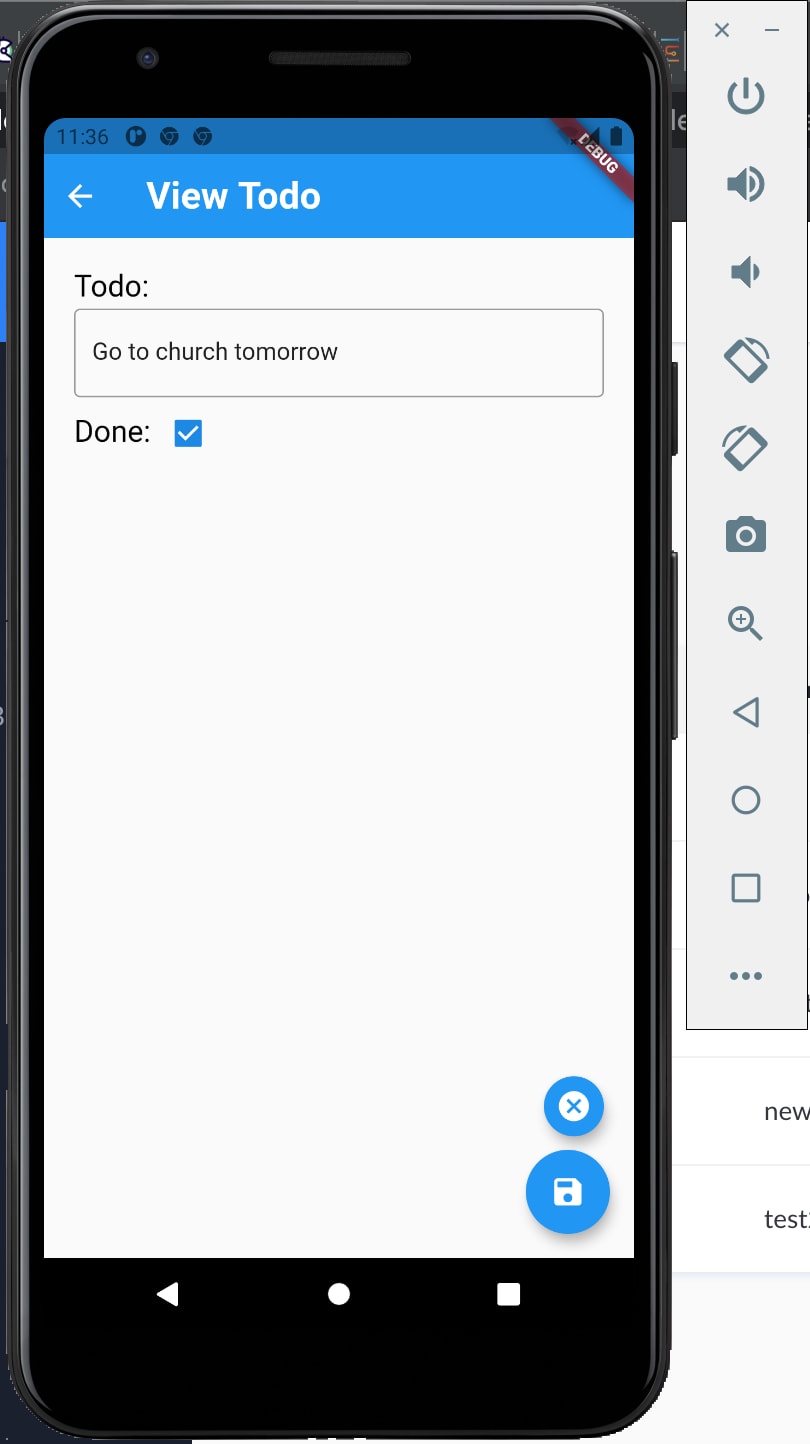
Delete todo

We learned a lot in this tutorial. First, we started by learning about Strapi and the goodies it brings to modern software development.
Next, we learned how to scaffold a Strapi project, how to build collections in it using its admin panel, and how to set up GraphQL endpoints.
We created a simple Todo app in Flutter to show how we can consume Strapi GraphQL endpoints from a mobile app.
Strapi is awesome. It is straightforward to begin with, and it has easy-to-understand docs. It can connect with any client, mobile, web, or desktop.
42