
42
Setting up Elastic Workplace Search with Docker
Recently I started looking into Elastic Enterprise Search’s Elastic Workplace Search offering. The configuration was not quite obvious when I first started off with the Docker version of it. The goal of this blog post is to walk you through the process of setting it up with Docker for local development.
💡 Note: This is only meant for local development. Consider their cloud offering for production use.
If you are looking for something to get started quickly, all you have to do is the following.
.env file. You can run openssl rand -hex 32 to generate values for ENCRYPTION_KEYS variable.docker-compose up
http://localhost:3002 and login as enterprise_search and the password you set in the above step.But, if you are feeling adventurous, read on! 🤘
After a bit of trial and error the I came up with the following docker-compose file. The only difference between the above is that this version doesn’t use a .env file and we need to go through some steps to set up each service.
version: "3"

services:
  elasticsearch:
    image: docker.elastic.co/elasticsearch/elasticsearch:7.13.4
    environment:
      - "node.name=es-node"
      - "discovery.type=single-node"
      - "cluster.name=enterprise-search-docker-cluster"
      - "bootstrap.memory_lock=true"
      - "xpack.security.enabled=true"
      - "xpack.security.authc.api_key.enabled=true"
      - "ES_JAVA_OPTS=-Xms512m -Xmx512m"
    ulimits:
      memlock:
        soft: -1
        hard: -1

  enterprisesearch:
    image: docker.elastic.co/enterprise-search/enterprise-search:7.13.4
    environment:
      - "elasticsearch.host=http://elasticsearch:9200"
      - "ent_search.auth.default.source=standard"
      - "elasticsearch.username=elastic"
      - "elasticsearch.password=password"
      - "secret_management.encryption_keys=[changeme Eg: ddc8XXXXXXXXXXXXXXXXXXXXc1157]"
      - "allow_es_settings_modification=true"
      - "JAVA_OPTS=-Xms2g -Xmx2g"
      - "ENT_SEARCH_DEFAULT_PASSWORD=changeme"
    ports:
      - 3002:3002
    depends_on: ['elasticsearch']
Note that I haven’t exposed the
elasticsearch service to the host, but feel free to do so by adding ports section under the service definition.First, set the
ENT_SEARCH_DEFAULT_PASSWORD to something you can remember. This will be the default password to be able to login in to the Enterprise Search instance.For the
secret_management.encryption_keys use the following command to generate a secure key. Note that should be at least one value in that list.openssl rand -hex 32Don’t worry about setting up
elasticsearch.password for now as we will be setting it up in a later step.If you check the logs for
enterprisesearch container now, you’ll see that it’s failing to authenticate against our elasticsearch instance. Don’t worry about it for now. We are going to set it in the below step.To fix the auth, let’s connect to our
elasticsearch container. The easiest way would be to do that from the Docker Desktop interface, or you could use your shell-fu as well 🤺
Once logged in, run the following command.
bin/elasticsearch-setup-passwords autoOnce you get the auto-generated passwords for each user, you will be able to see the following.
Changed password for user apm_system
PASSWORD apm_system = XXXXXXXXXXXXXXXXXXXX

Changed password for user kibana_system
PASSWORD kibana_system = XXXXXXXXXXXXXXXXXXXX

Changed password for user kibana
PASSWORD kibana = XXXXXXXXXXXXXXXXXXXX

Changed password for user logstash_system
PASSWORD logstash_system = XXXXXXXXXXXXXXXXXXXX

Changed password for user beats_system
PASSWORD beats_system = XXXXXXXXXXXXXXXXXXXX

Changed password for user remote_monitoring_user
PASSWORD remote_monitoring_user = XXXXXXXXXXXXXXXXXXXX

Changed password for user elastic
PASSWORD elastic = XXXXXXXXXXXXXXXXXXXX
Make note of the password for
elastic as we will be using that to configure the enterprisesearch instance.Or you could run the following command to quickly generate and grab the password for the
elastic user.bin/elasticsearch-setup-passwords auto -b | grep "PASSWORD elastic =" | cut -d '=' -f2 | xargsSince we have already set up the ES instance in the above step, setting up EES will be easy.
This time we need to connect to the
enterprisesearch container and update the elasticsearch.password environment variable.vi config/enterprise-search.yml
Update
CHANGE_THIS with the password you received for elastic user in the above step. Make sure to restart the container once that’s done and navigate to localhost:3002 You should be able to see the following welcome screen.
Log in with the
enterprise_search and the password that you set for ENT_SEARCH_DEFAULT_PASSWORD in the docker-compose-yml file.Also, if you have a look at the container logs you will be able to see the following as well. If you can see the below, that means you are good to go!
#########################################################

***Default user credentials have been setup. These are only printed once, so please ensure they are recorded.***

username: enterprise_search

password: XXXXXXXXXXXXXXXXXXXX

#########################################################
Once logged in, you will be able to see the following dashboard! 🙌

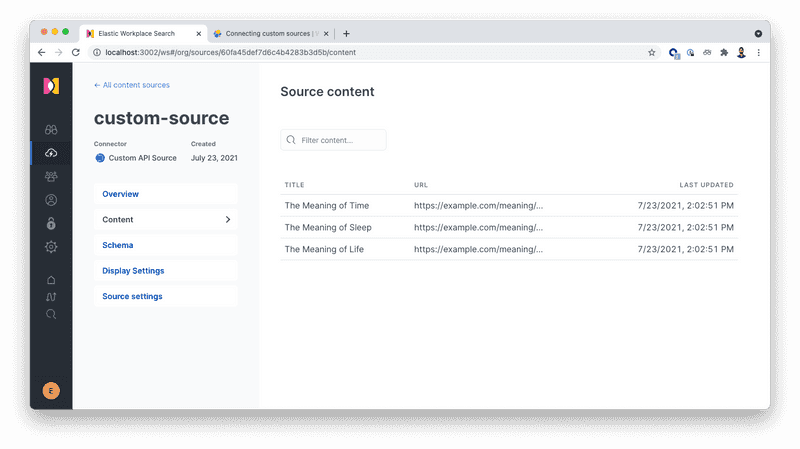
Once you log in there will be many options available for you to import from. To keep things simple, I will be using a custom source. Once you have set it up, you can do a curl request to index some sample data.
curl -X POST http://localhost:3002/api/ws/v1/sources/<put the source id here>/documents/bulk_create \
-H "Authorization: Bearer <put the access token here>" \
-H "Content-Type: application/json" \
-d '[
  {
    "id" : 1234,
    "title" : "The Meaning of Time",
    "body" : "Not much. It is a made up thing.",
    "url" : "https://example.com/meaning/of/time",
    "created_at": "2019-06-01T12:00:00+00:00",
    "type": "list"
  },
  {
    "id" : 1235,
    "title" : "The Meaning of Sleep",
    "body" : "Rest, recharge, and connect to the Ether.",
    "url" : "https://example.com/meaning/of/sleep",
    "created_at": "2019-06-01T12:00:00+00:00",
    "type": "list"
  },
  {
    "id" : 1236,
    "title" : "The Meaning of Life",
    "body" : "Be excellent to each other.",
    "url" : "https://example.com/meaning/of/life",
    "created_at": "2019-06-01T12:00:00+00:00",
    "type": "list"
  }
]'
Make sure to change
<put the source id here> and <put the access token here> in the above. You can get those values from the Credentials section of the custom source.You should be able to see the content once the request has been made. That’s it! 🎉
In this article, we looked at setting up Elastic Workplace Search with Docker containers to improve the developer experience without having to use a cloud option for dev work. We looked at two options a shorted version and a longer version where we dived deeped into how to set it up manually as well.
42