
43
Building executable as user for distribution from a progressive web app
I was working on a project for graduation called Roots, and I needed a way of exporting a web experience to an executable. I never expected this to be such a difficult thing to find information on. Granted, there are not a lot of use cases for this. Since I could not find a good way of exporting a web experience to an executable, I embarked on a quest to figure this out for myself.
Some might wonder: "Why would you want to export an executable from the web?". In my case, I needed this for my graduation project Roots. Roots is a 2D narrative game engine in the browser. Here are the pros to giving the option to create a executable to your users.
The main thing with Roots was that it has to be simple, so everybody with a browser can use it. And letting users try to host their projects online as a web app is not what I would call accessible for anyone. I think you know where I am going with this. I wanted a way that people would be able to distribute their projects on their own.
I also surveyed gamers about web games and installed games. One thing that came back multiple times was that they had the feeling that games hosted on the web were of lesser quality than installed games. Something about being able to have the game physically installed feels more premium.
One of the requirements was also that people should be able to use Roots offline. So it had to be installable, and work offline. Therefore, I had to figure out how to get an executable from a web app.
After this tutorial you will have touched a JavaScript compiler, Electron, C# and PWA. But that is enough of an introduction, for now, let’s take a closer look at how I worked it out.
The concept I will discuss is pretty simple. But getting all the parts together and work nicely with each other was the hard part. And in the end, the user should be able to use it. Otherwise, it would not add value.
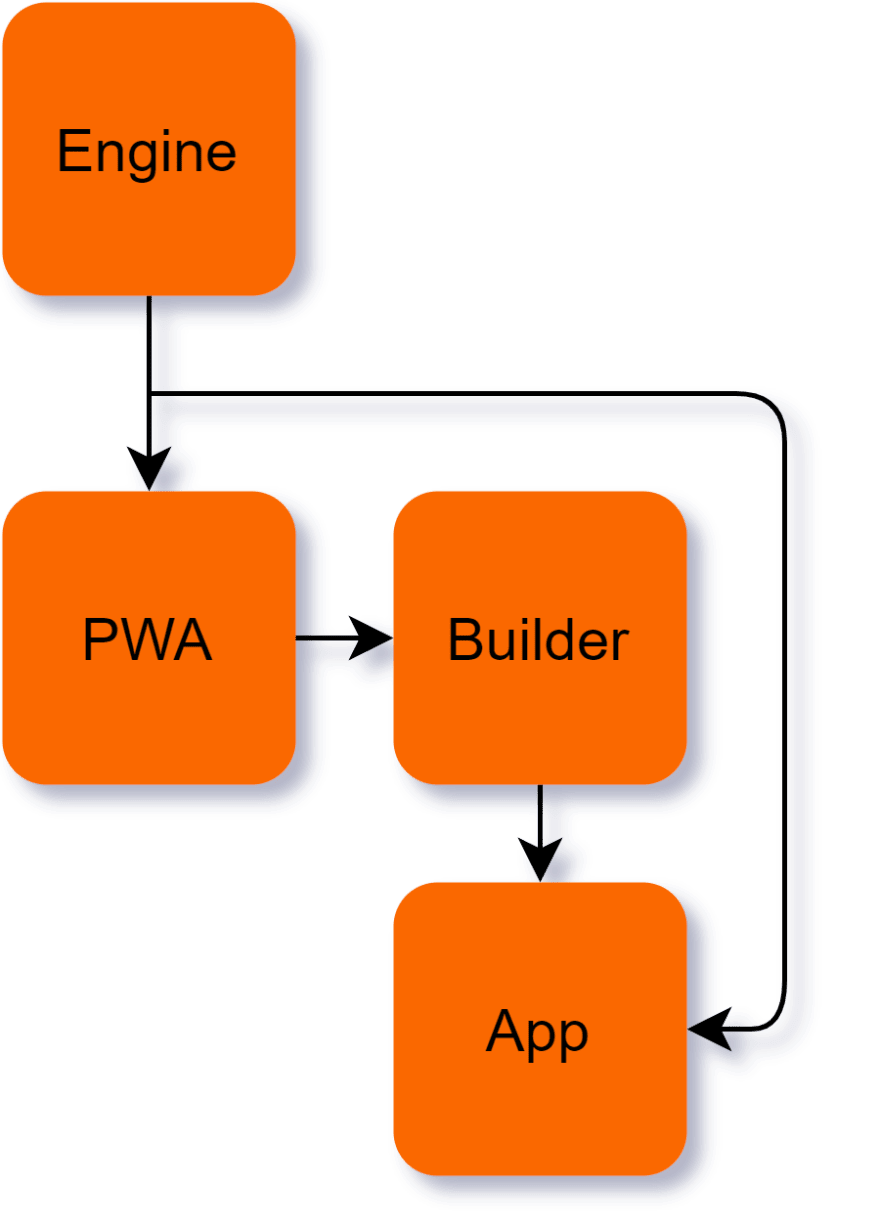
One of the nice parts of working with web technology is that you will have to create the rendering engine only once. This is important because you want to keep the experience the same between the game editor(PWA) and the final executable(App).
The best way too handle files in my opion is making use the
Chrome File System API. You can use this when you have a https site or PWA. This will make the experience of for exporting a executable more like a normal installed app.There are two ways to do this part. For now, I will only explain how to do the builder way. The builder is an executable that you can make that will get all the resources needed to build your project on a user's computer. Like an installer that does not permanently install unwanted software on the user's computer.
I'm figuring out how to do the protocol way and will update if I found a way of doing so.
The app is the result of what comes out of the builder. This will be a single executable
Electron app that can be shared. Because we are using Electron, it makes it possible to export the project to the user's current operating system.If you want to follow along with the implementation that I will be sharing down here, this is what you need to be familiar with.
The best experience I could create was in
Chrome. This is because of their excellent Chrome File System API. It is also doable with other browsers, but the user experience will be a lot less pollished then when you use Chrome.I like to use yarn to install and manage my decencies, but if you want to use NPM you free to do so.
Note: You can use different libraries to get the same result. But after a lot of trail and error, this what I came up with. If you know how to do this in other libraries, please share it in the comments below.
If you just want to check out the code, you can do that here → Git
The main thing with the engine is that you need to make a component with your front end framework that will accept data. In my case this is JSON, images and audio files. These have to be read and then displayed. When you have a working engine, you have to be able to share it with the rest of your project. This is when you have to use a JavaScript compiler to make it as compatible with other code as possible. Then you can publish it too NPM and use it with other projects. Now that we have defined what we have to do, let me show you how I did it.
Let's start with the backbone of your experience, the engine. Create a folder with the name of your engine and
cd into it.> mkdir engine
> cd ./engineThen we can create a React app in this folder using NPX and React's default template.
> npx create-react-app .When this is done, we will need to set up babel. This is a JavaScript compiler that will make sure that we can distribute our engine between the web app and the app. Make sure you add them as a dev dependency.
> yarn add --dev @babel/cli @babel/core @babel/preset-env @babel/preset-react core-jsNow we have to create a
babel.config.json in the root folder of our project. And this is the config you will add.{"presets": ["@babel/preset-env", "@babel/preset-react"]}Now we have to configure the
package.json with the build command for babel."build": "del /s /q dist && babel src/Engine --out-dir dist --copy-files"There is some configuration you can do here. You can remove the
/s and /q from the del command if you want to be asked if you are sure you want to rebuild. I would keep dist unchanged for the del and babel commands because this is a default. You can change the src/Engine however you want to call the folder where you have the source of your engine. But make sure it is a separate folder from the App.js and index.js.The last thing to do in the
package.json is setting the main, module, and type. This will also depend on how you export your library. I like to have one index.js that exports all."main": "dist/index.js",
"module": "dist/index.js",
"type": "module",How you are going to build your engine is up to you. But for example, this is how I made mine.
engine/src/Engine/Engine.jsimport * as React from "react";
import "core-js";
const Engine = ({ data }) => {
return (<div className="App">
<h1>{data.title}</h1>
{data.images.map(image => <img src={image} alt="" width={300} key={image} />)}
</div>);
};
export default Engine;Make sure to import
core-js here. Otherwise, you will have some dependency problems with Electron later on.engine/src/App.jsimport Engine from "./engine";
import projectData from "./projectData";
const App = () => {
const preProcessor = {
...projectData,
images: [...projectData.images.map(i => `/img/${i}`)]
};
return (<Engine data={preProcessor} />);
};
export default App;This
App.js is an example that you can have next to your engine library, with the purpose of easy testing without having to switch between the web app or app project. You can just use yarn start and work on the engine like a normal React project.Now to be able to distribute our engine to the other parts of our project we have to publish this library to NPM.
yarn publishYarn will ask you to log in if you haven't already, and it will ask you to give a version number when publishing. After you have done this, you have successfully set up the engine project we are going to use.
If you just want to check out the code, you can do that here → Git
This is where you would make the tools that your end user can use to create a presentation, game or what ever you need for your project. Again, you can do this using any front end framework that you want, I will be using React here. There is one key part that is important here. And that is the of the
Chrome File System API. This will give your user the best experience when working with files. This is also important because we are going to need this to deliver the content files and the builder executable with it. Let me show you how I did this.For the web app, you can follow the first two steps from the engine. So make a folder named web app, and create a React app.
There are three parts to the web app that I will explain. First is how to manage a project with
Chrome File System API and second how the engine will be used with the web app. Finally, we will return the builder to the user. This is quite a lot, so bear with me.If you want to read up on the Chrome File System API you can do so here
web app/scr/App.jsimport { useEffect, useState } from "react";
import Engine from "Engine";
const App = () => {
const [project, setProject] = useState();
const [projectData, setProjectData] = useState({
title: "This is your project",
images: []
});
const openProject = () => {
window
.showDirectoryPicker()
.then((directory) => {
setProject(directory);
return directory.values();
})
.then(async (fileHandles) => {
let projectData = undefined;
let imageDirectory = undefined;
for await (const entry of fileHandles) {
if (entry.name === "projectData.json") projectData = entry;
else if (entry.name === "img") imageDirectory = entry;
}
if (!projectData) return;
projectData
.getFile()
.then((file) => file.text())
.then((json) => JSON.parse(json))
.then(async (data) => {
const imageHandlers = await imageDirectory.values();
const images = [];
for await (const entry of imageHandlers) {
if (!data.images.includes(entry.name)) continue;
images.push(entry);
}
const newData = {
...data,
images: [...images],
};
setProjectData(newData);
});
});
};
const loadImages = () => {
if (!project) {
alert("No project folder opened")
return;
}
window.showOpenFilePicker(imagePickerOptions)
.then(images => {
setProjectData({
...projectData,
images: [
...projectData.images,
...images]
});
});
};
const saveProject = () => {
if (!project) {
alert("No project folder opened")
return;
}
project.getFileHandle('projectData.json', { create: true })
.then(newFile =>
writeFile(newFile, JSON.stringify({
...projectData,
images: [...new Set(projectData.images.map(i => i.name))]
}
)));
project.getDirectoryHandle('img', { create: true })
.then((imageFolder) => {
projectData.images.forEach((image) => {
imageFolder.getFileHandle(image.name, { create: true })
.then(newFile => {
image.getFile()
.then(file => writeFile(newFile, file));
});
});
})
};
return (
<div className="App" >
<button onClick={openProject}>Open project</button>
<button onClick={loadImages}>Load image</button>
<button onClick={saveProject}>Save project</button>
<h1>{project ? `${project.name} opened` : "No project opened yet"}</h1>
{
projectData.images.length > 0 &&
projectData.images.map(({ name }) => {
return <h2 key={name}>{`${name} opened`}</h2>
})
}
</div >
);
}
export default App;There is a lot to unpack here. But it's easier than you might think.
openProject will call window.showDirectoryPicker which will open a directory picker. Its default behavior is to register this folder as a new project. But if it finds a projectData.json it will try and load all the data so you can keep working on your project.loadImages is like openProject, but it will call window.showFilePicker and then the user can load an image.saveProject will save all the files that are used in the project to the project folder. Using the getFileHandle and getDirectoryHandle you can create directories and files in the project folder.And in the render function, there is some extra markup to show what's loaded in the project.
writeFile and writeURLToFile you can find those implementations here. All functions from the Chrome File System API are async and are to be awaited. If you want to publish the web app you will have to register an SSL certificate before you can use it.Now you can install your engine that you have created and published earlier on.
yarn add <-- Write the name of your engine hereAnd then you can implement the engine into the web editor.
web app/scr/App.js...
const [preProcessor, setPreProcessor] = useState();
useEffect(() => {
Promise.all(projectData.images.map(i => i.getFile()
.then(f => URL.createObjectURL(f))))
.then(data => {
setPreProcessor({
...projectData,
images: [...data]
});
});
}, [projectData]);
return (
<div className="App" >
{...}
{preProcessor && <Engine data={preProcessor} />}
</div >
);Like I did in the example from the engine, I created a pre-process that takes the file handlers and creates object URLs for them, so the engine can render them. Because this is an asynchronous process, we can expect
preProcessor to be empty. So we have to check for this in the render.Now let's see how we can share the builder with the user.
web app/scr/App.js...
const buildProject = () => {
if (!project) {
alert("No project folder opened")
return;
}
project.getFileHandle('builder.exe', { create: true })
.then(newFile => writeURLToFile(newFile, `${window.location.hostname}/<-- Add the path to where your builder.exe is -->`));
};
return (
<div className="App" >
{...}
<button onClick={buildProject}>Build project</button>
{...}
</div >
);
...Because we have access to the project folder through the
Chrome File System API it's really easy to download something to that folder. Here, I am using the writeURLToFile function to write a file in the public folder to the user’s project folder. Currently, we don't have the builder ready, but it will be added later when we have finished the builder.We can't call this from the browser because of security. That is one of the downfalls. You have to instruct the user to go to the folder and execute the builder. There is an alternative way where you can take advantage of registering a protocol and have the user only install the builder once. In this case, the next time they want to build, you can access the builder through a URL.
That is how to set up your web app and preview and set up a project that can be built later with the builder.
If you just want to check out the code, you can do that here → Git
This is where we are setting up what the final exported app will look like. The steps that we are going to take here are create a template that uses the engine that you have made, then we will set up a module bundler to get access to the content that the engine will need to render the user's experience. And then we will push all of this to git so the builder wich we will work on after this can access this template real easy. Let's set all this up now.
For setting up the base for your
Electron app template, you can follow the instructions here.Now we install the dependencies.
file-loader is needed to be able to pack the images in the Electron app.yarn add --dev file-loaderYou must also add the engine dependency here. So when we will build it later, we don't need to add them.
Now we have to change the
webpack.renderer.config.js so that webpack will use the file loader to access the images when the Electron app is built. This is what the config should look like.const rules = require('./webpack.rules');
rules.push({
test: /\.css$/,
use: [{ loader: 'style-loader' }, { loader: 'css-loader' }],
});
rules.push({
test: /\.(png|jpe?g|gif)$/i,
use: [
{
loader: 'file-loader',
options: {
name: 'img/[name].[ext]',
publicPath: '../.'
}
},
],
});
module.exports = {
module: {
rules,
},
};Electron does not like you to access public files directly. That is why we have to add a local protocol to Electron. This can be done in /src/main.js. First import session here const { app, BrowserWindow } = require('electron');. Then you can add the protocol here....
const createWindow = () => {
session.defaultSession.protocol.registerFileProtocol('static', (request, callback) => {
const fileUrl = request.url.replace('static://', '');
const filePath = path.join(app.getAppPath(), '.webpack/renderer', fileUrl);
callback(filePath);
});
const mainWindow = new BrowserWindow({
...You can change
static to whatever you like. It is just the name of your protocol.Now that everything is set up we can implement the engine in
Electron./scr/app.jsximport * as React from "react";
import * as ReactDOM from "react-dom";
import Engine from "Engine";
import projectData from "./projectData";
const importAll = (resource) => resource.keys().map(resource);
importAll(require.context("./img", false, /\.(png|jpe?g|gif)$/));
const preProcessor = {
...projectData,
images: [...projectData.images.map((i) => `static://img/${i}`)],
};
ReactDOM.render(
<Engine data={preProcessor} />,
document.getElementById("root")
);Before rendering, we need to tell React to import all the resources that webpack has built. Namely, all the images that are in the project.
Here we are doing pretty much the same as in the example from the engine. The only difference is that we are adding the
static:// before the img/. This way we can access the image files.Now you can test if the app works by adding an
img folder to src and a projectData.json. Then you can run yarn start first to see if it works. After that, you can verify if the build works by running yarn make and going to the out folder after it's finished and running the build.You could also look at
Electron Forge yourself. You can configure a lot, like icons and start-up behaviors, but that is all up to you.If everything works, we need to push all of this to git. This is important! Because after this we want to be able to get this template through the builder and git has a nice feature that we can exploit for this.
If you just want to check out the code, you can do that here → Git
The builder does a couple of things. Firstly, it gets all the resources that we need to create a build. So in this case it will download
NodeJs and the Electron template. Because we can't be sure that the user has NodeJs we download it for them. And the nice thing is you can execute NodeJs in place. And the Electron template can also easily be downloaded using the git zipball feature. These will be placed alongside of the project, so the builder can have access to the user's project content. This will be moved to the Electron template. And then we can use NodeJs to execute the install dependencies command and the build command of the Electron template. And then after a while you have a Electron app that the user can distribute. And down here is how to do this.The builder will be written in C#. And this has no other reason than that I am very comfortable creating executables with it. This should also be possible in NodeJS if you are using pkg or nexe. On top of that C# can be compiled for Linux, Mac, and Windows. So you can distribute this to multiple platforms.
For the sake of the example, I created a console application that will demonstrate what the steps are. But for user experience, it could also be done as a windows form.
private const string BUILDER_TOOLS = "BuilderTools";
private const string NODE_JS = "NodeJs";
// This could be any NodeJS version you needed. Make sure it is the zip version.
private const string NODE_JS_URL = "https://nodejs.org/dist/v14.16.1/node-v14.16.1-win-x64.zip";

private const string APP_TEMPLATE = "AppTemplate";
private const string APP = "App";
private const string APP_TEMPLATE_GIT = "https://api.github.com/repos/<-- GIT USERNAME -->/<-- GIT REPO NAME -->/zipball";

private const string PROJECT_NAME = "Project";
These are the config options for the builder. You can change or edit anything to your liking. This is only to be more organized. Notice
APP_TEMPLATE_GIT, this is why we needed to publish the app template to git. Because you can't be sure that the user has git or NPM installed, you have to get the app template another way. This is where zipball comes in handy. Now we can just download the zip to the user, and we don't need to install anything extra on their machine./* Setting up NodeJs */
Console.WriteLine("Downloading NodeJs");
if (!Directory.Exists(BUILDER_TOOLS))
{
WebClient webClient = new();
webClient.DownloadFile(NODE_JS_URL, $".\\{BUILDER_TOOLS}.zip");
Console.WriteLine("Downloaded NodeJs");
Console.WriteLine("Extracting NodeJs");
ZipFile.ExtractToDirectory($".\\{BUILDER_TOOLS}.zip", BUILDER_TOOLS, true);
// Renaming the folder in the builder tools so it’s easier accessible
DirectoryInfo node = new($".\\{BUILDER_TOOLS}");
if (!Directory.Exists($"{node.FullName}\\{NODE_JS}"))
{
Directory.Move(node.GetDirectories()[0].FullName, $"{node.FullName}\\{NODE_JS}");
Directory.Delete(node.GetDirectories()[0].FullName);
}
File.Delete($".\\{BUILDER_TOOLS}.zip");
}
Console.WriteLine("Extracted NodeJs");/* Setting up App template */
Console.WriteLine("Downloading App template");
if (!Directory.Exists(APP_TEMPLATE))
{
using WebClient client = new();
client.Headers.Add("user-agent", "Anything");
client.DownloadFile(APP_TEMPLATE_GIT, $".\\{APP_TEMPLATE}.zip");
Console.WriteLine("Downloaded App template");
Console.WriteLine("Extracting App template");
ZipFile.ExtractToDirectory($"{APP_TEMPLATE}.zip", APP_TEMPLATE, true);
DirectoryInfo app = new($".\\{APP_TEMPLATE}");
if (!Directory.Exists($"{app.FullName}\\{APP}"))
{
Directory.Move(app.GetDirectories()[0].FullName, $"{app.FullName}\\{APP}");
Directory.Delete(app.GetDirectories()[0].FullName);
}
//Clean up
File.Delete($"{APP_TEMPLATE}.zip");
}
Console.WriteLine("Extracted App template");These two parts are doing pretty much the same thing. They are getting NodeJS and the git repo and extracting them to the project folder. Always clean up and remove the zip files after you are done extracting.
File.WriteAllBytes(@"C:\NodeJS.zip", YourProjectName.Properties.Resources.NodeJS);This is one way of doing it. Because you could also embed everything as a resource. And then your code would be simpler. But the initial download would be bigger. But just if your curious, you can find how to load a resource in
C# here. And this is how you would write it to disk./* Move the project files to the app template and overwrite if they already exist */
Console.WriteLine("Setup App template");
if (!Directory.Exists($".\\{APP_TEMPLATE}\\{APP}\\src\\img"))
Directory.CreateDirectory($".\\{APP_TEMPLATE}\\{APP}\\src\\img");
CopyFilesRecursively(".\\img", $".\\{APP_TEMPLATE}\\{APP}\\src\\img");
if (File.Exists($".\\{APP_TEMPLATE}\\{APP}\\src\\projectData.json"))
File.Delete($".\\{APP_TEMPLATE}\\{APP}\\src\\projectData.json");
File.Copy(".\\projectData.json", $".\\{APP_TEMPLATE}\\{APP}\\src\\projectData.json");
Console.WriteLine("Setup done App template");
// This is a utility function you can place outside the main function
private static void CopyFilesRecursively(string sourcePath, string targetPath)
{
foreach (string dirPath in Directory.GetDirectories(sourcePath, "*", SearchOption.AllDirectories))
Directory.CreateDirectory(dirPath.Replace(sourcePath, targetPath));
foreach (string newPath in Directory.GetFiles(sourcePath, "*.*", SearchOption.AllDirectories))
File.Copy(newPath, newPath.Replace(sourcePath, targetPath), true);
}Because the builder executable is going to live in the same folder as where the project is, we can move the project files to the app template. If they are there already we want to overwrite them.
/* Setup the package.json of the app */
Console.WriteLine("Configure App template");

string path = $".\\{APP_TEMPLATE}\\{APP}\\package.json";

string json = File.ReadAllText(path);
JObject package = JObject.Parse(json);

SaveJsonKeyEdit(package, "author", "dutchskull");
SaveJsonKeyEdit(package, "description", "An exported executable from the web");
SaveJsonKeyEdit(package, "name", PROJECT_NAME);

File.WriteAllText(path, package.ToString());
Console.WriteLine("Configure done App template");

// This is a utility function you can place outside the main function
private static void SaveJsonKeyEdit(JObject package, string key, object value)
{
    if (package.ContainsKey(key))
        package[key] = value.ToString();
    else
        package.Add(key, value.ToString());
}
At this point, we can do some configuration based on the project itself. If you add some settings for the user to change in the web app, like icons, name, description, and author, you can configure them back into the app template here. You will need to add
Newtonsoft.Json to your C# project. This can be done by running this command in the terminal NuGet install Newtonsoft.Json./* The building step */
Console.WriteLine("Building App template");
CommandExecuter.ExecuteCommand($"cd .\\{APP_TEMPLATE}\\{APP} && .\\..\\..\\{BUILDER_TOOLS}\\{NODE_JS}\\npm.cmd i");
CommandExecuter.ExecuteCommand($"cd .\\{APP_TEMPLATE}\\{APP}\\ && .\\..\\..\\{BUILDER_TOOLS}\\{NODE_JS}\\npm.cmd run make");
Console.WriteLine("Build App template");Now you will run the commands to install all of the dependencies of the app template. I needed to create a custom class to run these commands without having crashes. But I will not go into detail on those since they are only here for support. You can download those here → CommandExecutor and CommandOutput.
/* Move the build to the root of the project */
DirectoryInfo buildOutputPath = new($".\\{APP_TEMPLATE}\\{APP}\\out\\make\\squirrel.windows\\x64\\");

if (File.Exists($"./{PROJECT_NAME}.exe"))
    File.Delete($"./{PROJECT_NAME}.exe");

File.Move(buildOutputPath.GetFiles().Where(file => file.Name.Contains(".exe")).FirstOrDefault().FullName, $"./{PROJECT_NAME}.exe");

if (File.Exists($"{PROJECT_NAME}.exe"))
    Process.Start("explorer.exe", $"{ PROJECT_NAME}.exe");
After the build is done, we can grab the executable and move it to the root project folder where the user can grab it. We can also auto-run the project when it is done building. This way the user knows it works.
Now that we have written the builder, we have to make an executable that we can add to the web app. This part was also difficult. I wanted to create a portable executable because it is easier to share one file than multiple. So I read the documentation and this is what you need to do.
<PropertyGroup>
      <OutputType>Exe</OutputType>
      <TargetFramework>net5.0</TargetFramework>
      <PublishSingleFile>true</PublishSingleFile>
      <SelfContained>true</SelfContained>
      <RuntimeIdentifier>win-x64</RuntimeIdentifier>
      <PublishTrimmed>true</PublishTrimmed>
      <PublishReadyToRun>true</PublishReadyToRun>
      <IncludeAllContentForSelfExtract>true</IncludeAllContentForSelfExtract>
      <DebugType>embedded</DebugType>
  </PropertyGroup>
You need to edit the project XML file and put this property group instead of the property group that is already there. With all of these settings, you can go to publish like illustrated down below.

Now that we have a portable executable that will build an
Electron app for our users, we have to add it to the web app. So in the web app project, you can now add the new build builder to public/builder.exe.And that's it. Now you have a fully working build system for a web app.
Phew, that was a lot. It takes almost half a day to get everything set up. But in the end, you will have a system that can build an app from a web app and that a user can use and distribute. There are still some user experience quirks that have to be ironed out. Like letting the user install a builder once and use a protocol to build their experience after that. The way the builder is delivered to the user, by choosing how to package NodeJS and the app template, could also be improved. But none of these cases are breaking the core concept.
This is my first time writing a blog post like this, so I would love to get some feedback for next time so I can keep sharing experiments like this.
43