
42
Create a Resume Uploader Using AWS Amplify
In the first part of this series, we learned how to send emails by creating a contact form. In this post, we'll take things up a notch by also allowing our users to upload attachments.
Sites like Indeed.com allow for job seekers to upload their resumes with the idea that employers can browse those resumes to see if a candidate is a good fit.
The scope of this post will be catered to job seekers submitting resumes, but it can also be extended to account for companies as well.
📝 Because the knowledge in this series builds with each post, in this post, we'll spend more time focusing on the how and only touch on the why when appropriate.
We'll kick things off by downloading the starter project. This will contain our UI, but it currently has no backend logic tied to it.
Once the project is cloned to our machine, we'll make sure we're on the
resume-uploader-starter branch. From here, we can install the dependencies and run our application. When running the application, we should be presented with the following screen:
// screenshot of app

This is nearly identical to the last project, however, when clicking the "upload resume" button there is a new option to upload a file:

The goal of this project is to allow a user to upload a file, and have it both saved in AWS as well as emailed to a verified recipient.
Before diving into the code, let's take a moment to walk through how our AWS services will be working together.

Using the above screenshot as a guide, as a candidate enters our application, they will be asked to sign up.
📝 We want users to authenticate to not only restrict who can upload/download files, but also in case resumes have the same name ie. resume.pdf. So we'll use their generated user ID as a prefix to their resume.
More on the note above later 😉
The next part of our application is very similar to the last post: Our API sends data to our database and upon being stored in the table, a function is triggered to send an email.
This brings us to S3.
When our frontend gets a .pdf file, we'll store it in S3. Our lambda function will be in charge of grabbing the correct .pdf and adding it as an attachment to the email.
That's the general flow of the application. Let's get started on putting it all together.
In our terminal, we'll make sure we're in the project's root directory. For here, we'll install some Amplify dependencies as well as initialize our project to use the Amplify CLI:
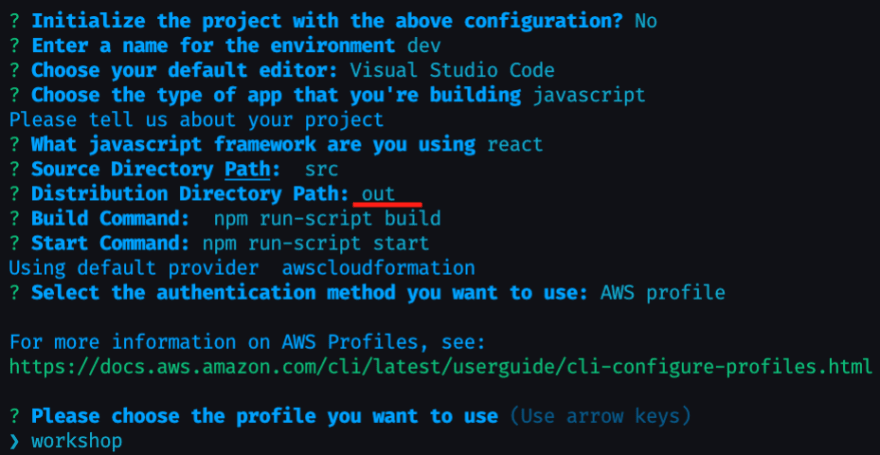
npm i aws-amplify @aws-amplify/ui-react && amplify initOnce the dependencies are done installing, there will be a prompt asking us how we would like our app configured.
Enter a name of your choosing, then **select
n **when asked if you would like to initialize amplify with the default configuration.This is because we want to change the build directory from
build to out since NextJS will be building our site as static HTML files.Hit enter to accept the default options when prompted, but when asked for a "Distribution Directory Path" type out and hit enter.
When done, confirm the profile you'd like to use. The entire flow should look similar to the following screenshot:
📝 If you ever accidentally accept the default configuration or want to change it later, typing the command amplify configure project will take you back to the prompt.
With our project configured, let's started adding our services.
Amazon Cognito user pools will store our users while identity pools will manage their permissions. Amplify can set this up for us with reasonable defaults (password protection, TOTP, etc) all from the CLI.
To get started, we'll type the following command in our terminal:
amplify add authThe prompts will ask us how we would like to configure Amazon Cognito.
For our use case, we'll make the following selections:
Default Configuration
Username
No, I am done.
The entire flow, should look like the following screenshot:

With auth templated through the CLI, let's move on to our next service.
Setting up an API using AWS AppSync will be very similar to the last section, with the addition of a reference to the candidate's resume.
Back in the terminal, type the following command:
amplify add apiFor the prompts that follow, select the following options:
GraphQL
[enter] to select the default name
Amazon Cognito User Pool
No, I am done.
No
Single object with fields
Yes
The generated flow, should look like the following screenshot:

Selecting "Yes" to the last option should've opened up our schema file in our editor.
Replace the contents with the following:
type Candidate
  @model
  @auth(rules: [{ allow: owner, operations: [create, update] }]) {
    id: ID!
    name: String!
    email: String!
    resumeFile: String!
    userIdentity: String!
}
As mentioned in the last post, the
@model directive will automatically create our DynamoDB table and the corresponding CRUDL operations to interact with it.The
@auth directive says that the only operations allowed on this API are the ability to create and update. Furthermore, those operations are scoped to the currently signed in user.The fields correspond to what is being stored in our database --
id, name, email, and resumeFile.We also have a
userIdentity field. When a user is added to Cognito, a user ID is created for them. We are adding this to our API so that our lambda function (as well as employers in the future) will be able to access resumes. Note that this ID is not associated with our user's usernames or passwords 😉 The next two services are where things really start to get interesting. Let's dive in!
In our application, we are choosing to store resumes in Amazon Simple Storage Service (S3). Doing so has the following benefits:
Decreases the payload size of what we're storing in our database
We don't have to mess around with sending multi-part form data to our lambda
We have a dedicated space where emails are sent, as opposed to just an email inbox
Much like the other services thus far, we'll create our S3 bucket from within the CLI.
To start, we'll type the following command in out terminal:
amplify add storage📝 Amplify comes with two primary types of storage: A database, and an S3 bucket.
Through the prompts, we'll configure our S3 bucket by selecting the following options:
Content
[enter] to accept the default
[enter] to accept the default
Auth users only
use the spacebar to select all options
No
When done, the generated output should look like the following screenshot:

With S3 configured, it's time to tie our services together!
Our lambda function has the following requirements:
Is triggered by the dynamoDB table associated with our API
Has access to the S3 bucket we just created
Has permission to send email with SES
Amplify gives us the ability to accomplish all of this without heading to the AWS Console.
To get started, type the following command in the CLI:
amplify add functionFrom here, make the following selections:
Lambda function
"resumeFunc"
NodeJS
Lambda Trigger
Amazon DynamoDB Stream
Use API category graphql @model table
Configure Advanced Settings? Yes
"Y" to access other resources
[use spacebar to select storage]
[use spacebar to select our S3 bucket]
select "read"
"N" to not invoking on a recurring schedule
"N" to not enable lambda layers
"Y" to configuring environment variables
SES_EMAIL
[enter an email address you have access to]
"I'm done"
"N" we don't need to configure secret values
"Y" we want to edit the local function now
📝 If you think that was a lot of steps, try doing it manually!
📝 Once done, the CLI should provide you with a few environment variables that it generated: ENV, REGION, and _YOUR_BUCKET_. Keep track of the bucket variable for now as we'll be needing that later.

Similar to the last post, this function will be triggered whenever there is a change event on our database (when an item is inserted, modified, or deleted).
Also worth re-mentioning from the last post is that under heavy load, DynamoDB with batch changes together. This is why we are iterating over
event.Records.Replace the generated code in the lambda function with the following:
const aws = require('aws-sdk')
const nodemailer = require('nodemailer')

const ses = new aws.SES()
const s3 = new aws.S3()
const transporter = nodemailer.createTransport({
  SES: { ses, aws },
})

exports.handler = async (event) => {
  for (const streamedItem of event.Records) {
    if (streamedItem.eventName === 'INSERT') {
      //pull off items from stream
      const filename = streamedItem.dynamodb.NewImage.resumeFile.S
      const candidateEmail = streamedItem.dynamodb.NewImage.email.S
      const candidateName = streamedItem.dynamodb.NewImage.name.S
      const candidateIdentity = streamedItem.dynamodb.NewImage.userIdentity.S
      //change this to match your bucket name👇🏽
      const RESUME_BUCKET = process.env.STORAGE_RESUMEBUCKET_BUCKETNAME
      try {
        //get record from s3
        const resumeFile = await s3
          .getObject({
            Bucket: RESUME_BUCKET,
            Key: `protected/${candidateIdentity}/${filename}`,
          })
          .promise()

        //setup email with attachment
        const mailOptions = {
          from: process.env.SES_EMAIL,
          subject: 'Candidate Resume Submission',
          html: `<p>You can reach ${candidateName} at the following email: <b>${candidateEmail}</b></p>`,
          to: process.env.SES_EMAIL,
          attachments: [
            {
              filename,
              content: resumeFile.Body,
            },
          ],
        }

        //send email
        await transporter.sendMail(mailOptions)
      } catch (e) {
        console.error('Error', e)
      }
    }
  }
  return { status: 'done' }
}
The code above can be split into four basic sections:
Configure our project: Here we're bringing in and setting up relevant packages. The nodemailer package is a handy utility we'll install in a bit. This makes sending emails with attachments a bit simpler.
Grabbing the data we need from the event
Getting the relevant resume file. Note that our files are protected.
Setting up our email and sending the email with an attachment.
The last thing to do here is give our function permission to call SES.
In the last section, we set up SES. Feel free to grab the ARN from that resource, or follow the steps in that post to setup SES for the first time.
📝 If you have the AWS CLI installed, you can actually setup an email by typing the following command in your terminal and clicking the verification link sent to the provided email address:
aws ses verify-email-identity --email-address your-email@emai.com --region us-east-1 --profile=your-aws-profileOnce you have an ARN for the SES email we created, we'll want to open up our function's cloudformation template:
//from the root of your project
cd amplify/backend/function/YOUR_FUNC_NAME
From there, open the file ending in
-cloudformation-template.json.Add a statement to the
lambdaexecutionpolicy object:{
"Effect": "Allow",
"Action": "ses:SendRawEmail",
"Resource": "YOUR_SES_ARN"
}The
lambdaexecutionpolicy should look like the following screenshot:
Finally, we'll change into the
src directory of our lambda function and install the nodemailer package:// assuming we're still in the amplify/backend/function/ourFunction directory:
cd src && npm i nodemailer📝 We don't have to install the aws-sdk unless we're testing our function locally. AWS already installs this package in the lambda runtime.
With all of our services configured and connected, it's time to push them up to AWS.
In the root of our application, we'll run the following command:
amplify pushThis will bring up a table, showing all of our configured services. When asked if we'd like to continue, select yes (
Y) and accept all of the default options.☕️ This will deploy our backend resources to the cloud, generate code for our API, and create an aws-exports file containing our backend secrets (automatically added to .gitignore).

With our backend successfully deployed, we can now connect it to our frontend.
In
_app.js add the following snippet to connect our frontend to our Amplify backend:import Amplify from '@aws-amplify/core'
import config from '../src/aws-exports'
Amplify.configure(config)The next step is to have our users sign in. In addition to letting our users have their own account, user sign in gives us the following benefits:
We have insight into who is storing information in our S3 bucket
We can control who has access to view and upload items in S3
Amplify comes with several ways to add authentication to our applications depending on how much control we'd like to have over the process.
For this project, we'll go with the simplest, which is a higher-ordered-function that fully manages the authentication flow.
In
index.js modify the top portion to look like the following snippet:import { AppHeader } from '../components/AppHeader'
import { withAuthenticator } from '@aws-amplify/ui-react'
function HomePage() {
return (
<>
<AppContainer>
<AppHeader />
<ResumeModal />
</AppContainer>
</>
)
}
export default withAuthenticator(HomePage)
//rest of code...The last step is to add the actual code that sends data from our frontend to both our database and to S3.
In
ResumeForm.js add the following import statements:import { API, Storage, Auth } from 'aws-amplify'
import { createCandidate } from '../src/graphql/mutations'
Storage.configure({ level: 'protected' })The API module will talk to AppSync, the Storage module will talk to S3 and we are bringing in our
createCandidate mutation that was generated automatically when we pushed up our schema.Note that we are setting the configuration level to
protected.The S3 module comes with three modes:
public: All files are stored at the same level. Accessible to all users.
protected: Files are separated by the user's Cognito identity ID. Anyone can read, but only the user can write.
private: Only accessible to the given user.
📝 In some cases, it might make sense for files to be public. What's important to remember is that files with the same name will overwrite one another, which would be bad in our application. Example: user1 uploads resume.pdf, user2 uploads resume.pdf. For that reason we use protected.
The last bit before we test this out is to add the code that actually does the uploading. In the same file, there is a function called
handleResumeFormSubmit. Let's replace the comment and console statement with the following:
const currentCredentials = await Auth.currentCredentials()
const fileKey = await Storage.put(
  formState.resumeFile.name,
  formState.resumeFile
)
const response = await API.graphql({
  query: createCandidate,
  variables: {
    input: {
      name,
      email,
      resumeFile: fileKey.key,
      userIdentity: currentCredentials.identityId,
    },
  },
})
📝 Because we configured S3 as protected, it will automatically prepend our files with protected/{COGNITO_IDENTITY_ID}/, however, we call Auth.currentCredentials() to get the Cognito User Identity ID to send to our lambda function.
After making sure all our files are saved, restarting the application and signing up for an account, we should be able to upload a .pdf and have it sent to the email we verified with SES! 🎉
I'll be frank--it took a lot longer to explain this process, than it did to actually do it 😅
The level of power that AWS Amplify provides lies in its suite of tools. In this post we took a deep dive into its CLI. However, out of the box, it provides a CI/CD pipeline, UI components, an Admin UI, and much more.
Thank you for taking the time to read this! Let me know your thoughts and questions in the comments, or follow me on Twitter for more insights into AWS Amplify!
Until next time 🤖
42