
45
Deploying Azure Runtime Environment on e-RT3 Plus
Azure IoT Runtime enables you to collect information and execute commands on Edge devices remotely. When installed on e-RT3 Plus, the features of both e-RT3 Plus and Azure Runtime Environment can be utilized to create a variety of applications.
This is part one of a three-part series on using Azure Runtime Environment and e-RT3 Plus together to create bespoke solutions. In this article, we will demonstrate how to deploy Azure Runtime Environment on the e-RT3 Plus device.
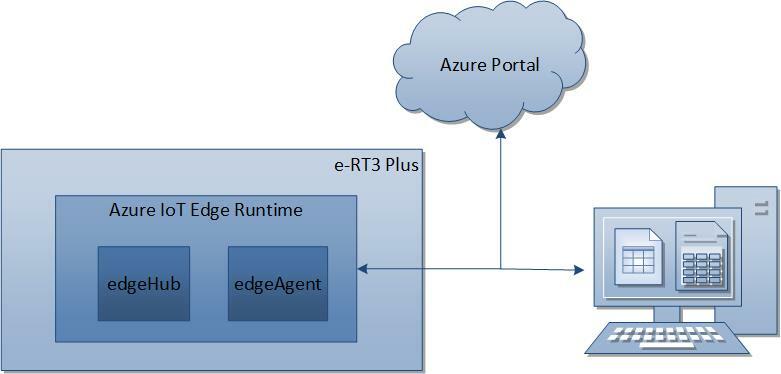
To deploy Azure IoT Edge Runtime on e-RT3 Plus device, configuration must be performed both on the e-RT3 Plus and Azure Cloud. First, the Azure Runtime Environment is installed on e-RT3 Plus by executing commands through an SSH terminal. Once this is done, an IoT Hub is set up on Azure Portal and an Edge device is registered in it. Finally, the e-RT3 Plus and the Edge device in the Azure portal are connected using a connection string and the IoT Edge module is deployed to e-RT3 Plus.
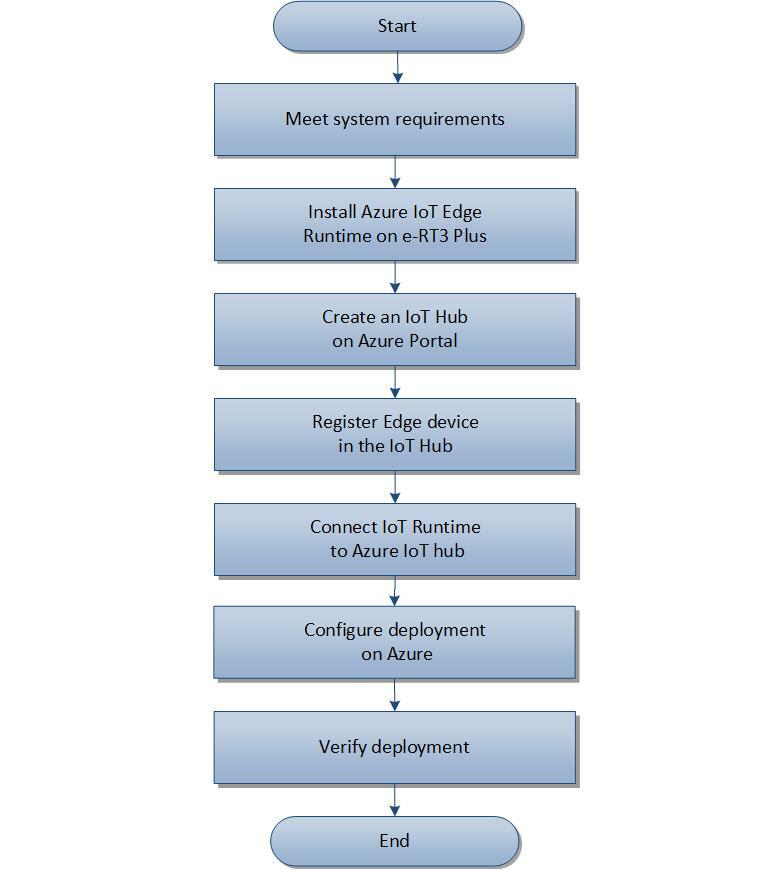
The following figure shows the workflow for deploying Azure Runtime Environment on e-RT3 Plus.
Before you start this tutorial, the following prerequisites must be met:
Deploying Azure Runtime Environment to the e-RT3 Plus involves the following steps:
To support the operation of the Azure IoT Edge modules, Azure IoT Edge Runtime must be installed.
Follow these steps to install Azure IoT Edge Runtime on e-RT3 Plus:
Open an SSH terminal to the e-RT3 Plus device.
Prepare the e-RT3 Plus device to access the Microsoft installation packages by performing the following steps:
-
Run the following command to install the repository configuration for Ubuntu operating system.
curl https://packages.microsoft.com/config/ubuntu/18.04/multiarch/prod.list> ./microsoft-prod.list -
Run the following command to copy the generated list to the
sources.list.ddirectory.
sudo cp ./microsoft-prod.list /etc/apt/sources.list.d/ -
Run the following command to install the Microsoft GPG public key.
curl https://packages.microsoft.com/keys/microsoft.asc | gpg --dearmor > microsoft.gpg
sudo cp ./microsoft.gpg /etc/apt/trusted.gpg.d/
Run the following commands to update the package lists and install the container engine (Moby) on the e-RT3 Plus device.
sudo apt update
sudo apt install moby-engine
Note: For more information about enabling sudo user privileges, refer to Enabling SUDO user.
To complete the Azure IoT Edge Runtime installation, perform the following steps:
-
Run the following command to install
libiothsm-std version 1.1.4.
curl -L https://github.com/Azure/azure-iotedge/releases/download/1.1.4/libiothsm-std_1.1.4-1_ubuntu18.04_armhf.deb -o libiothsm-std.deb && sudo dpkg -i ./libiothsm-std.deb -
Run the following command to install
iotedge version 1.1.4.
curl -L https://github.com/Azure/azure-iotedge/releases/download/1.1.4/iotedge_1.1.4-1_ubuntu18.04_armhf.deb -o iotedge.deb && sudo dpkg -i ./iotedge.deb
Azure IoT Edge Runtime is installed on e-RT3 Plus.
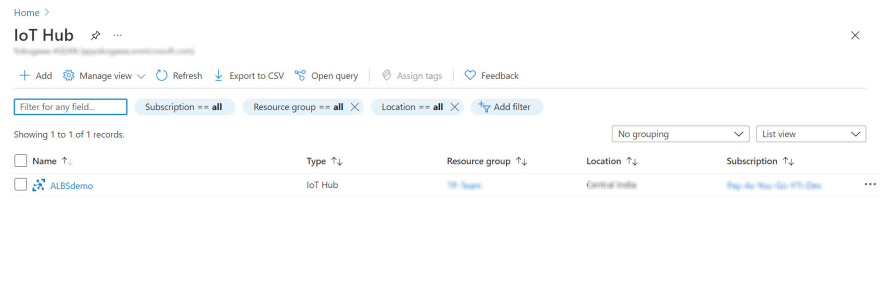
After installing Azure Runtime Environment on e-RT3 Plus, Azure Cloud must be configured to recognize e-RT3 Plus as an Edge device. To do this, you must first create an IoT Hub on Azure Portal.
To learn how to create an IoT Hub on the Azure portal, refer to Create an IoT Hub.
Now, we will register the Edge device on the newly created IoT Hub
To register an IoT device on the IoT Hub, refer to Registering Edge device on IoT Hub. Additionally, e-RT3 Plus must be registered as an Edge device. Hence, you must replace the command in step 4 of the registration procedure with the following command:
az iot hub device-identity create --hub-name YOUR_HUB_NAME --device-id YOUR_DEVICE_ID --edge-enabledHere,
YOUR_HUB_NAME is the name specified while creating the IoT Hub and YOUR_DEVICE_ID is the name of the device being registered.Note: Save the DEVICE_CONNECTION_STRING obtained in step 5 of the registration procedure for future reference. This will be used to bind the e-RT3 Plus device with the Edge device created in Azure IoT Hub.
Now that Azure IoT Edge Runtime is installed on e-RT3 Plus, and the same device is registered on the IoT Hub, these two must be connected to establish communication between them. To do this, the
DEVICE_CONNECTION_STRING obtained in the previous step must be specified in the config.yaml file. This file is generated during the installation of Azure IoT Edge Runtime environment.Note: If you are using a proxy, refer to the steps described in Configure an IoT Edge device to communicate through a proxy server and then continue.
Follow these steps to connect the Azure IoT Edge Runtime to the Azure IoT Hub:
cd command to navigate to the location /etc/iotedge/.config.yaml file in an editor and search for Manual provisioning to locate the provisioning configuration.If the Manual provisioning configuration is commented, uncomment it and edit the details as follows:
# Manual provisioning configuration using a connection string
provisioning:
source: "manual"
device_connection_string: "<DEVICE_CONNECTION_STRING>"
Note: Here, the
DEVICE_CONNECTION_STRINGis the string obtained during the registration of the Edge device.
Run the following command to restart the IoT Edge service for the modifications to take effect.
sudo service iotedge restart
Run the following commands to check the status of the IoT Edge service.
sudo service iotedge status
iotedge list
Verify that the
edgeAgent is successfully started. The status of the edgeAgent must be displayed as running before proceeding to the next step.After configuring the connection string, the IoT Hub must be deployed to the e-RT3 Plus device.
Follow these steps to deploy the IoT Hub on the e-RT3 Plus device:
In the Azure services section, click IoT Hub.
The IoT Hub page appears, displaying the list of created IoT Hubs.
Select the IoT Hub that you have created.
The IoT Hub Overview page appears, displaying the details of the selected IoT Hub.
On the left pane, under Automatic Device Management, select IoT Edge.
The IoT Edge devices page appears, displaying the IoT Edge device that you created.

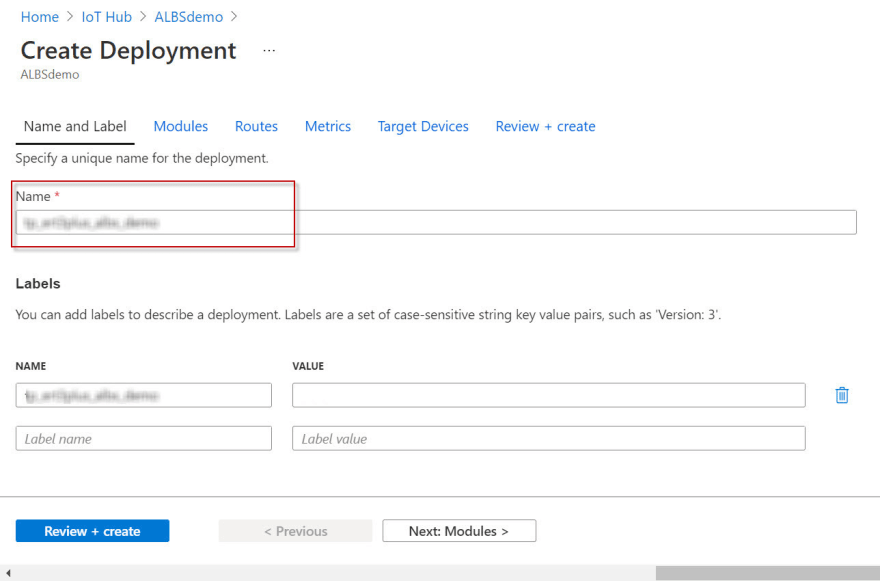
In the upper-left corner, click Create Deployment.
The Create Deployment page appears.
On the Name and Label tab, specify a unique name for the deployment in the Name box.
In the Target Devices tab, specify a priority from 0 to 10 in the Priority box.
Here, zero is the lowest priority, and ten is the highest priority.
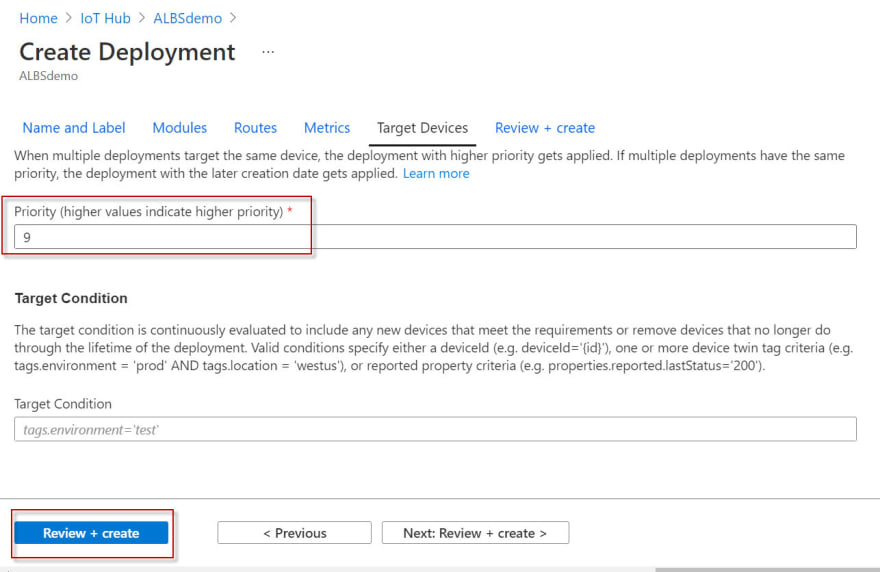
Click Review + create.
The details entered are validated and the Review + create page appears.
Click Create.
The deployment is started. The deployment usually takes a while to complete, so you must wait before proceeding to the next step.
Now that the deployment is complete, we will verify if Azure Runtime Environment is running on the e-RT3 Plus device by checking its status.
Follow these steps to verify the deployment:
In the Azure services section, click IoT Hub.
The IoT Hub page appears, displaying the list of created IoT Hubs.
Select the IoT Hub that you have created.
The IoT Hub Overview page appears, displaying the details of the selected IoT Hub.
On the left pane, under Automatic Device Management, select IoT Edge.
The IoT Edge devices page appears, displaying the IoT Edge device that you created.
Select the Device ID of the Edge device.
The Device page appears, displaying the deployment status in the Modules tab.

If the deployment is successful, the Runtime Status is displayed as running for each module. The modules listed here are the same modules listed in the e-RT3 Plus device as verified in the last step of Connect IoT Runtime on e-RT3 Plus to Azure IoT Hub.
Azure Runtime Environment is deployed on e-RT3 Plus and communication between Cloud and e-RT3 Plus is established. Now, IoT modules can be created and deployed to the e-RT3 Plus device as per your requirements.
In the subsequent articles, we will learn how to create a custom IoT module and use an IoT module from Azure marketplace.
45