
31
How to build an ECommerce App with React
In this tutorial, we will build an E-commerce App with React using ButterCMS and Snipcart. We will use Chakra UI, a modular and accessible component library, to style the app.
Finally, we will deploy our ecommerce app with Stormkit, a serverless deployment service for JavaScript apps similar to Vercel or Netlify.
Finally, we will deploy our ecommerce app with Stormkit, a serverless deployment service for JavaScript apps similar to Vercel or Netlify.
If you want to jump right into the code, check out the GitHub Repo here.
And here's a link to the deployed version: https://yakscythe-49dgnn.stormkit.dev/.
Snipcart works perfectly with Headless CMS like Butter and speeds up your development process, provides better security, and functionality to your ecommerce app.
In this tutorial, you will use Create React App template to quickly create the initial React app. Run the following command in the terminal.
npx create-react-app react-ecommerce-butter
cd react-ecommerce-butter
npm start
The last command,
npm start, will start the React development server on your system's port 3000. Head over to http://localhost:3000/ in your browser to view your React app.
You can stop the development server by hitting CTRL+C in the terminal.
In this tutorial, you will use Chakra UI to style your ecommerce app. Run the following command to install Chakra UI.
npm i @chakra-ui/react @emotion/react@^11 @emotion/styled@^11 framer-motion@^4 react-iconsUpdate
src/index.js to wrap your react app with the ChakraProvider component.import React from "react";
import ReactDOM from "react-dom";
import "./index.css";
import App from "./App";
import reportWebVitals from "./reportWebVitals";
import { ChakraProvider } from "@chakra-ui/react";
ReactDOM.render(
<React.StrictMode>
<ChakraProvider>
<App />
</ChakraProvider>
</React.StrictMode>,
document.getElementById("root")
);
reportWebVitals();Create a
.env file to store ButterCMS and Snipcart API keys securely as environment variables. Run the following command to create the .env file.touch .envThe next step is to create a free ButterCMS account. After creating an account, head over to https://buttercms.com/settings/ and copy the Read API Token.

Navigate to https://app.snipcart.com/register in your browser and create a free Snipcart account if you haven't already.
After creating the Snipcart account, head over to account settings and copy the PUBLIC TEST API KEY under Credentials.

Paste both Butter CMS API Key and Snipcart Public Test API Key in the
.env file as shown below.REACT_APP_BUTTER_ECOMMERCE=''
REACT_APP_SNIPCART_KEY=''In this section, you will create the products for your ecommerce app on Butter. In this tutorial, you will create an ecommerce platform named Cookie Jar, where customers can buy different varieties of cookies. Hence, the products for this ecommerce platform will be cookies.
Navigate to your Butter Dashboard and then create a new collection named cookies with the following fields.
id - Type: Number - isRequired
name - Type: Short Text - isRequired
description - Type: Long Text - isRequired
price - Type: Number - isRequired
image - Type: Media - isRequired
You can create an ecommerce app on any product like shoes, sports stuff, craft, etc. You can add additional fields like ratings, reviews, stock, etc., to your ecommerce app, but these are the bare minimum required for any ecommerce app.
You can add the fields by dragging and dropping the corresponding field types.

After adding the fields, click on the Create Collection button, name the collection
cookies, and hit Save as a Collection.
You will also need to add some dummy data to the
cookies collection. You can either copy the dummy data from https://yakscythe-49dgnn.stormkit.dev/ or add your favorite cookies.Make sure to hit Publish after adding the cookies, aka products. You can come back and add more products or edit them whenever you want.
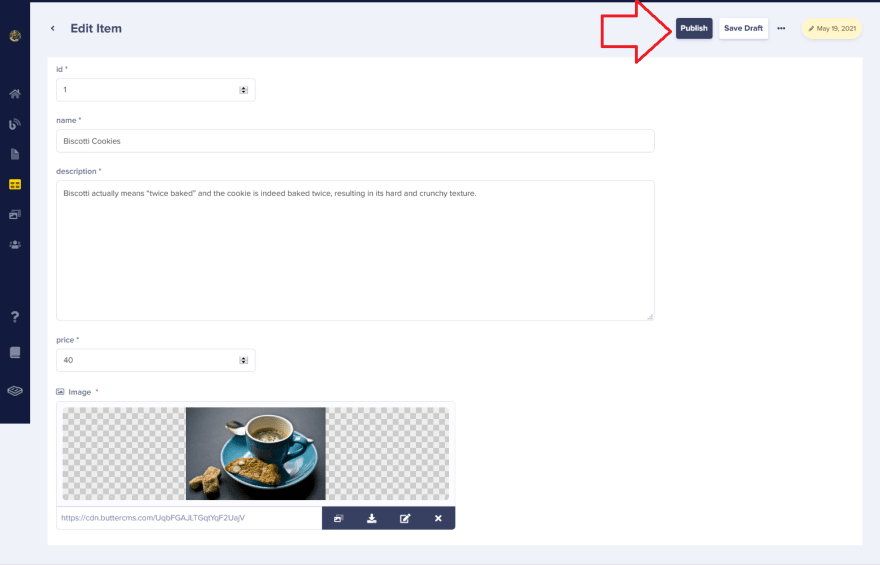
Here is how your
cookies collection will look after adding products to it.
In this section, you will fetch the data from Butter CMS and display them as products on your ecommerce app.
You will use the
buttercms library to fetch data from ButterCMS. Run the following command in your project's root directory to install buttercms.npm i buttercmsUpdate
App.js file with the following code.import { useState, useEffect } from "react";
import Butter from "buttercms";
const butter = Butter(process.env.REACT_APP_BUTTER_ECOMMERCE);
function App() {
const [products, setProducts] = useState([]);
useEffect(() => {
async function fetchData() {
const res = await butter.content.retrieve(["cookies"], {
order: "name",
});
const { data } = await res.data;
const allProducts = data.cookies;
setProducts(allProducts);
}
fetchData();
}, []);
return (
<div>
{products.map((product) => (
<div>
<img src={product.image} alt={`${product.name}`} />
{product.name}
{product.price}
{product.description}
</div>
))}
</div>
);
}
export default App;In the above code, you start by creating an instance of
Butter using your ButterCMS API key stored in .env file and accessed using process.env.REACT_APP_BUTTER_ECOMMERCE. Then you create a state named
products to store the data fetched from ButterCMS using the useState() hook. Hooks are functions that use React features like defining a state without writing a class.You fetch the collection named
cookies using butter's .retrieve() method inside the React's useEffect() hook.You then access the response from ButterCMS and store it inside the
products state using the setProducts() method. Here is how the state products look like.[
{
"meta": {
"id": 125151
},
"id": "1",
"name": "Biscotti Cookies",
"price": 40,
"description": "Biscotti actually means “twice baked” and the cookie is indeed baked twice, resulting in its hard and crunchy texture.",
"image": "https://cdn.buttercms.com/UqbFGAJLTGqtYqF2UajV"
},
{
"meta": {
"id": 113778
},
"id": "2",
"name": "Chocolate Chip Cookies",
"price": 30,
"description": "Chocolate chip cookies are the perennial classic and longtime fan favorite. ",
"image": "https://cdn.buttercms.com/Xe1zfNvRCiOOI4LPuoVb"
}
]To display the product's data, you iterate over the
products state using the .map() method and display the data on the page using curly brackets {}.{
products.map((product) => (
<div>
<img src={product.image} alt={`${product.name}`} />
{product.name}
{product.price}
{product.description}
</div>
))
}Head over to http://localhost:3000/. Here is how your ecommerce app will look like.

Though your app needs styling, but you are getting all the required data from ButterCMS successfully. Now, you will use Chakra UI to style the app. Update
App.js with Chakra UI components to style your ecommerce app.import {
Container,
Text,
Divider,
Box,
Image,
Button,
SimpleGrid,
Flex,
} from "@chakra-ui/react";
import { FiShoppingCart, FiShoppingBag } from "react-icons/fi";
import { useState, useEffect } from "react";
import Butter from "buttercms";
const butter = Butter(process.env.REACT_APP_BUTTER_ECOMMERCE);
function App() {
const [products, setProducts] = useState([]);
useEffect(() => {
async function fetchData() {
const res = await butter.content.retrieve(["cookies"], {
order: "name",
});
const { data } = await res.data;
const allProducts = data.cookies;
setProducts(allProducts);
}
fetchData();
}, []);
return (
<Container maxW="container.xl" h="100vh" >
<Flex justifyContent="space-between" alignContent="center">
<Text
as="a"
href="/"
fontSize="2rem"
color="gray.900"
fontFamily="Robo"
my="5px"
>
Cookie Jar
</Text>
<Button
my="5px"
colorScheme="green"
variant="ghost"
leftIcon={<FiShoppingBag size="24px" />}
size="lg"
p={2}
>
View Cart
</Button>
</Flex>
<Divider />
<Box mt={4}>
<SimpleGrid
minChildWidth="300px"
align="center"
justify="center"
spacing="40px"
mb={32}
>
{products.map((product) => (
<Box
bg="white"
maxW="sm"
borderWidth="1px"
rounded="lg"
shadow="lg"
_hover={{ shadow: "dark-lg" }}
key={product.id}
>
<Image
h="350px"
fit="cover"
src={product.image}
alt={`Picture of ${product.name}`}
roundedTop="lg"
/>
<Box p="6">
<Flex
mt="1"
justifyContent="space-between"
alignContent="center"
>
<Text
fontSize="2xl"
fontWeight="semibold"
as="h4"
textTransform="uppercase"
lineHeight="tight"
fontFamily="Roboto"
>
{product.name}
</Text>
<Text
as="h4"
fontSize="2xl"
fontWeight="bold"
color="teal.600"
>
${product.price}
</Text>
</Flex>
<Text
mt={2}
color="gray.500"
display={{ base: "none", md: "flex" }}
>
{product.description}
</Text>
<Button
leftIcon={<FiShoppingCart size="24px" />}
size="lg"
mt={4}
isFullWidth
colorScheme="blue"
variant="outline"
alignSelf={"center"}
>
Add to Cart
</Button>
</Box>
</Box>
))}
</SimpleGrid>
</Box>
</Container>
);
}
export default App;In the above code, you import different Chakra UI components like
Container, Flex, etc., and use them to style your app. Except for styling, the code used to fetch and display the data on the app remains the same.In this tutorial, we will not discuss how these components are used in-depth; you can refer to official Chakra UI docs to learn more about these components.
Here is how your app will look.

You have created two buttons in the above code,
View Cart, which shows users their cart, and Add to Cart, which adds the product to the cart. These buttons don't work yet; you will integrate them with Snipcart in the next section.In this section, you will configure and integrate Snipcart with your ecommerce app.
Update
public/index.html file and add the following code inside the <Head> tag.<link rel="preconnect" href="https://app.snipcart.com">
<link rel="preconnect" href="https://cdn.snipcart.com">
<link rel="stylesheet" href="https://cdn.snipcart.com/themes/v3.2.0/default/snipcart.css"/>Now, add the following code in
public/index.html before closing <Body> tag.<script
async
src="https://cdn.snipcart.com/themes/v3.2.0/default/snipcart.js"
></script>
<div
id="snipcart"
data-config-modal-style="side"
data-api-key="%REACT_APP_SNIPCART_KEY%"
hidden
></div>The Snipcart API Key stored in
.env file is being accessed in the above code using %REACT_APP_SNIPCART_KEY%. Update
Add to Cart button in src/App.js like this.<Button
leftIcon={<FiShoppingCart size="24px" />}
size="lg"
mt={4}
isFullWidth
colorScheme="blue"
variant="outline"
alignSelf={"center"}
className="snipcart-add-item"
data-item-id={product.id}
data-item-image={product.image}
data-item-name={product.name}
data-item-url="/"
data-item-description={product.description}
data-item-price={product.price}
>
Add to Cart
</Button>In the above code, you pass the data required by Snipcart, like the product's name, id, description, etc.
Here is the
Add to Cart button in action.
Finally, update the
View Cart button like with className="snipcart-checkout".<Button
my="5px"
colorScheme="green"
variant="ghost"
leftIcon={<FiShoppingBag size="24px" />}
size="lg"
p={2}
className="snipcart-checkout"
>
View Cart
</Button>This button will show the current items in the cart to the user.

Run the following commands in the terminal to commit your code.
git add .
git commit -m"Finished building the React Ecommerce app"In this section, you will deploy the ecommerce app with the free tier of Stormkit.
The first step is to push your code to a GitHub repository. Create an account on https://github.com/ if you haven't already.

Navigate to https://github.com/new and create a new GitHub repo with
react-ecommerce-butter as the repo name. You can skip other fields for now. Finally, click on the Create repository button.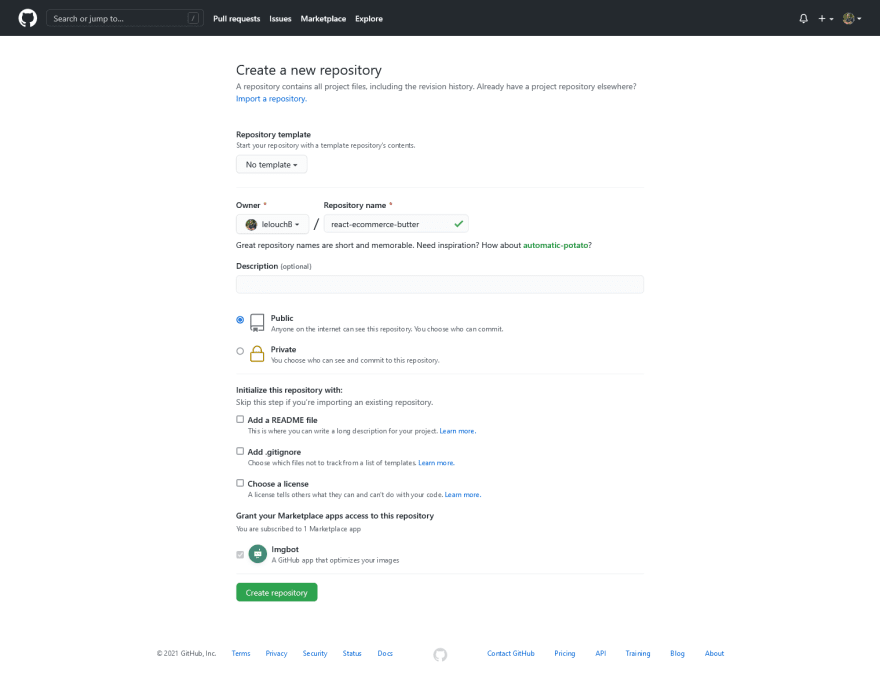
On the next page, you will be provided with the code to push your code to GitHub. Copy the commands from the second section, i.e.,
...or push an existing repository from the command line section.
The commands will be similar to this but will contain your GitHub username.
git remote add origin https://github.com/lelouchB/react-ecommerce-butter.git
git branch -M main
git push -u origin main
The last command will push your code to GitHub. Head over to https://app.stormkit.io/auth and login using GitHub OAuth.

Click on the GitHub icon under Where can we find your codebase?

You will be asked to connect your repositories with Stormkit. You can choose to connect all your repositories or select only the
react-ecommerce-butter repo. Select the
react-ecommerce-butter repository and proceed further.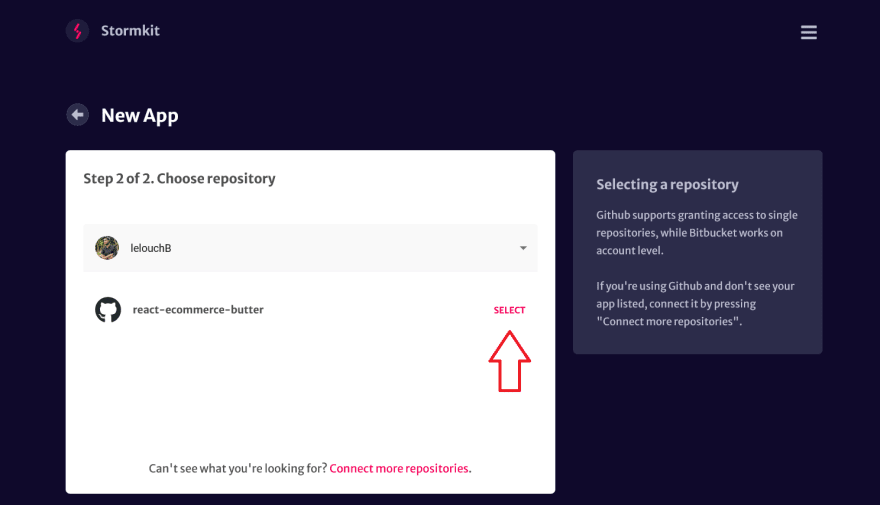
You will be redirected to your Stormkit dashboard, where your newly connected app would appear. Select the app you want to deploy.

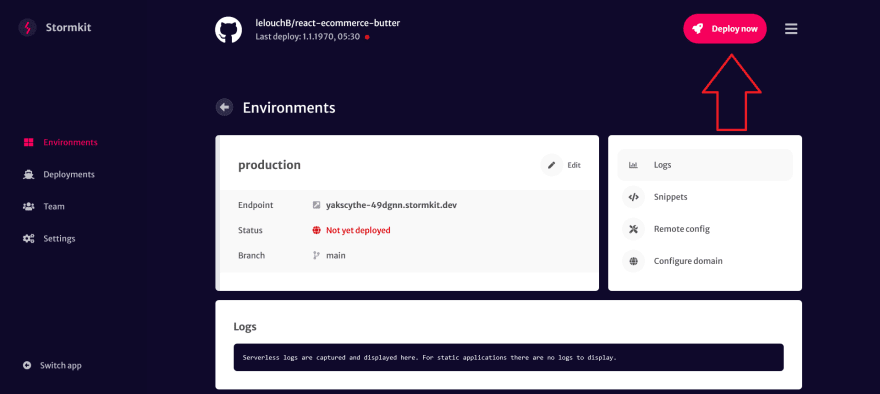
On your app dashboard, you will be provided with a default
production environment. You can create as many environments as you want. In this tutorial, we will deploy using the default production environment.Before deploying, you will need to set the environment variables in your
production environment; else your deployment will fail. Click on the
production environment.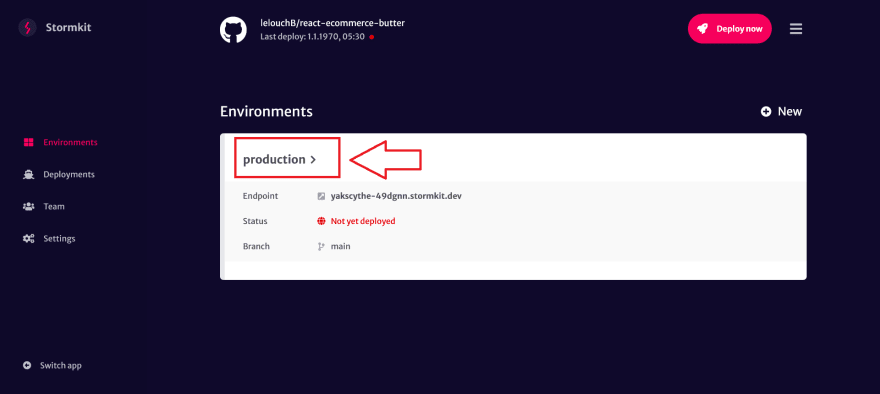
Now, click on the
Edit button or the pencil icon to edit the environment configurations.
A modal will appear with current environment configurations.
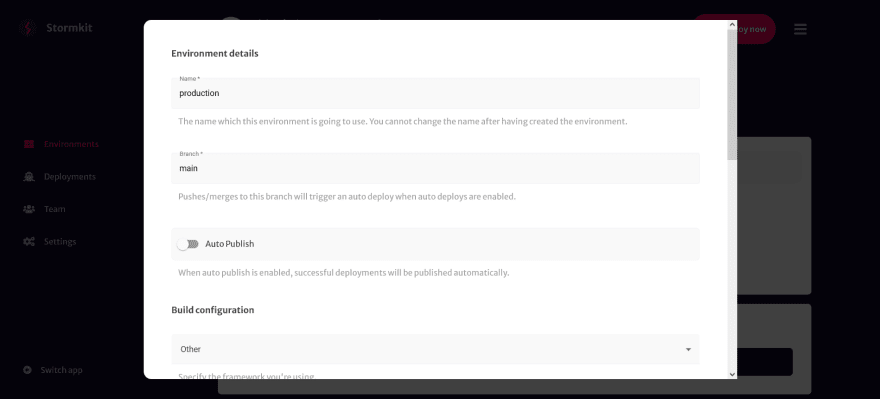
Scroll to the bottom of the modal; you will see the Build configuration and Environment variables sections.
Under Build configuration, type
build under Public folder field and add npm run build command under Build command field.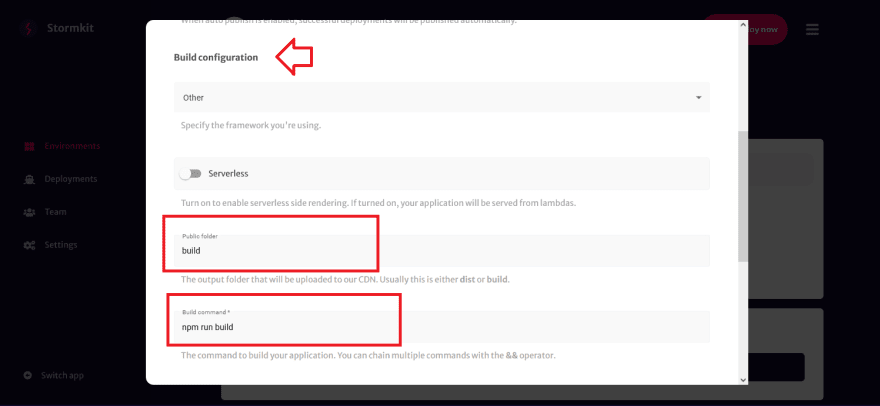
Under Environment variables, add
REACT_APP_BUTTER_ECOMMERCE and REACT_APP_SNIPCART_KEY environment variables with their values and click on the Update environment button.
Finally, click on the Deploy now button to deploy your app.
A modal will appear to select the environment, select the production environment and click on Deploy now.

The Deploy now will trigger the deployment process, which you can see live on your dashboard.
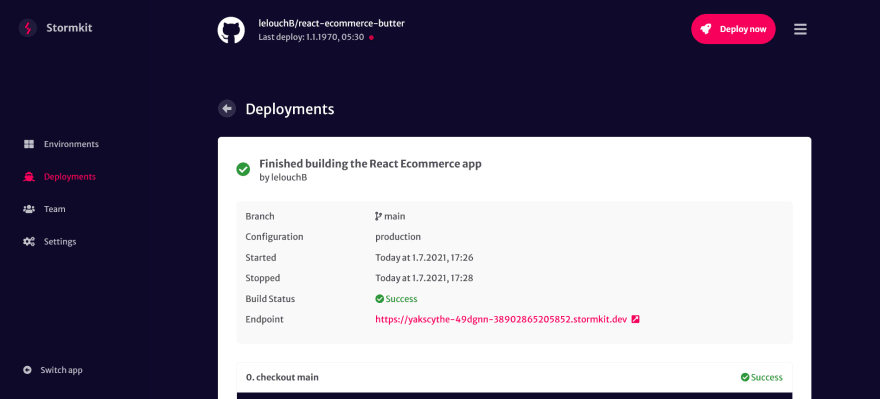
After the deployment process completes, you will be provided with a preview URL of your deployed website.
If the preview looks good, you can publish it to production by going to the Deployments tab and clicking on the triple dots across the latest commit, i.e.,
Finished building the React Ecommerce app.
A modal will appear, deselect the sync sliders option and then scroll the bar to 100%, i.e., to the end. Finally, click on Publish to production button to publish the app.

Congratulations, your ecommerce app has been deployed. You can see the deployed version of this project here.

In this tutorial, we learned how to build an Ecommerce App with React.js using ButterCMS and Snipcart. Finally, we deployed our ecommerce app with Stormkit. You can follow this tutorial and create your own version of this project.
Here are a few ideas to get you started:
Here are some additional resources that can be helpful:
Happy coding!
31